
TONIQ user manual
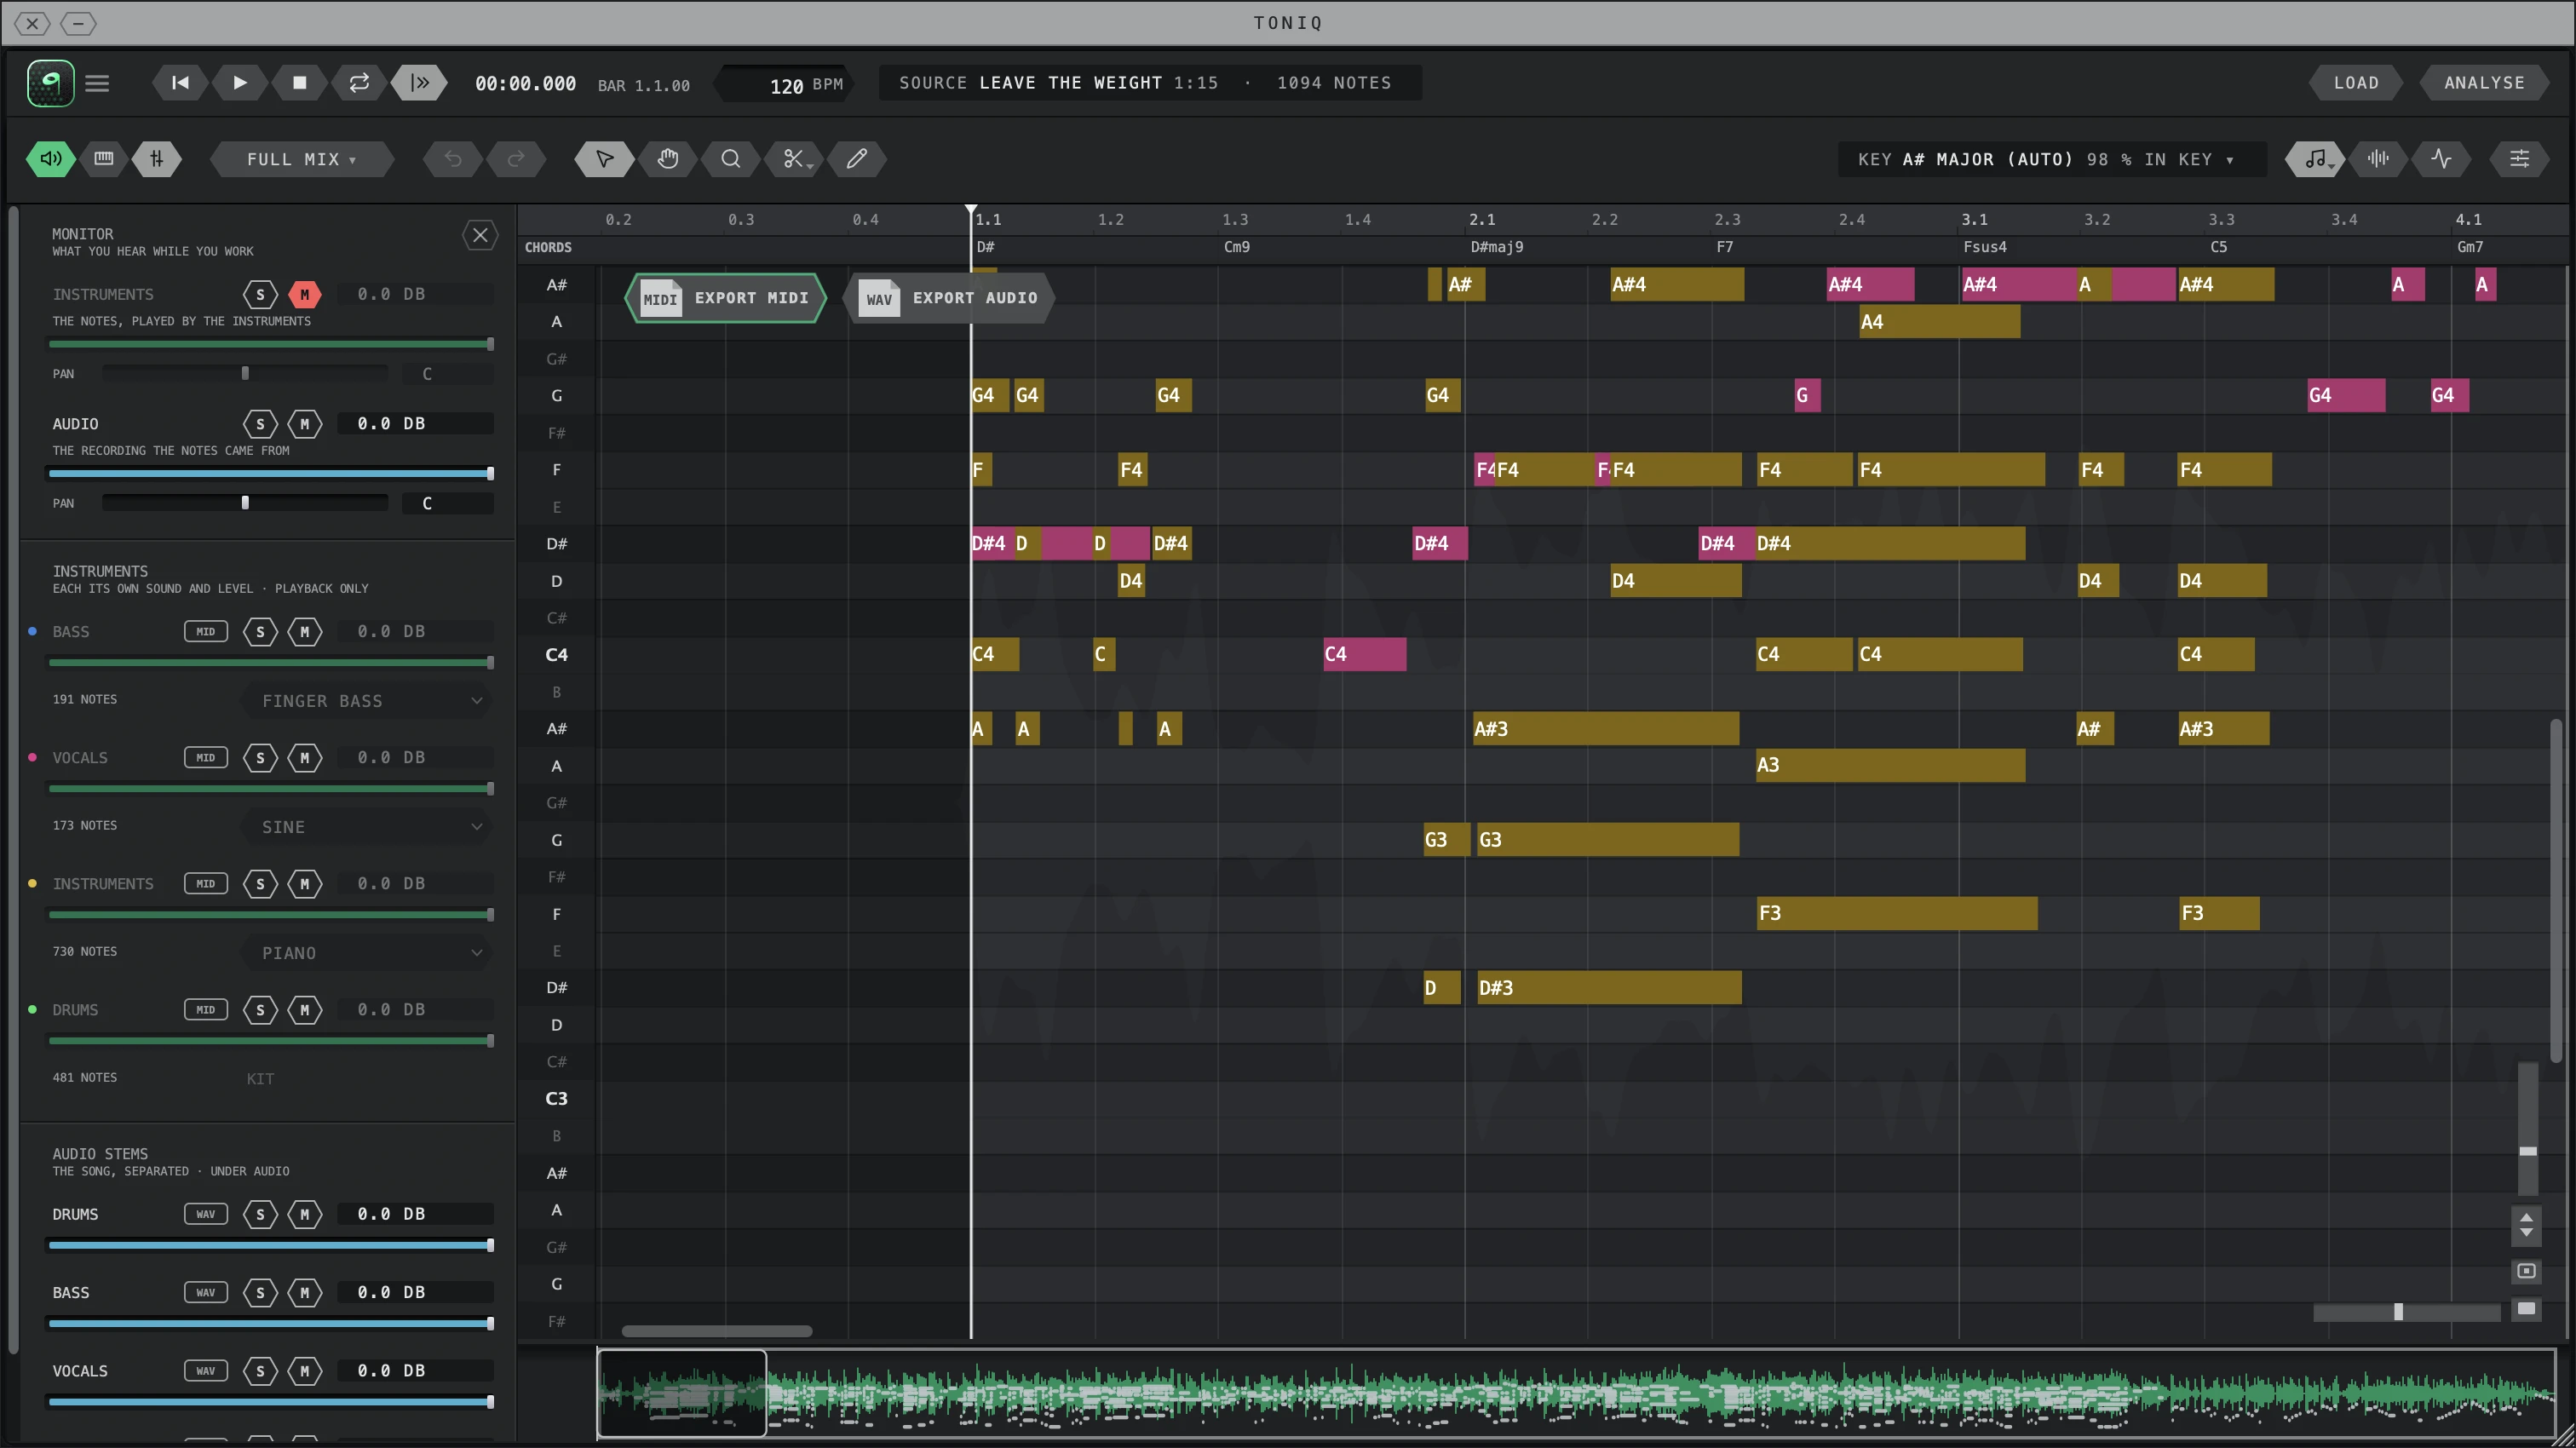
TONIQ turns audio into MIDI. It runs as a plug-in (AU, VST3, AAX) and as a standalone app, on Mac and Windows. Everything runs on your computer; nothing is uploaded.
- macOS 12 or later, Apple silicon and Intel: AU, VST3, AAX, standalone.
- Windows 10 or 11, 64-bit: VST3, AAX, standalone.
Contents
| Subject | What's in it | |
|---|---|---|
| Quick start | A song to MIDI in your DAW in two minutes | |
| 1 | Install and sign in | Installing, the one-time email code, 14 days of Pro that start by themselves, what's free and what's Pro, your licence on up to 3 computers |
| 2 | Getting audio in | ARA inside Pro Tools, Cubase, Nuendo, Studio One and REAPER; drag-and-drop, Capture or the standalone app in Logic, Ableton, FL Studio, Bitwig and others |
| 3 | Choosing what it is | Which mode to pick: Polyphonic, Melodic, Vocal, Drums or Full mix; how to get a vocal line as MIDI |
| 4 | Reading the result | The result screen, the toolbar, the piano roll, layers, listening, key and chords, settings, the menus, note colours |
| 5 | Editing notes (Pro) | The tools and their keys, selecting, moving, the right-click menu, undo; fixing octave errors |
| 6 | Pro features | Editing notes inside the audio, Pencil, Detection, Vibrato, Quantize, MIDI per instrument, Correct Pitch, audio export |
| 7 | Exporting MIDI and stems | Dragging and saving MIDI, audio stems from a full mix, the edited take, file names |
| 8 | Keyboard shortcuts | Every key in one table |
| 9 | Updating TONIQ | How TONIQ tells you about a new version, and how to install it |
| 10 | Troubleshooting and FAQ | Messages TONIQ shows, code not arriving, wrong octaves, missing quiet notes, where TONIQ keeps its files |
| 11 | Getting help | How to reach us, and what to send |
Quick start: a song to MIDI in two minutes ↑ Contents
This is the shortest way from a song to MIDI in your DAW. It works on the free version.
- Install TONIQ and open the TONIQ app (the standalone). The first time, type your email and the code we send you (section 1).
- Drop a song (WAV, AIFF, FLAC or MP3) on the window, or click LOAD.
- TONIQ asks WHAT'S IN THIS AUDIO? and marks one row SUGGESTED. For a finished song that is Full mix. Press Enter to take the suggestion.
- Wait while the bar fills. A Full mix takes longer than the other modes: TONIQ separates the song first.
- Drag MIDI TO YOUR DAW onto an instrument track in your DAW.
- Set your DAW's tempo to the TEMPO shown on the result screen, so the bars line up.
What you just got: one MIDI track with every instrument TONIQ found, the drums on MIDI channel 10. Drop it where the song starts in your DAW.
Next steps: OPEN THE EDITOR to see and hear the notes on a piano roll (section 4), pick another mode if the audio is a single instrument (section 3), or, with Pro, take one MIDI track per instrument (section 6).
1. Install and sign in ↑ Contents
Install
Download the installer from insektiq.com/download and run it. One installer holds every format: the plug-ins and the standalone app. There is one TONIQ: the free version and Pro are the same app, and Pro unlocks inside it.
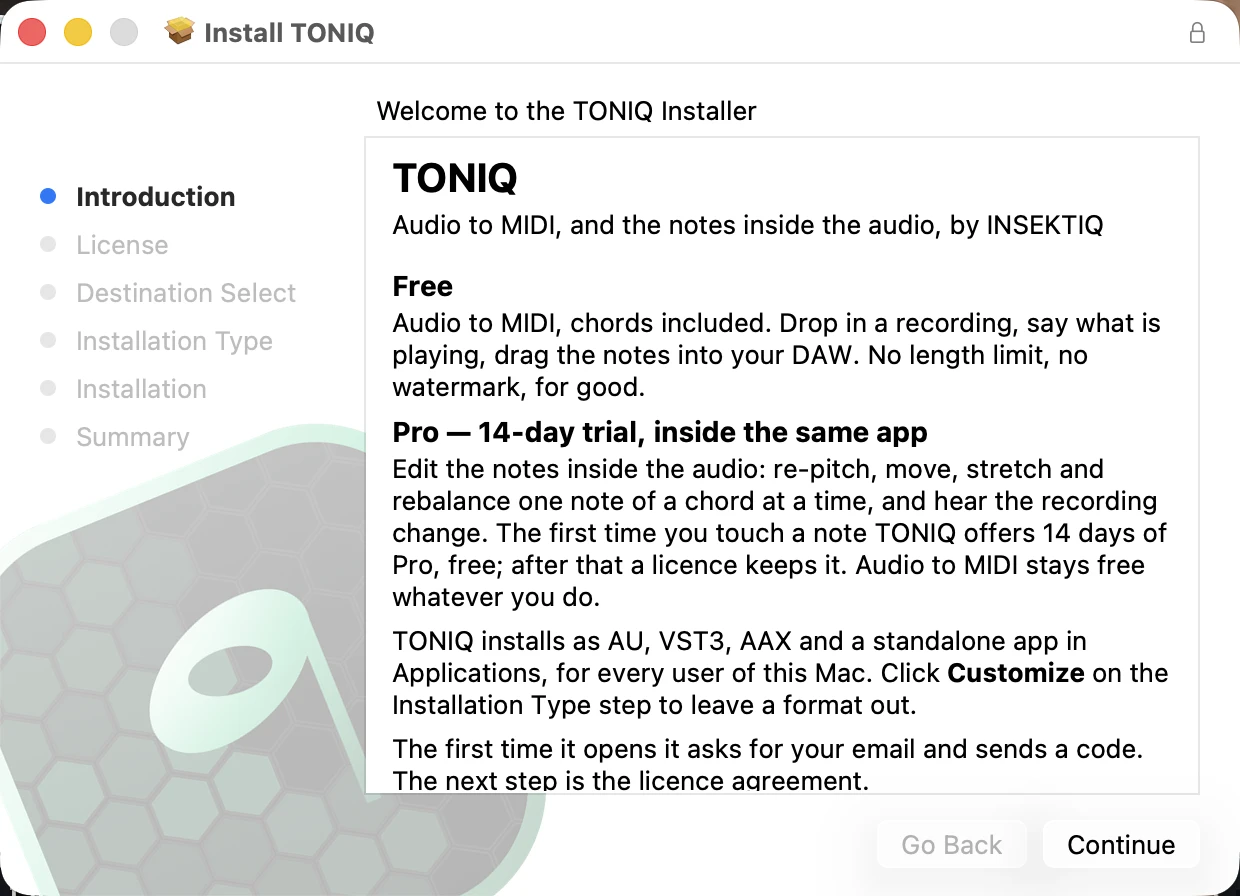
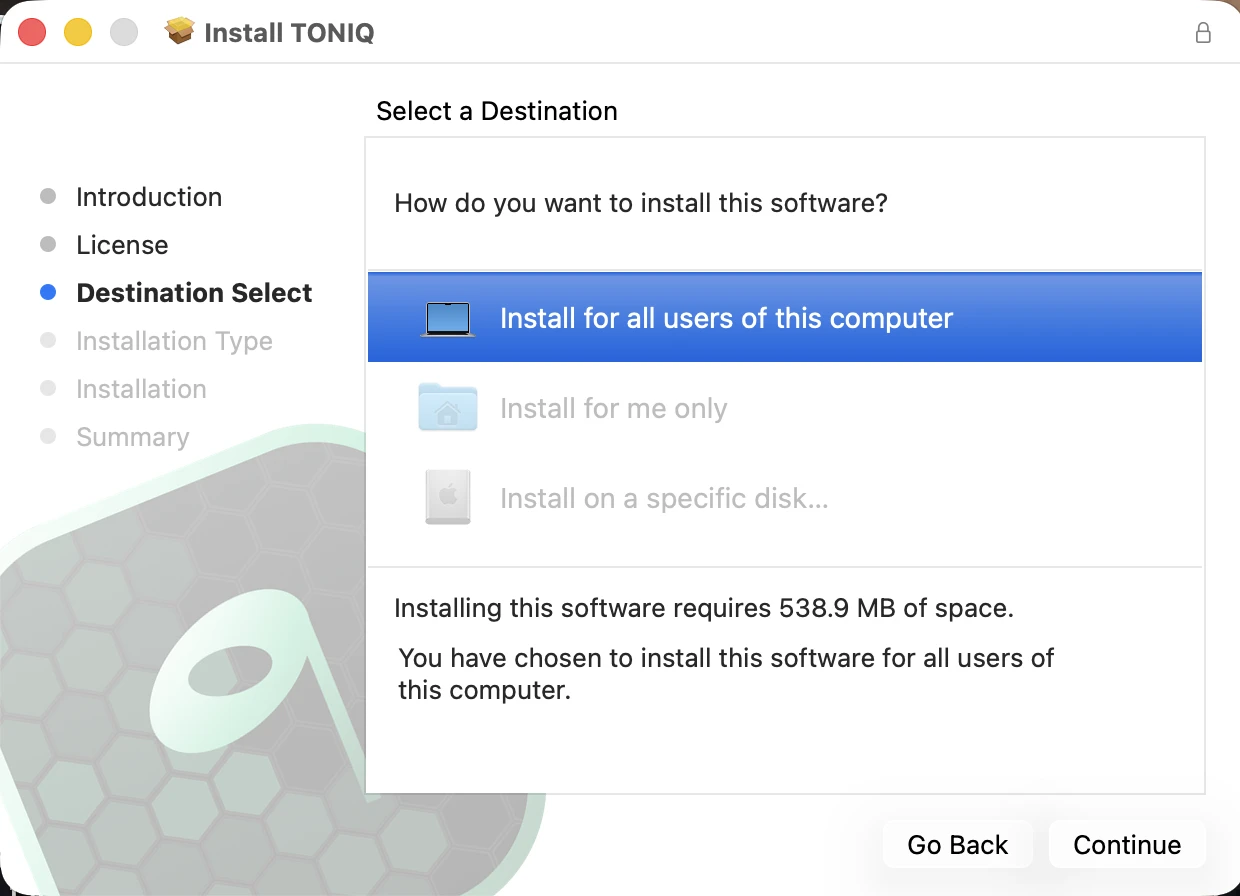
- Steps Where you are in the installer.
- Installation Type Click Customize here to leave a format out.
- Go Back The previous step.
- Continue The next step.
On a Mac, the installer goes through these steps:
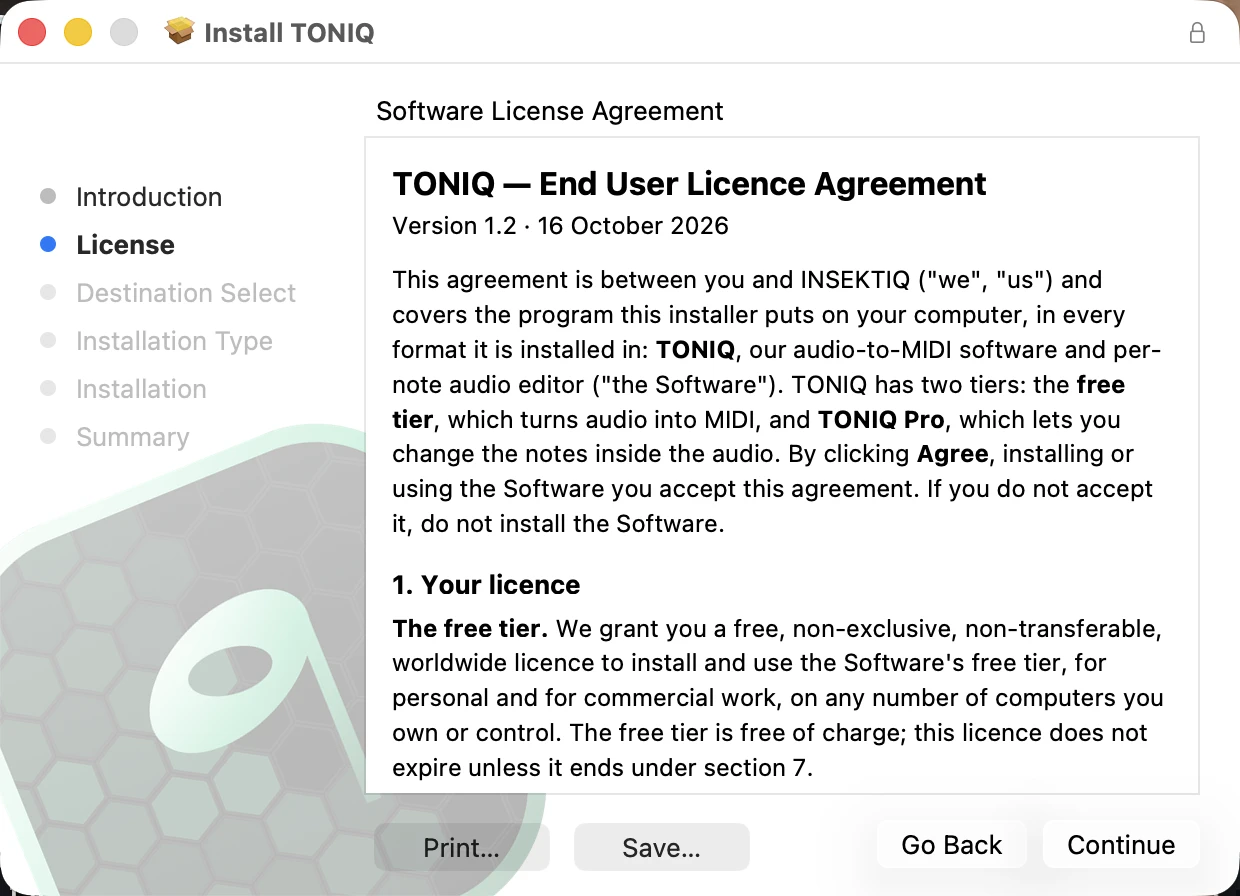
- Print… Print the agreement.
- Save… Keep a copy.
- Continue Then Agree on the next sheet.
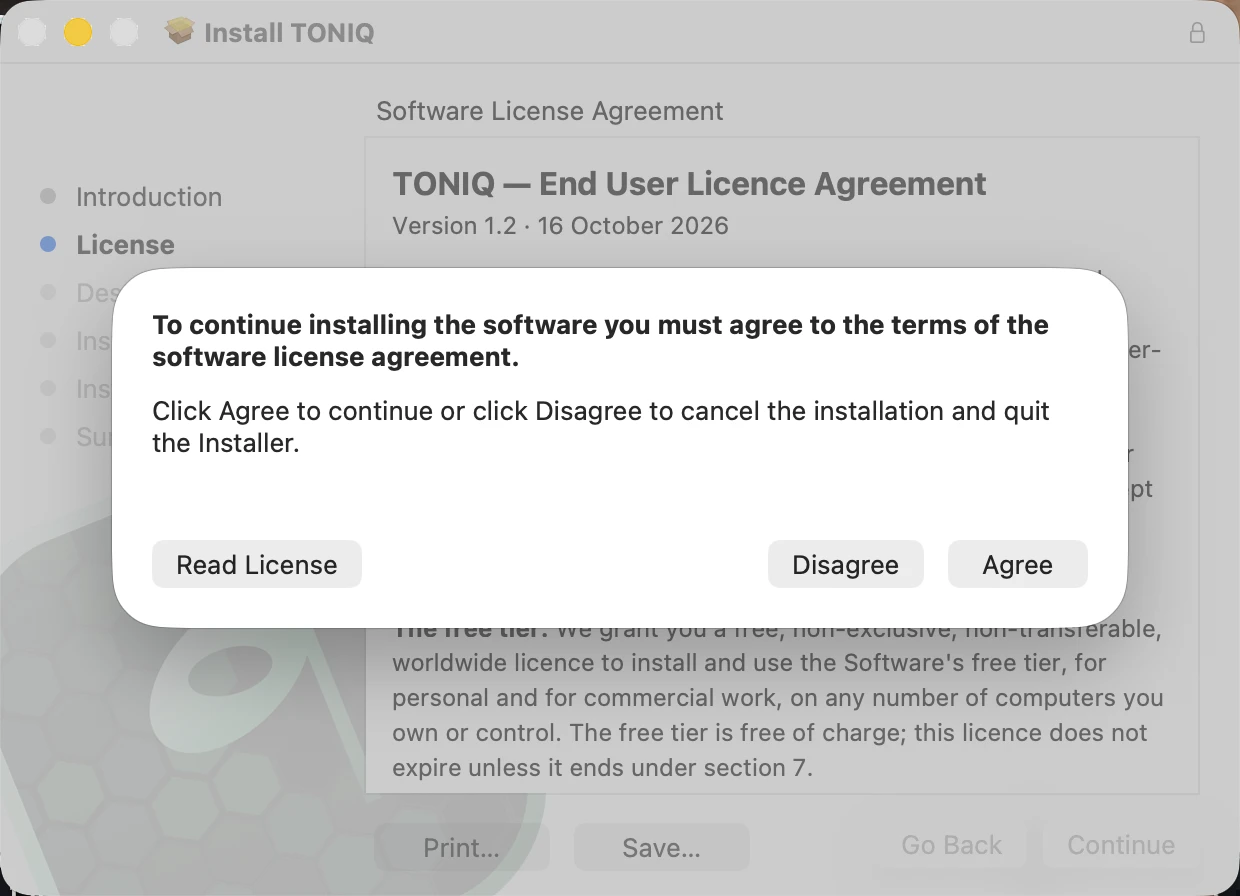
- Read License Back to the text.
- Disagree Stops the install.
- Agree Accept and go on.
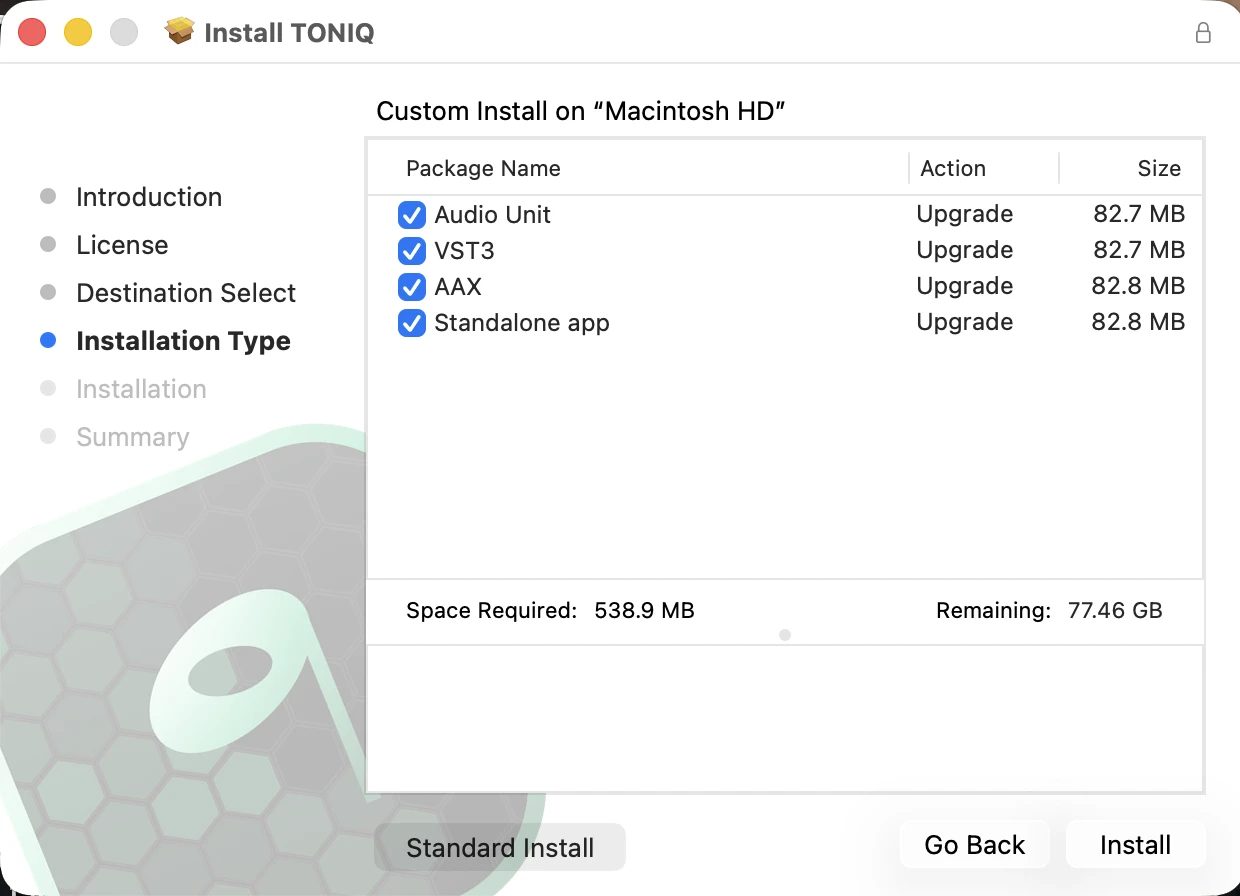
- Audio Unit For Logic, GarageBand, Ableton and other AU hosts.
- VST3 For most other DAWs.
- AAX For Pro Tools.
- Standalone app TONIQ without a DAW.
- Standard Install Back to installing everything.
- Install Starts the install.
Every format is installed by default: Audio Unit, VST3, AAX and the standalone app. To leave one out, click Customize on the Installation Type step and untick it. AAX is installed for every user on the computer, because Pro Tools looks for it there.
On Windows, run TONIQ-
- Welcome: press Next.
- License Agreement: choose I accept the agreement, then Next.
- Select Destination Location: the app goes to
C:\Program Files\INSEKTIQ\TONIQ. Keep it, or browse. - Select Components: Full installation installs everything: the VST3 plug-in, the AAX plug-in for Pro Tools and the standalone app. To leave one out, choose Custom installation and untick it.
- Ready to Install: press Install.
- Finished: press Finish.
The VST3 plug-in goes to C:\Program Files\Common Files\VST3, and the AAX plug-in to C:\Program Files\Common Files\Avid\Audio\Plug-Ins. After installing, rescan plug-ins in your DAW. Windows has no Audio Unit; that format is Mac only.
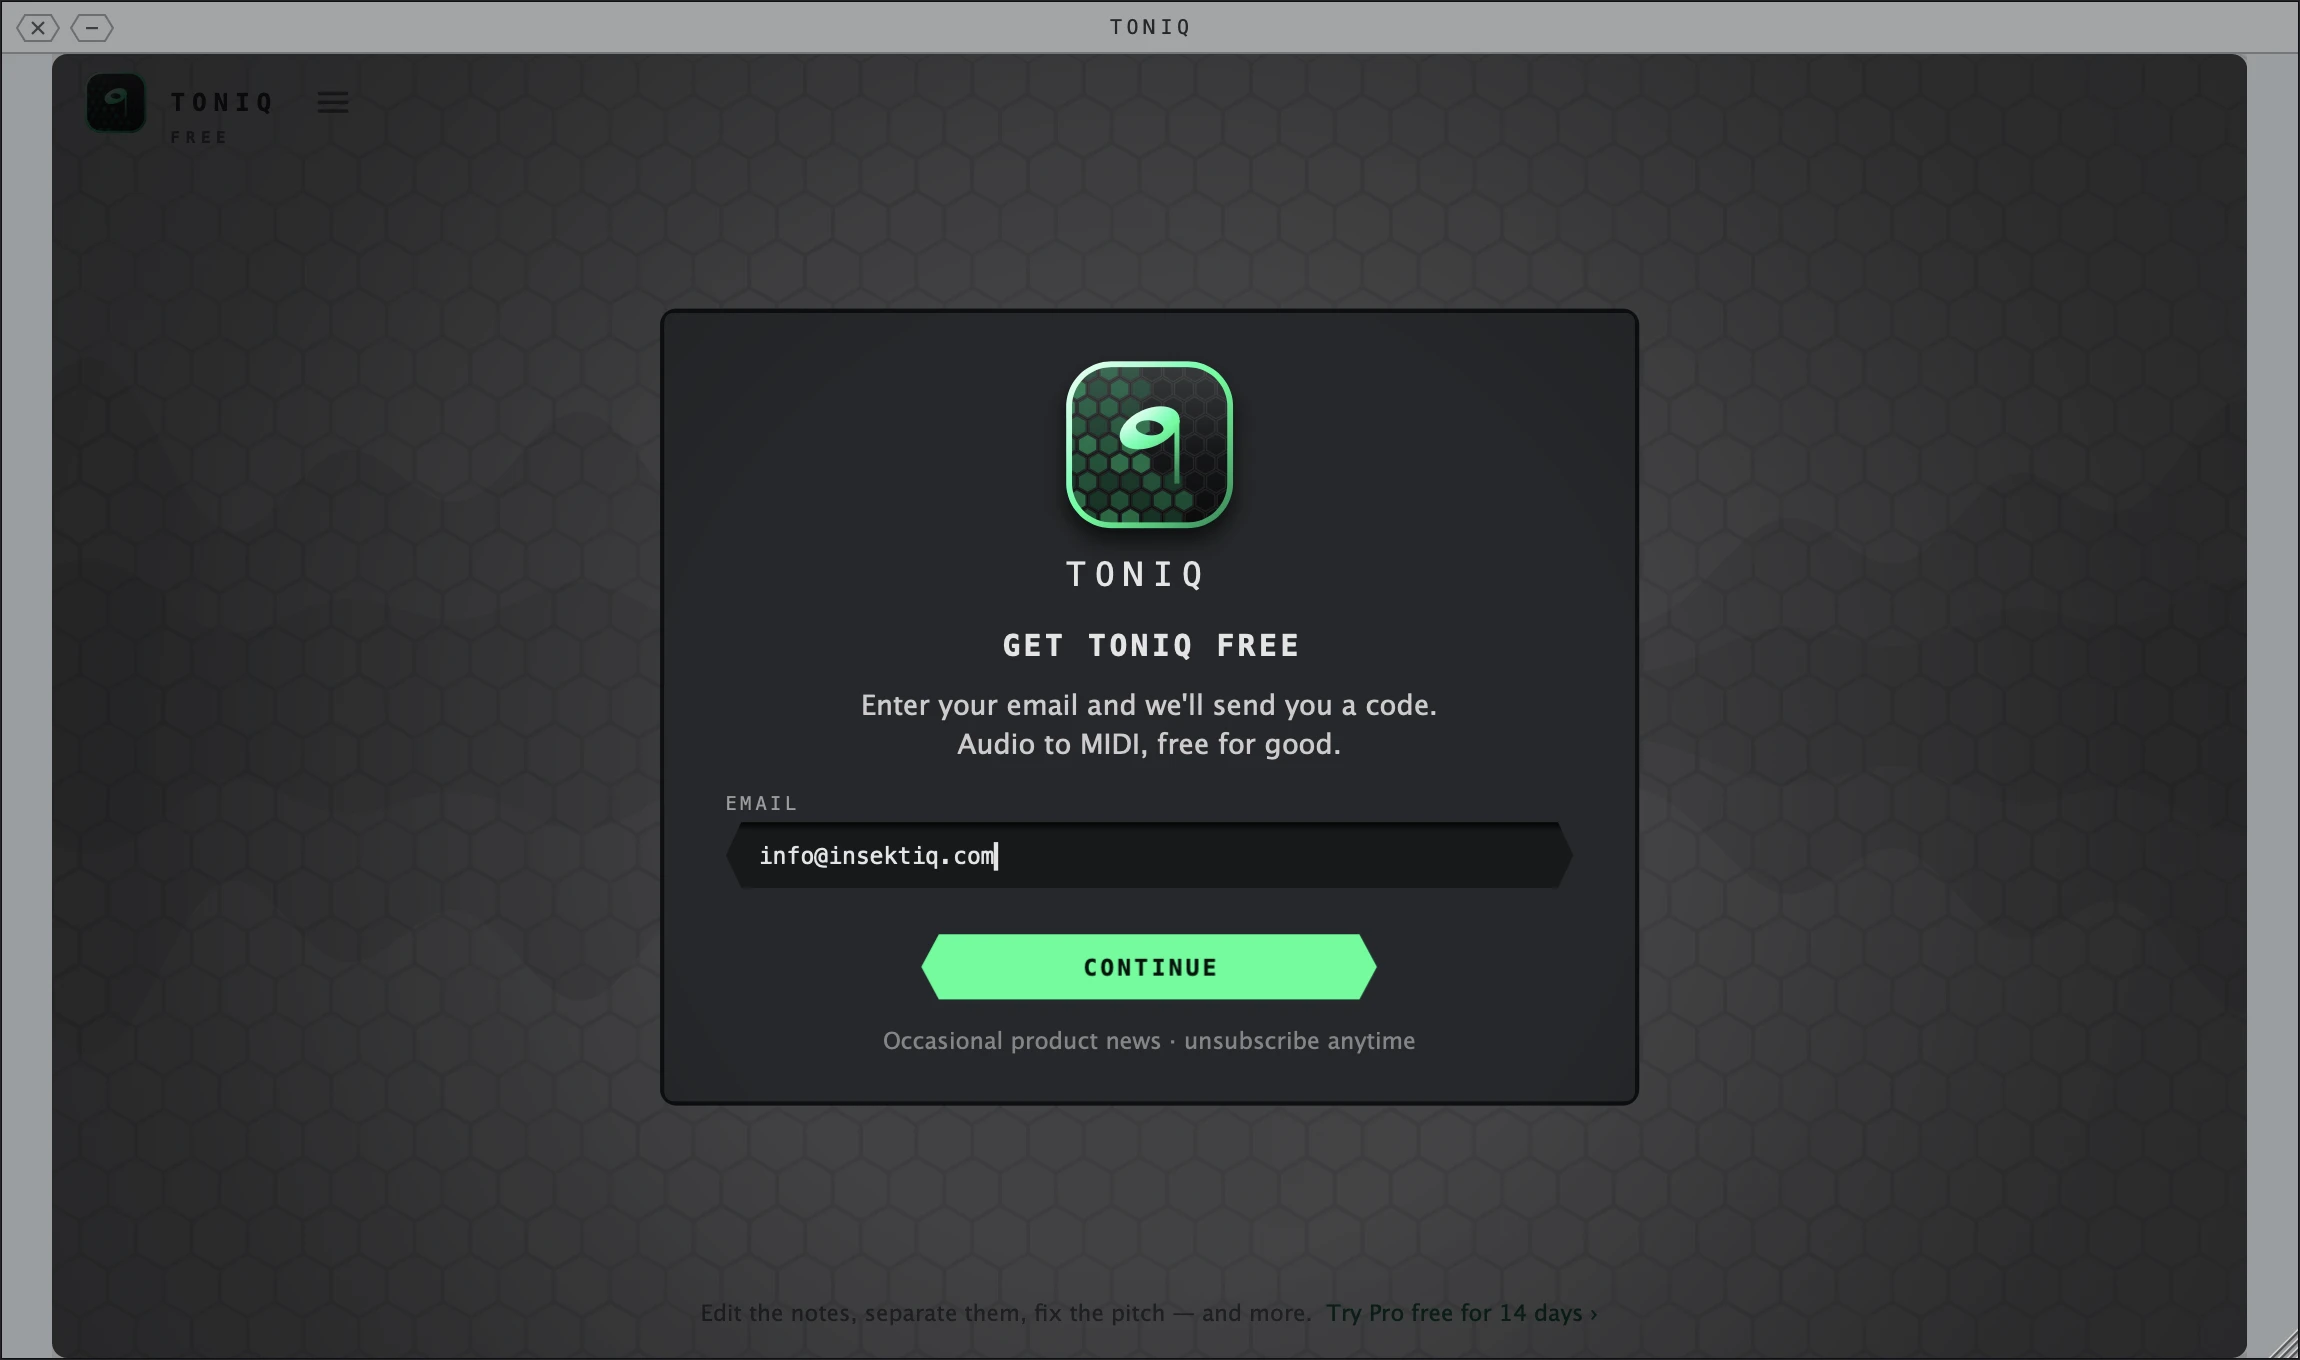
Get TONIQ free: your email, once
The first time you open TONIQ it asks for one thing, your email address. You do this once per computer.
- On the GET TONIQ FREE card, type your email and press CONTINUE.
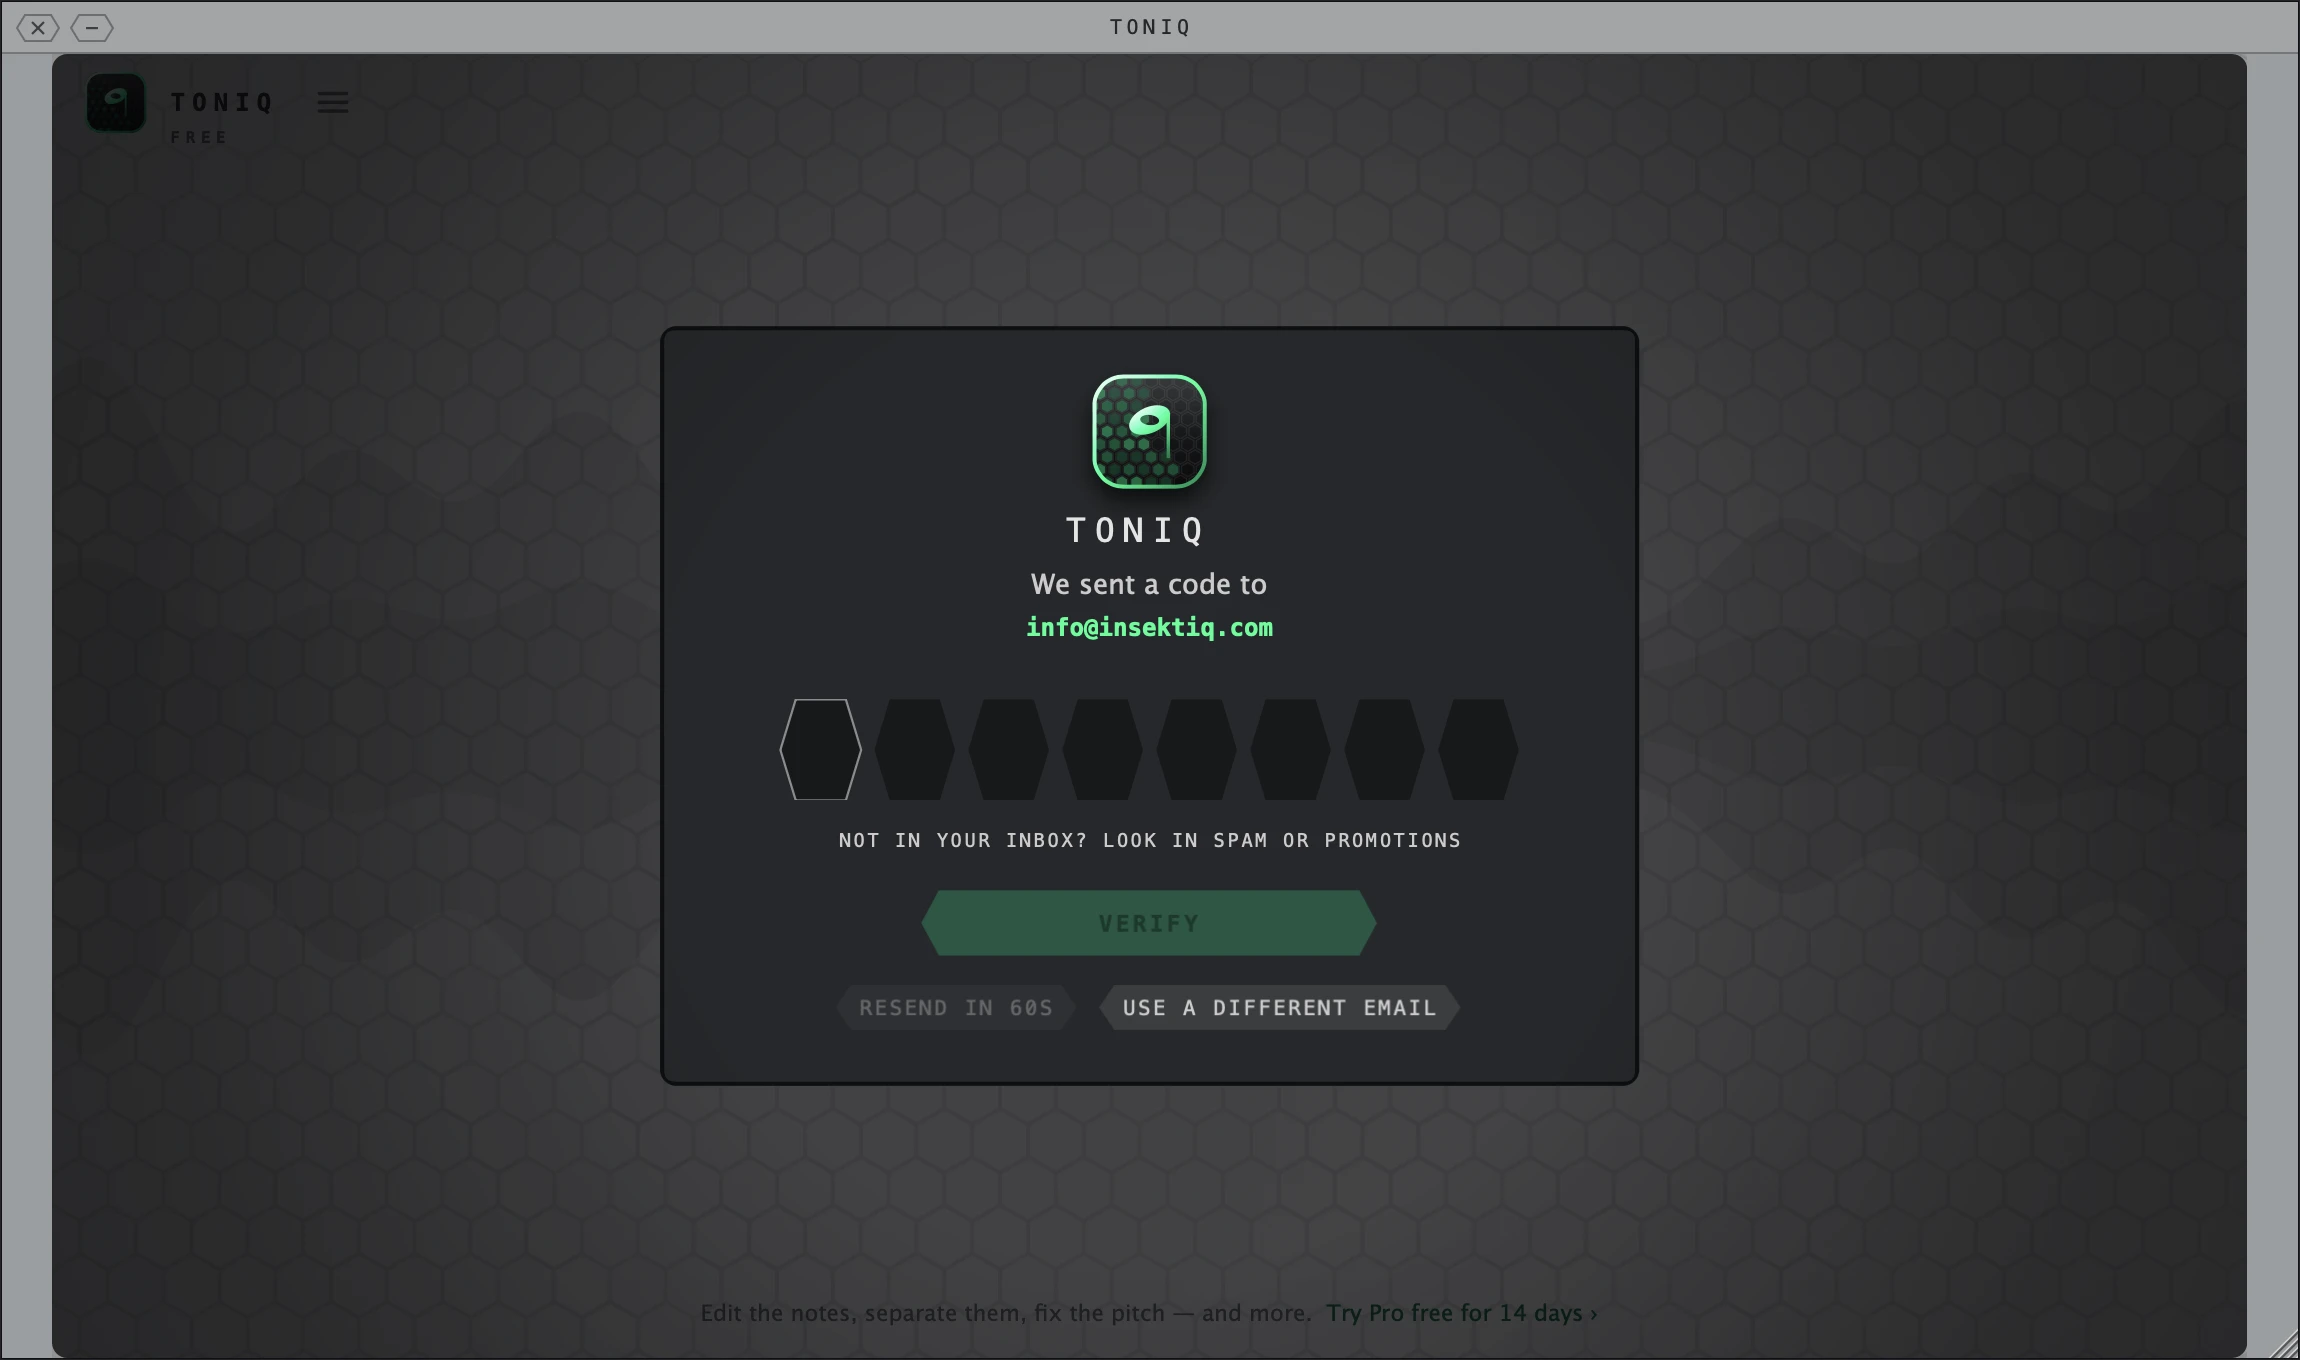
- Open the email from INSEKTIQ and type the code into the cells. The card shows the address the code went to. Press VERIFY.
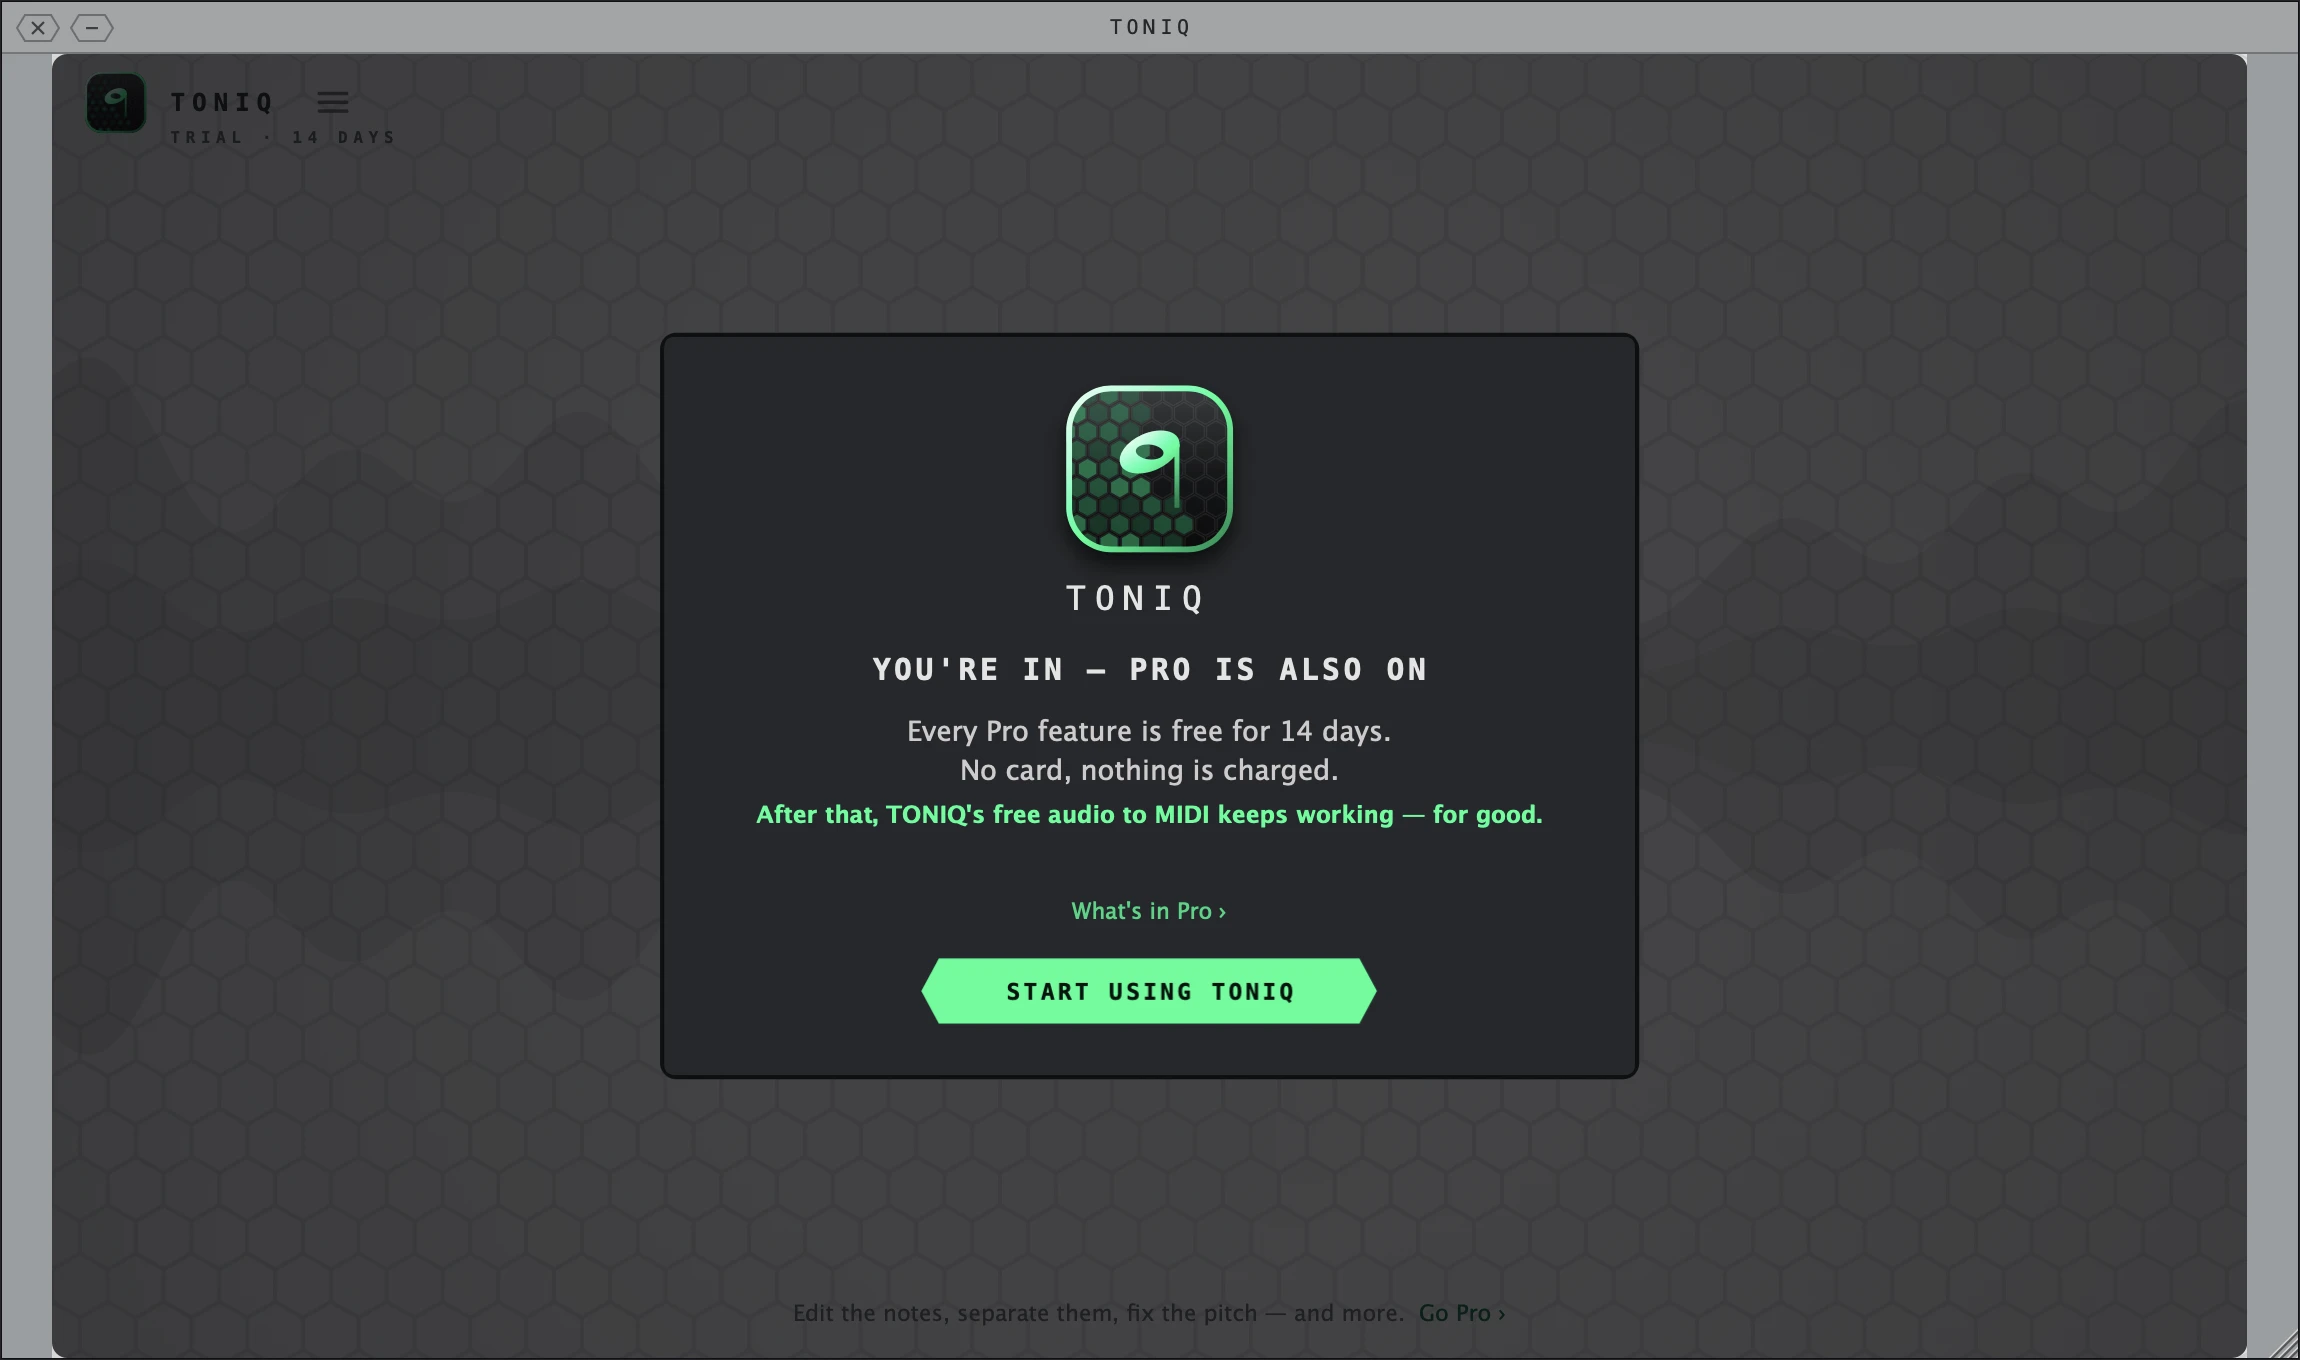
- TONIQ says Starting your 14 days of Pro…, then YOU'RE IN — PRO IS ALSO ON. Press START USING TONIQ.
- Not in your inbox? Look in Spam or Promotions. Under VERIFY, RESEND CODE sends another one; it can be pressed once a minute, and until then it reads "Resend in 60s" and counts down. USE A DIFFERENT EMAIL takes you back to correct the address.
- No internet? TONIQ needs a connection to send the code. On the email step it says "No connection - connect to the internet to begin". If the connection drops after the code was sent, the code step offers Skip for now: you can keep working for up to 3 days, and the card says "You can keep working for N more days". Verify once you are online. After 3 days the card says "Verify to carry on".
- Already bought Pro? You don't need a key here. If you bought it with the same address, TONIQ finds your licence when you verify, and the card says YOU'RE IN — YOUR LICENCE IS ACTIVE. If you bought it with another address, enter the key afterwards (see Pro licence below).
14 days of Pro, free, starting by themselves
Verifying your email starts 14 days of Pro by itself: every Pro feature, no card, nothing is charged. There is nothing to press. When the 14 days end, TONIQ's free audio to MIDI keeps working, for good.
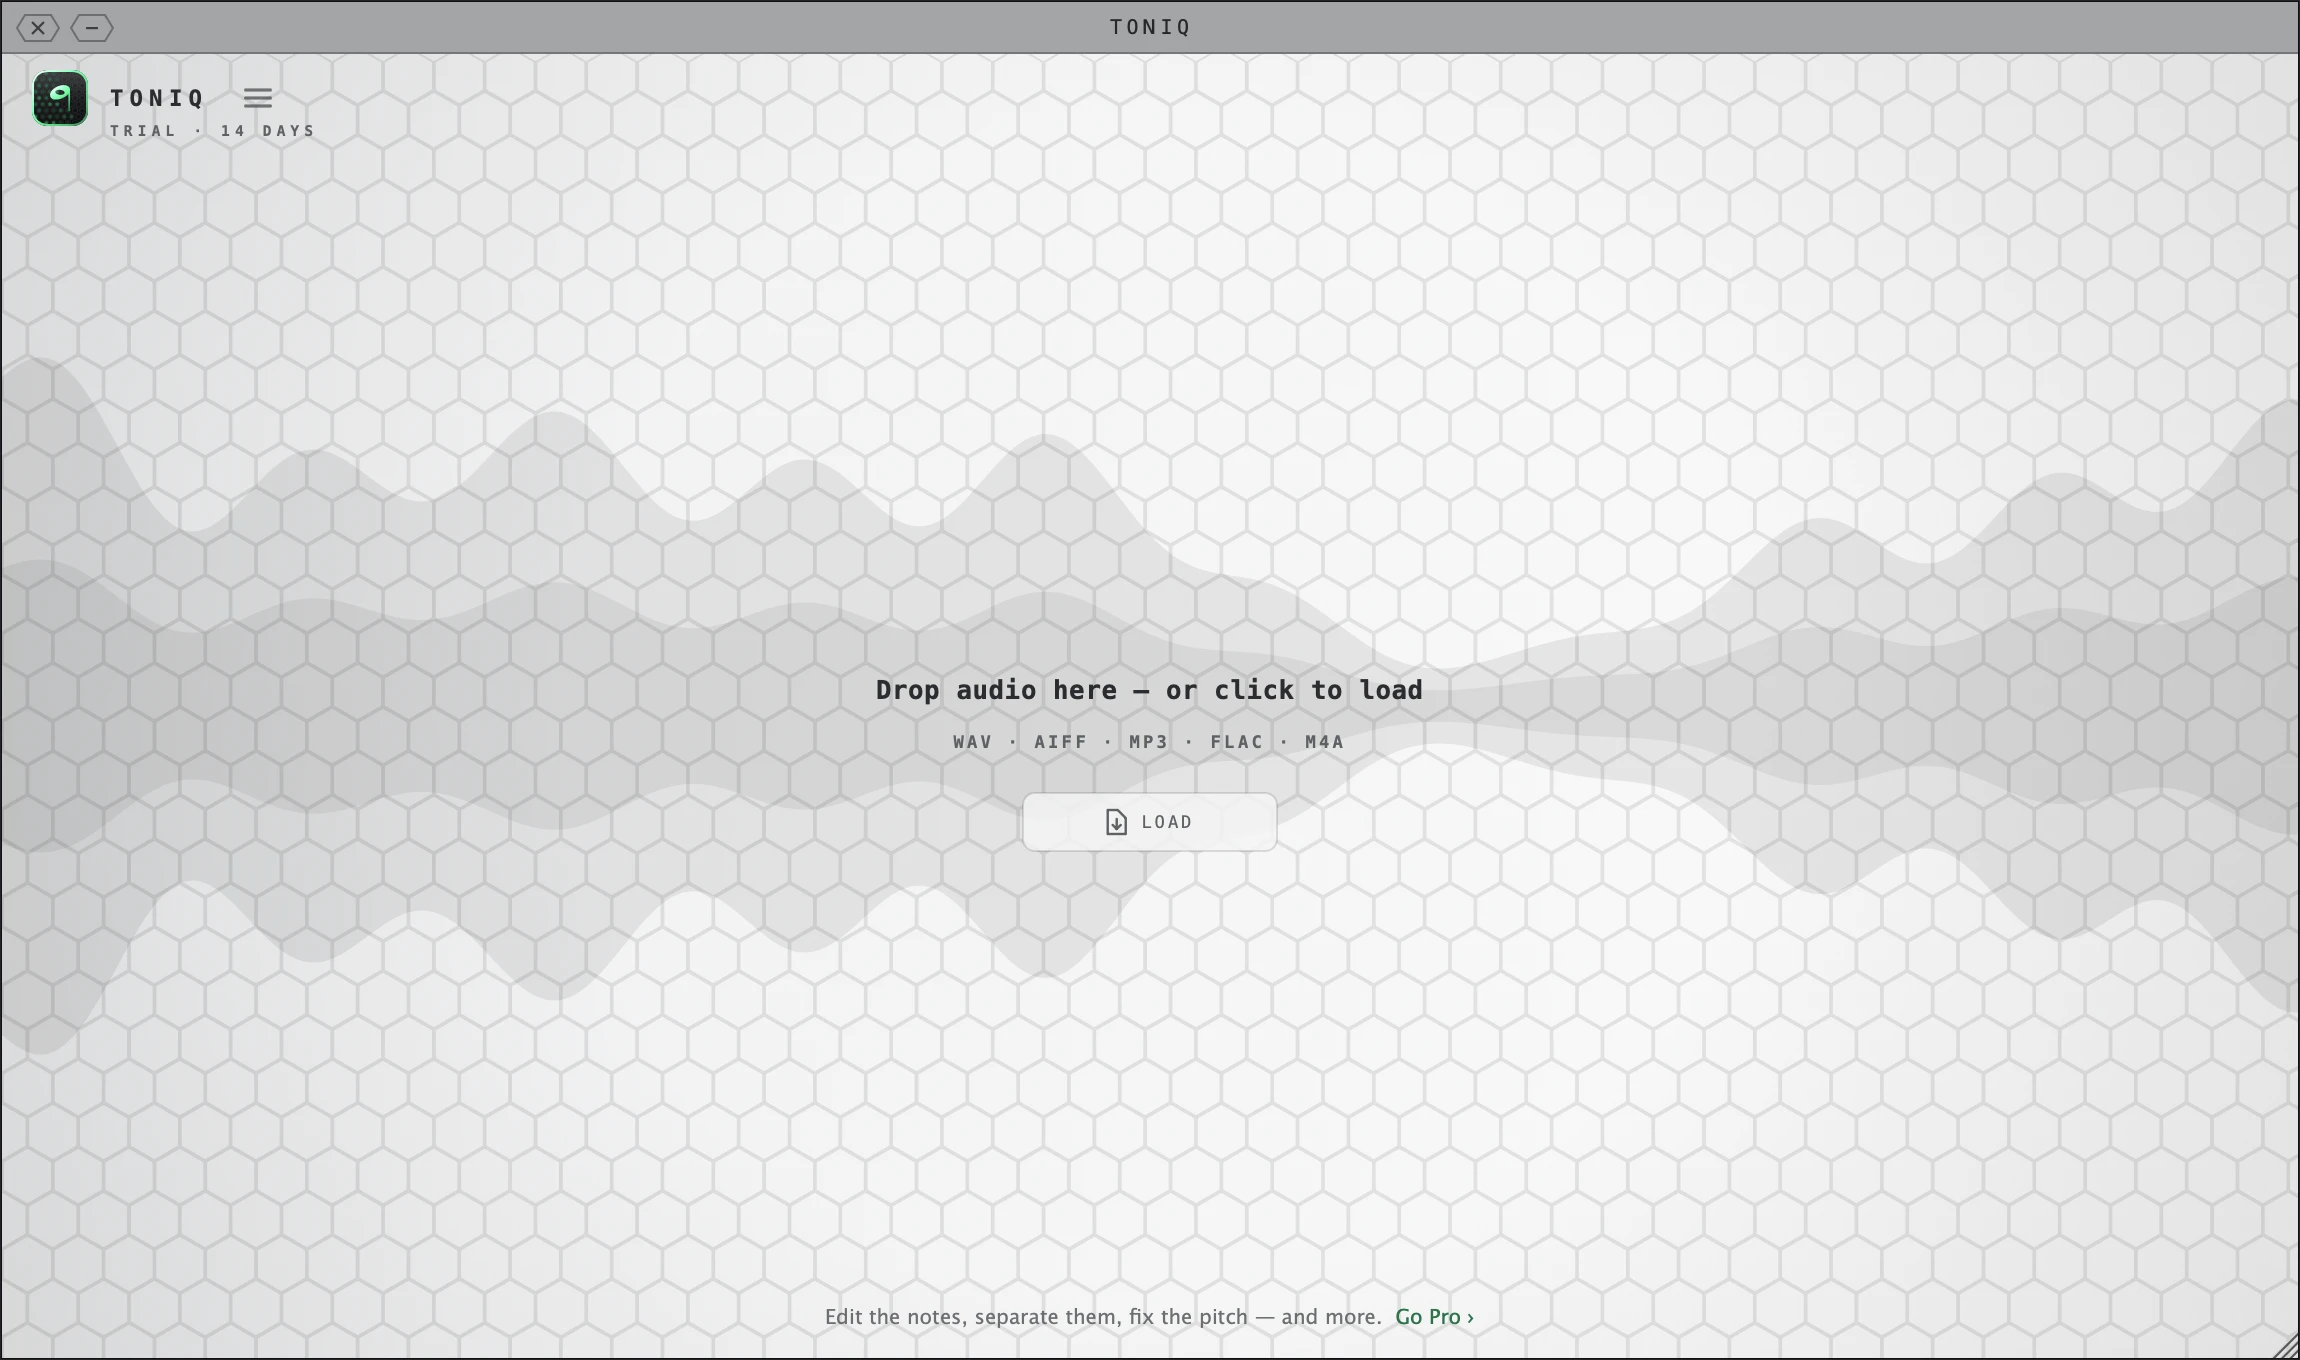
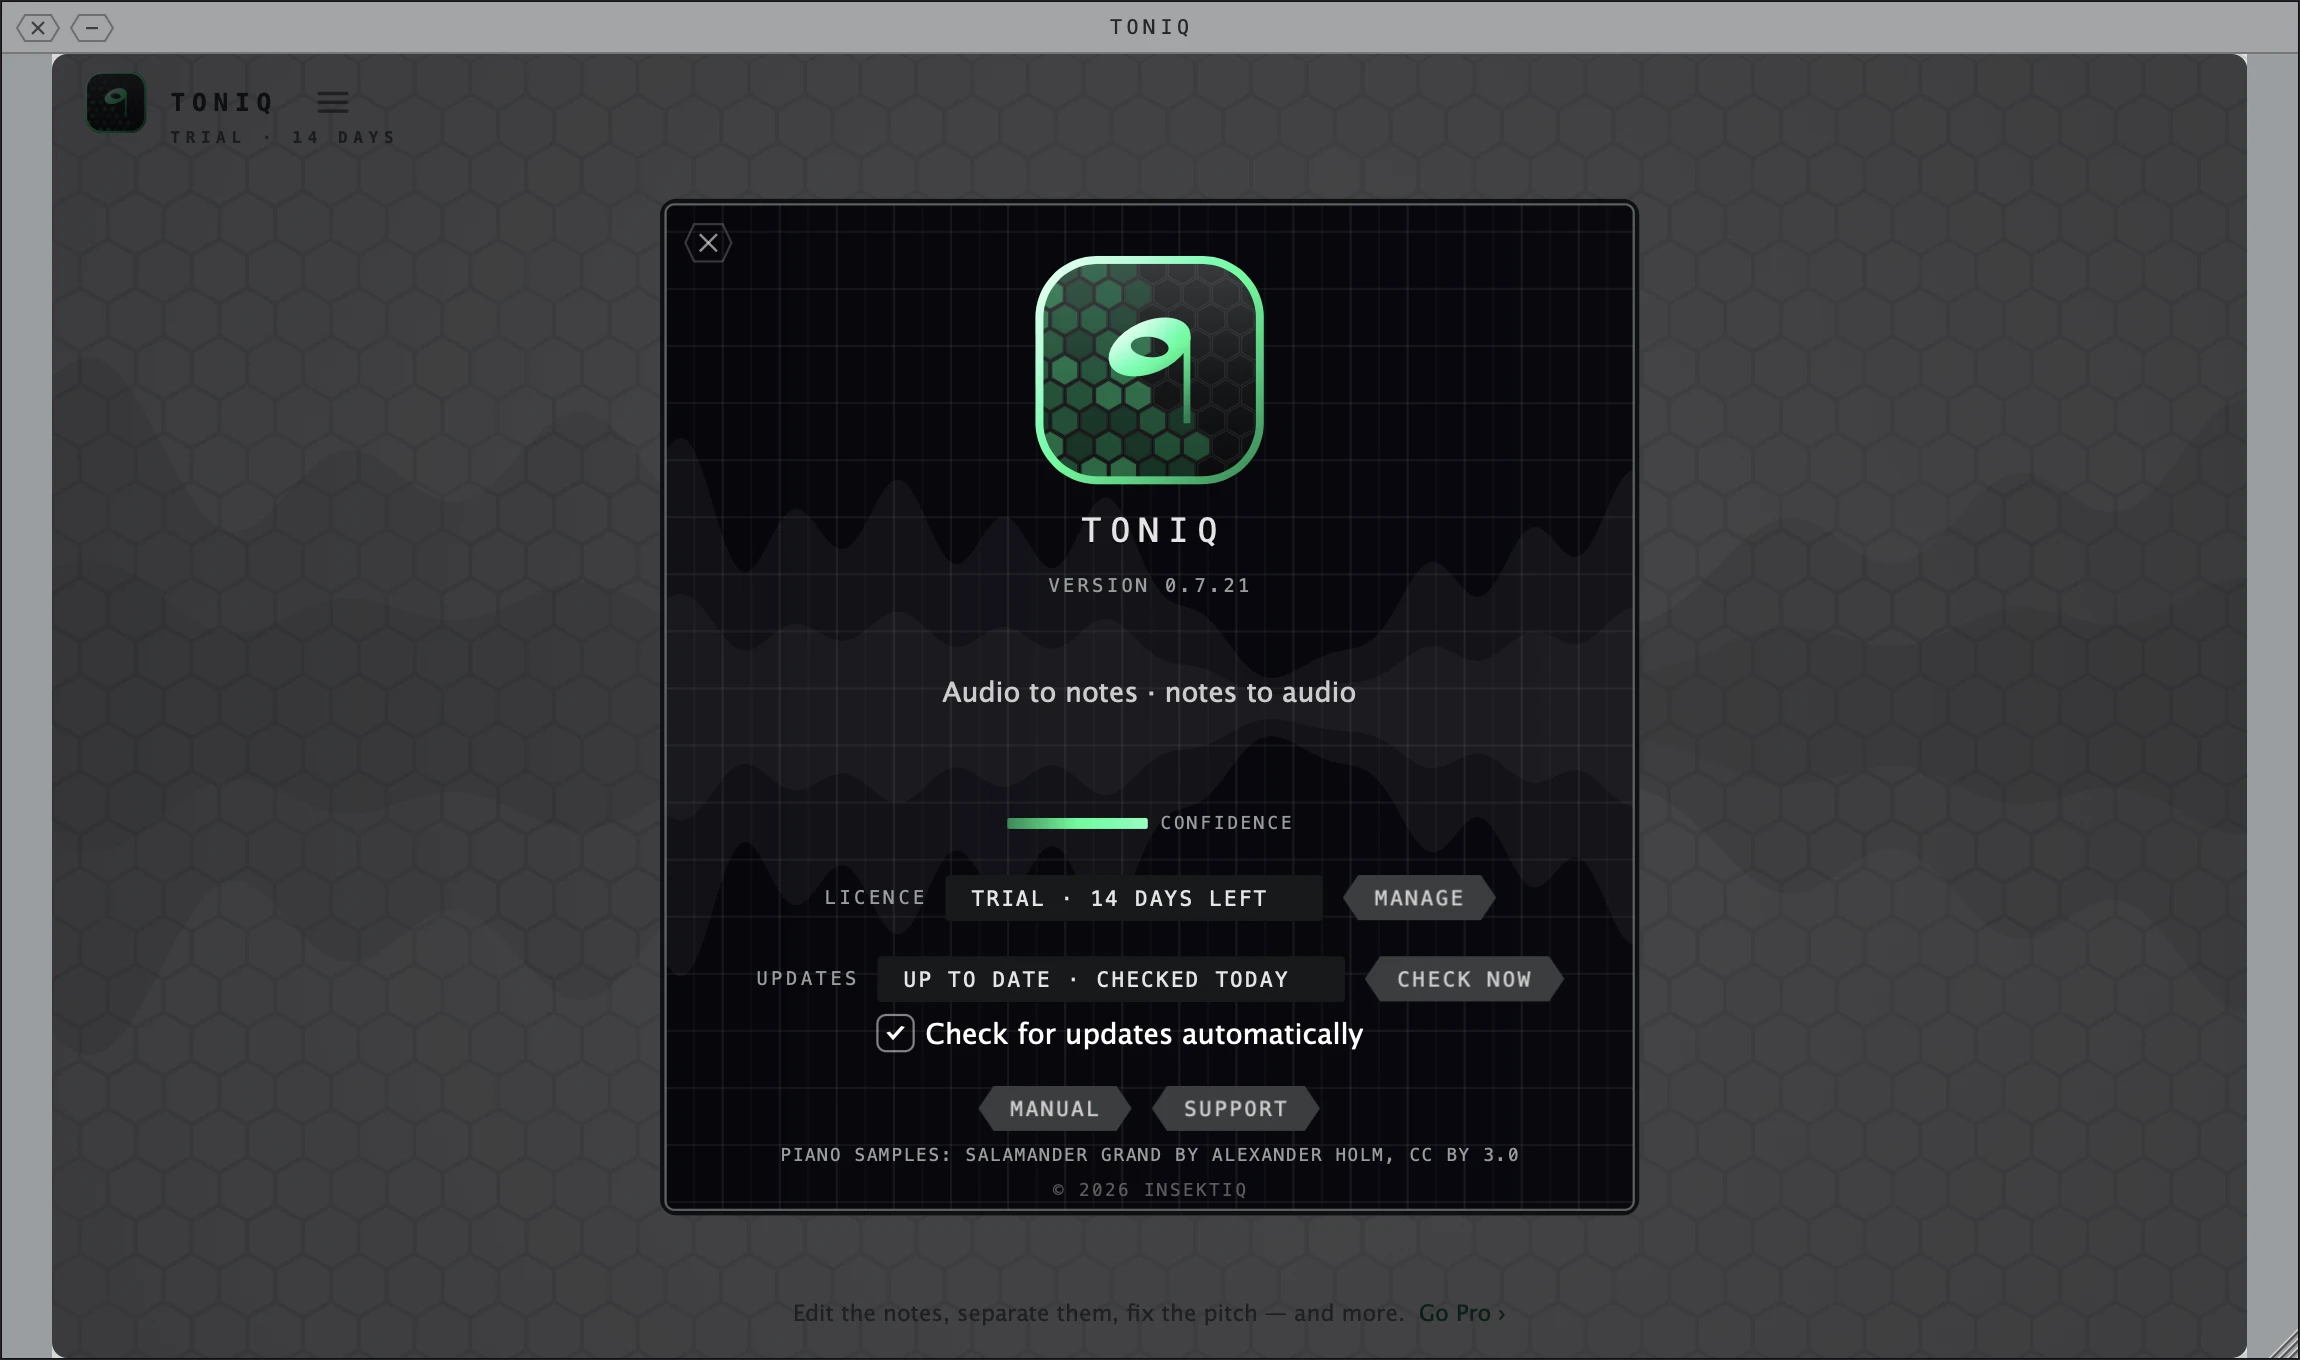
- While the trial runs, TRIAL · N DAYS shows under the TONIQ wordmark (on the last day, TRIAL · LAST DAY), and About says TRIAL · N DAYS LEFT. In the editor, the toolbar shows the same count, for example "Trial 12 days".
- What's in Pro › on the card opens a list of the Pro features.
- Each email address and each computer get the 14 days once. If you verified your email on an earlier version, the 14 days start the first time you open this version, unless you have had them before. TONIQ then shows PRO IS ON — 14 DAYS, FREE; press GOT IT. If you have had them, the card just says You're in: audio to MIDI, free for good.
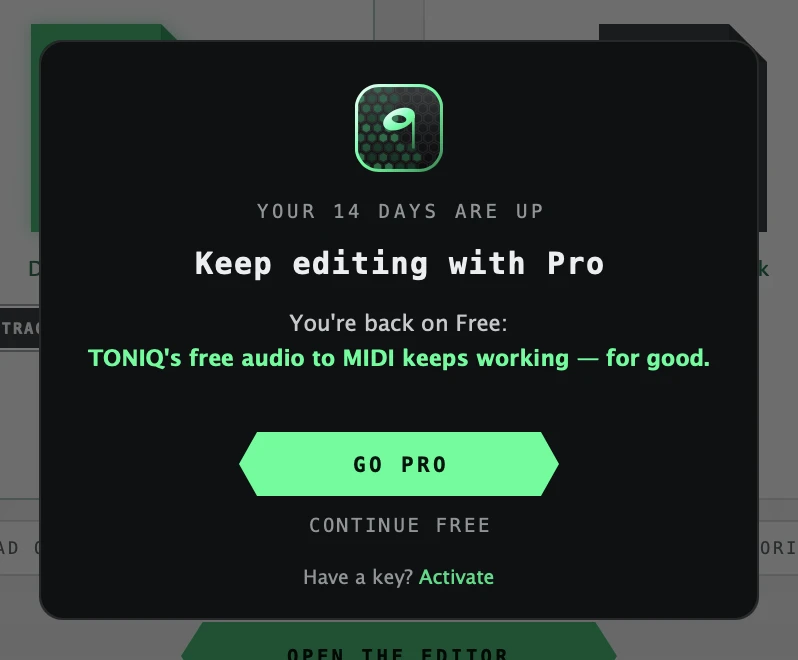
When the trial ends, the YOUR 14 DAYS ARE UP card ("Keep editing with Pro") opens once, with GO PRO and CONTINUE FREE. It comes back only when you install a new version. Your edits and settings stay in the session; they come back when you activate Pro.
After the trial, FREE shows under the wordmark, and the editor's toolbar reads "Free · unlock editing".
Free and Pro
| Free | Pro | |
|---|---|---|
| Audio to MIDI in every mode (Polyphonic, Melodic, Vocal, Drums, Full mix) | Yes | Yes |
| Every note of every chord, with velocity | Yes | Yes |
| No length limit, no watermark, commercial use | Yes | Yes |
| The piano roll, playback on the built-in sounds | Yes | Yes |
| One MIDI file (notes, drums, tempo) | Yes | Yes |
| Pitch bends in the MIDI | Vocal mode | Every mode |
| A full mix split into audio stems you can hear, drag out and export | Yes | Yes |
| Editing notes (move, stretch, cut, glue, draw, delete, undo) | Yes | |
| Detection, Vibrato and Quantize settings | Yes | |
| MIDI per instrument from a full mix (MIDI stems) | Yes | |
| Correct Pitch | Yes | |
| Audio export (the edited take, each pitch's audio) | Yes | |
| Edited take plays on the DAW timeline (ARA) | Yes |
During the 14 days everything in the Pro column is on. After them, when you try a Pro action, a small PRO card opens next to the pointer and names it ("Editing notes is Pro", "Quantize is Pro" and so on). Your notes are not changed. GO PRO opens the pricing page; close the card with NOT NOW, Esc, or a click anywhere else. Enter presses the lit key.
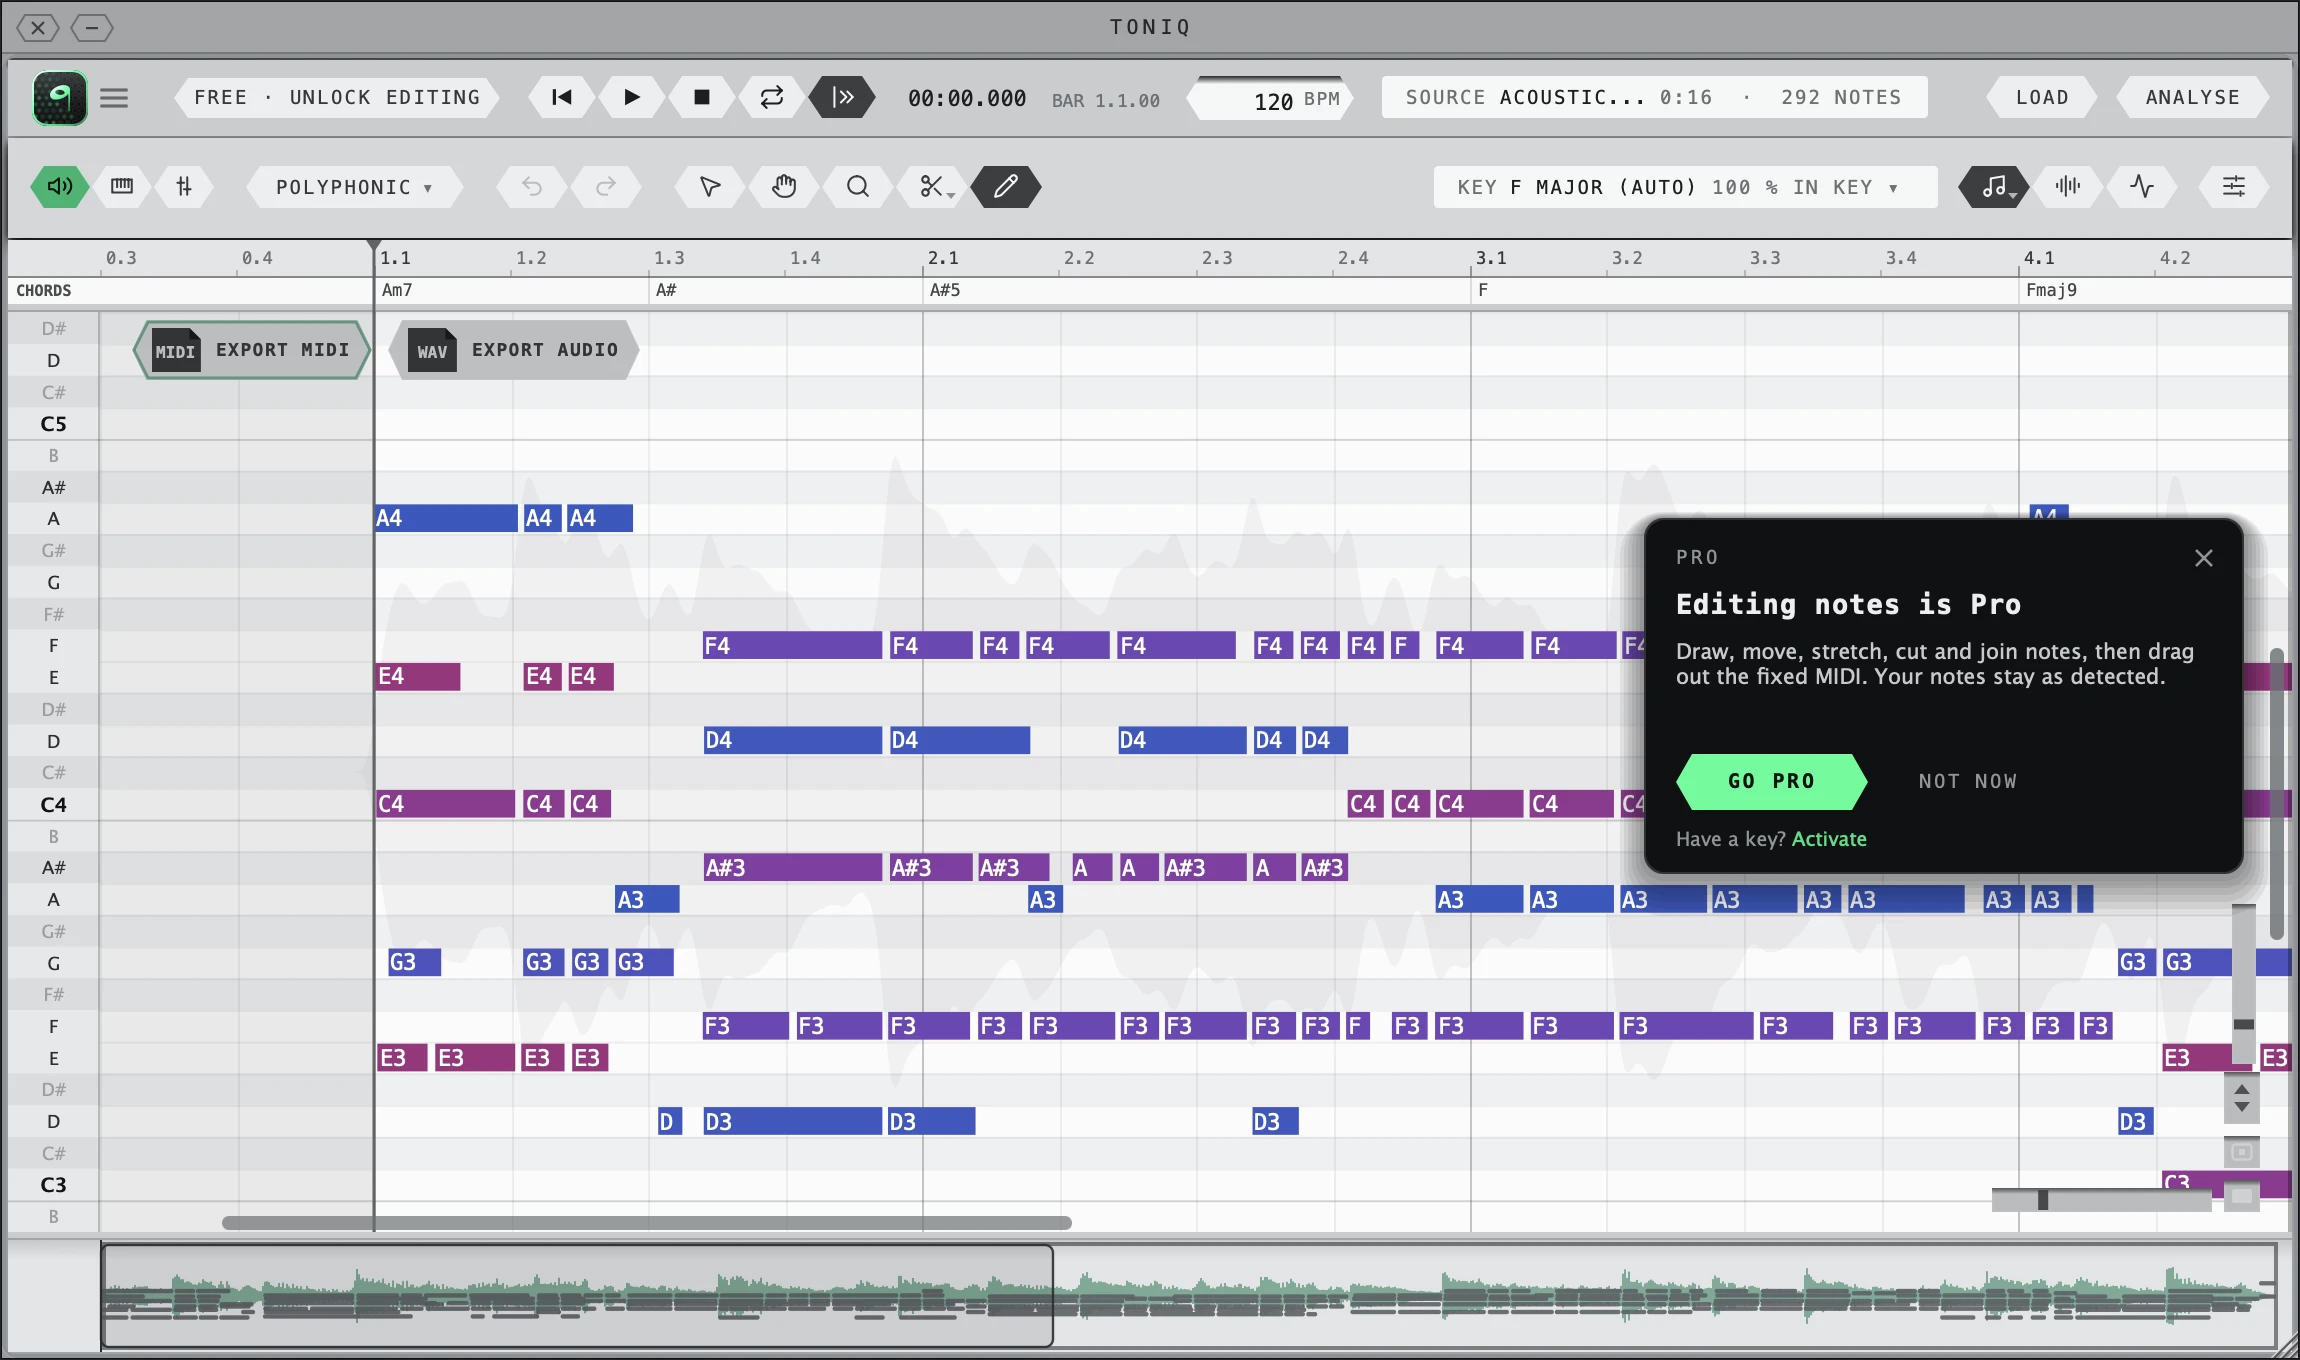
If this computer has not had its 14 days yet (for example, the trial could not start because there was no connection), the card reads PRO · 14 DAYS FREE, its lit key is START 14 DAYS, and the second key is GO PRO.
On the result screen, the free version shows a line under the keys: "Try Pro free for 14 days ›" while the trial is still to be had, "Go Pro ›" after it. Dimmed settings say "Pro: click to see what it does".
Pro licence
Pro is a one-time licence, not a subscription. See insektiq.com/pricing.
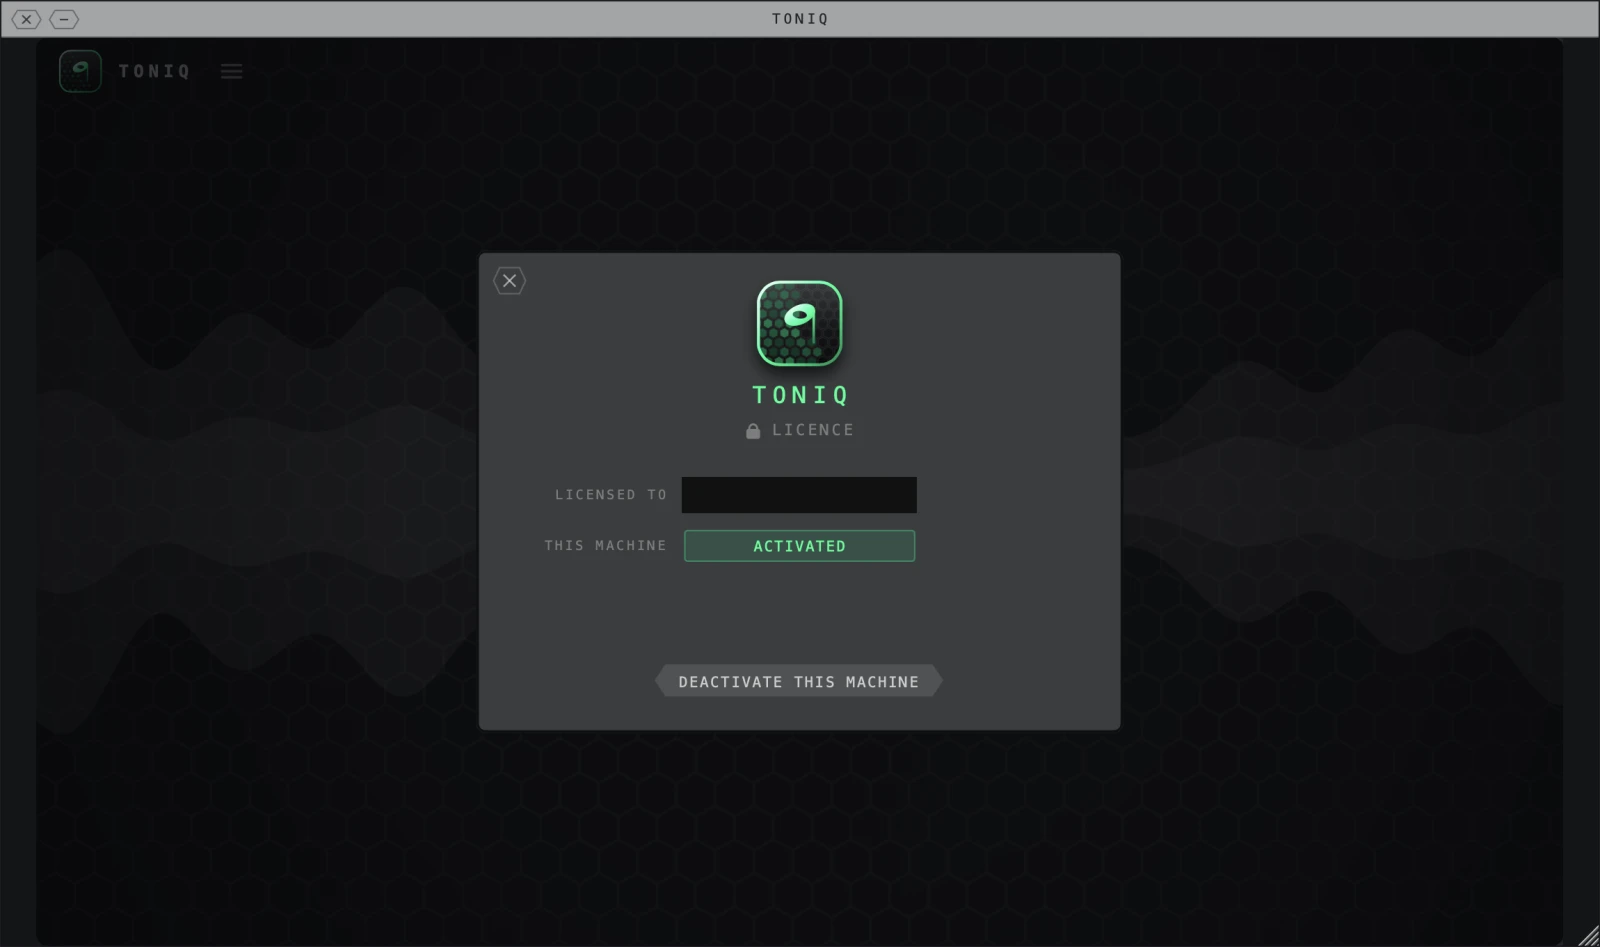
- LICENSED TO The email address the licence belongs to.
- THIS MACHINE ACTIVATED when this computer holds one of the licence's three seats.
- DEACTIVATE THIS MACHINE Frees the seat, to move the licence to another computer.
- One licence, three computers.
- The menu item (the TONIQ mark or the menu key at the top left) changes with your state: Try Pro free… while your 14 days are still to be had, Activate… on the free version or during the trial, and Licence… once a licence is active. All three open the licence card.
- To activate: choose Activate…, or click Have a key? Activate on a Pro card or on the YOUR 14 DAYS ARE UP card. Enter your email and licence key. The key is only needed if you bought Pro with a different address from the one you verified.
- If TONIQ says "No licence on this computer for that email yet", press Send me a code, type the code, then paste your key. If you bought under another email, type that address and TONIQ sends it a code.
- To move a licence to another computer: on the old one open Licence… and press Deactivate this machine. Then activate on the new one.
- If all three computers are in use, TONIQ says "All this licence's computers are in use. Deactivate one in your account." You can do that at insektiq.com/account, or on the old computer.
The licence card's other keys: START 14 FREE DAYS (when the trial is still to be had), HAVE A KEY? and USE A KEY INSTEAD (to type a licence key), TRY PRO FREE INSTEAD, and BUY LICENCE (opens the pricing page).
No internet on the studio computer? On the licence card press No internet?. Then:
- Press COPY CODE to copy the machine code.
- On any connected device, go to insektiq.com/account/activate-offline and enter it.
- Paste the response into TONIQ and press APPLY RESPONSE (or drop the response file on the card).
2. Getting audio in ↑ Contents
TONIQ needs a recording to read. How you give it one depends on your DAW.
| DAW | How |
|---|---|
| Pro Tools, Cubase, Nuendo, Studio One, REAPER | ARA 2 (recommended), or any method below |
| Logic Pro, Ableton Live, FL Studio, Bitwig, GarageBand | Drag a file in, Capture, or the standalone app |
| No DAW | The standalone app |
TONIQ reads WAV, AIFF, FLAC and MP3 files on Mac and Windows, and M4A files on Mac. On Windows, convert an M4A to WAV first.
ARA 2: Pro Tools, Cubase, Nuendo, Studio One, REAPER
ARA (Audio Random Access) is a way for a plug-in to read a clip straight from your session. With ARA, TONIQ needs no recording pass and no file dragging.
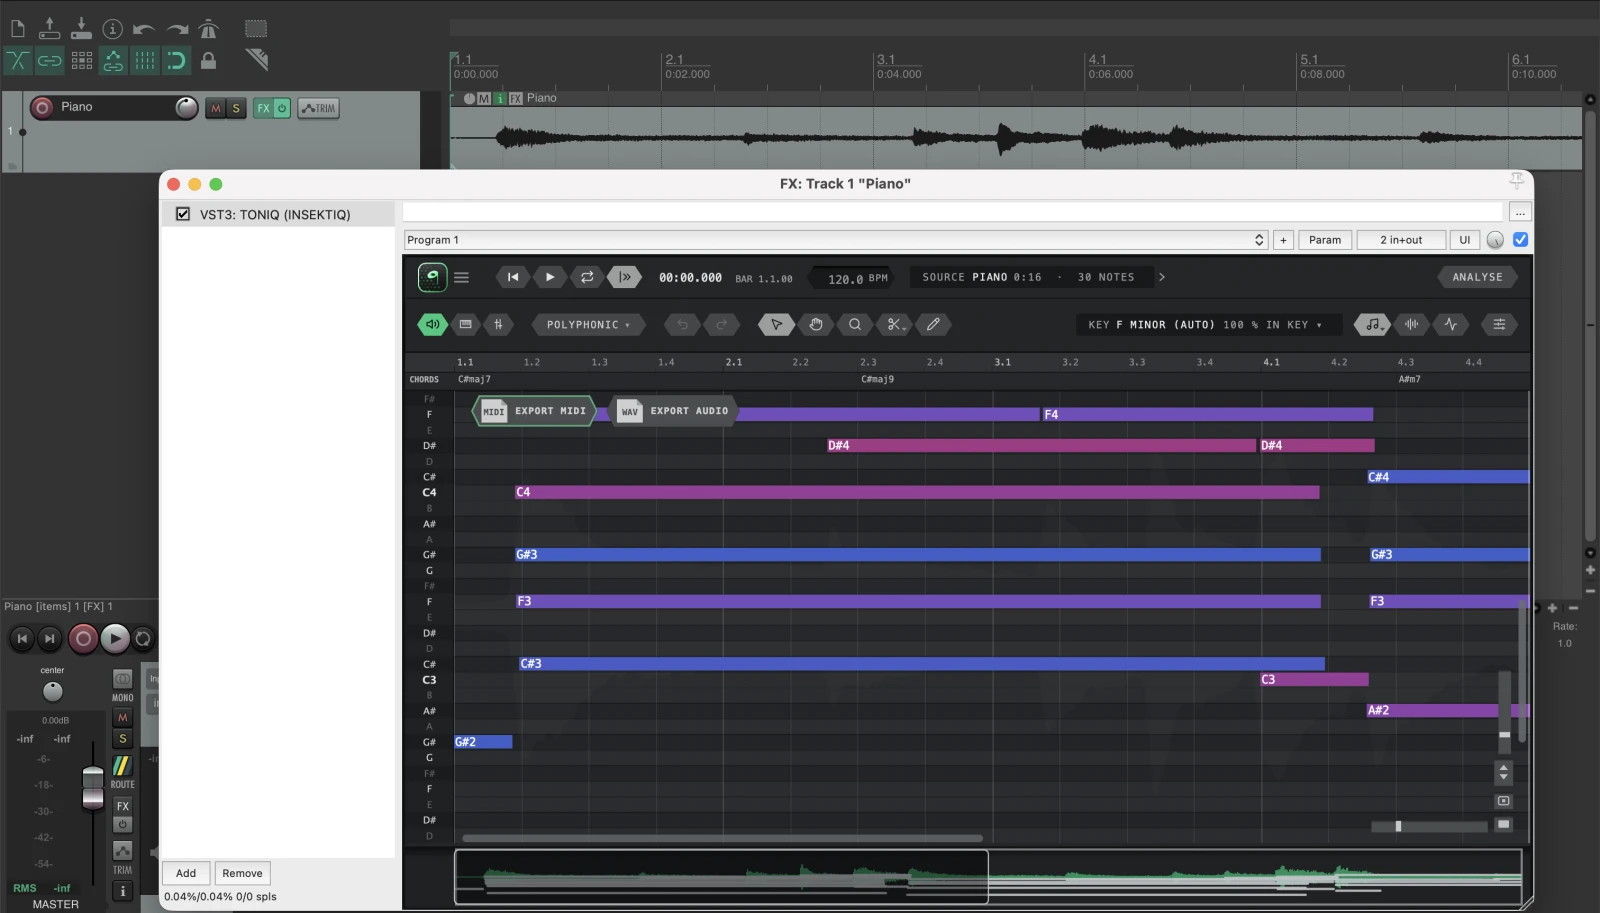
- TONIQ on the track's FX In REAPER TONIQ connects through ARA here too.
- EXPORT MIDI / EXPORT AUDIO Drag the result into your session (section 7).
- ANALYSE Read the clip again.
- Add TONIQ to the audio clip as an ARA extension. In REAPER, put TONIQ on the item's FX or on the track's FX: both connect through ARA.
- TONIQ shows "Waiting for the clip from your DAW…", then reads the notes as soon as the audio arrives.
- Choose what the audio is (see section 3). Under ARA the choice is kept per clip.
Under ARA:
- The MIDI lines up with your timeline: an exported file keeps the clip's position in the song.
- With Pro, your note edits play back on the DAW's timeline.
- Analyse reads the clip again, and replaces any note edits you made.
- A clip you have edited keeps its mode: changing it says "This clip has edits — its algorithm stays as it was".
- One source file is read in a window of up to ten minutes. If clips of the same file are spread wider than that, the source line says how many clips are "too far into their file to analyse", and those clips show "outside the analysed range". Bounce or consolidate those clips into a file of their own.
- MIDI per instrument from a full mix covers Bass, Vocals, Guitar, Keys, Strings, Brass & Winds and Synth, but not Drums.
- Audio stems from a full mix can be heard, but not dragged or exported yet. For the stem files, drop the song on the standalone app.
- Space bar and transport belong to your DAW. The loop you set on TONIQ's ruler is used.
Logic, Ableton, FL Studio, Bitwig and others
TONIQ does not use ARA in these DAWs. In Logic, insert TONIQ (not "TONIQ (ARA)") from the Audio FX menu. You have three ways in. All three give the same result.
A. Drag a file in
- Put TONIQ on a track as an insert effect.
- Drag an audio file from the DAW's browser (or from Finder / Explorer) onto TONIQ's window.
- "DROP HERE — TO TURN IT INTO MIDI" appears. Let go.
B. Capture (plug-in only)
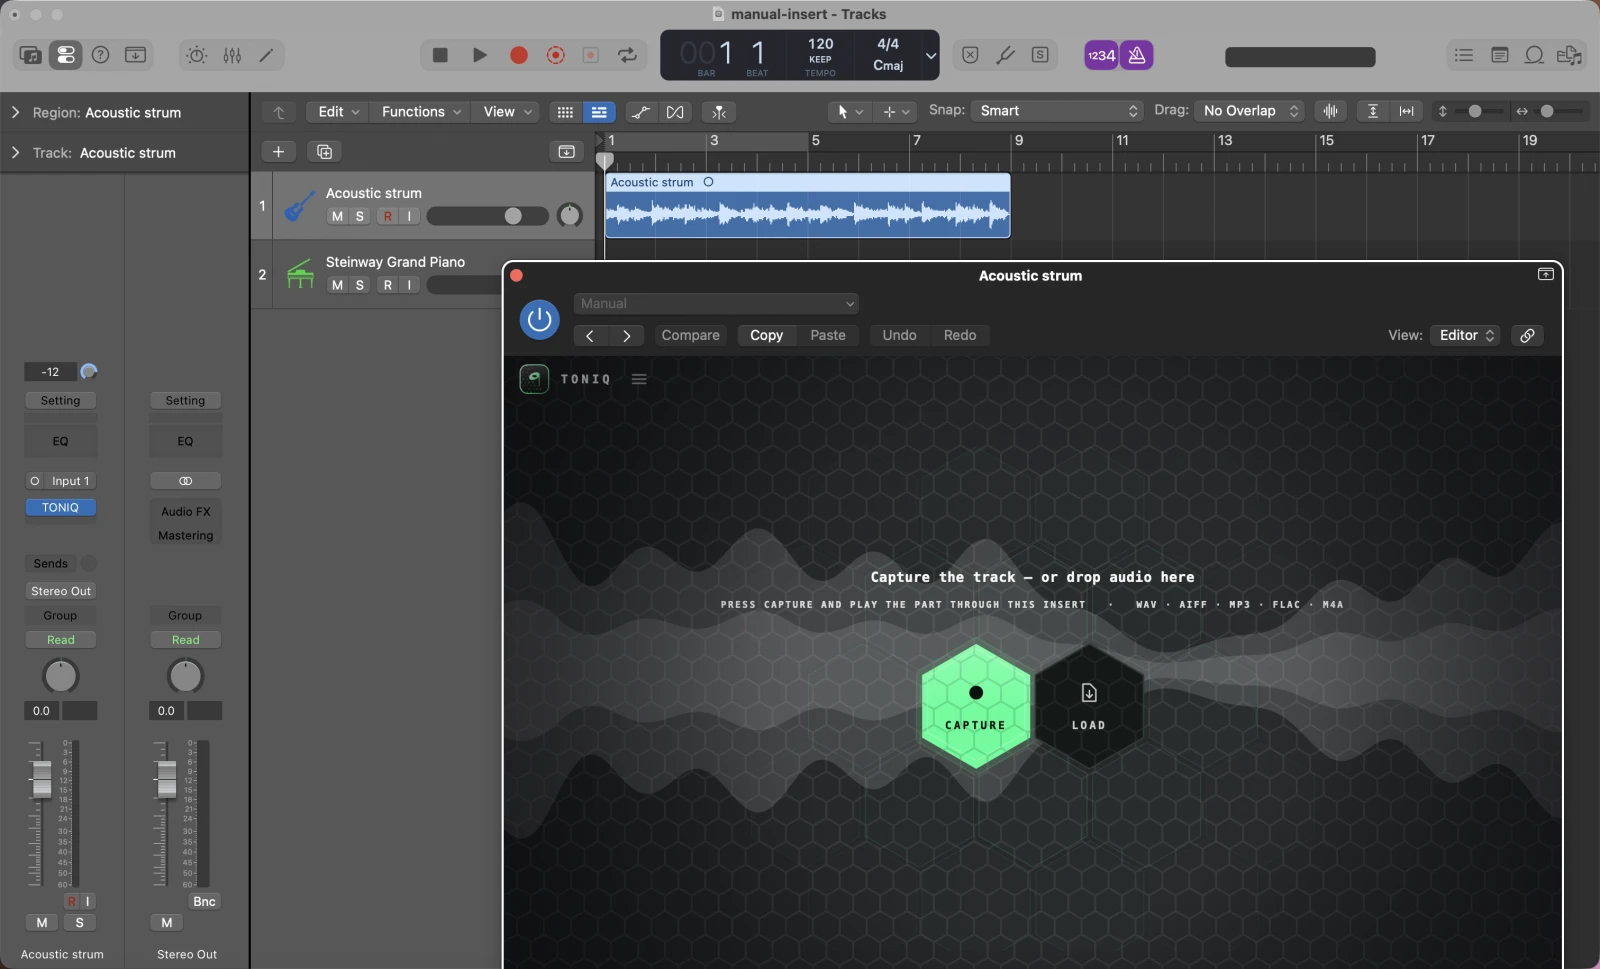
- TONIQ on the track A plain Audio FX insert. In Logic choose TONIQ, not TONIQ (ARA).
- ≡ menu Size, theme, note colours, Clear source…
- CAPTURE Press it, then play the part through the insert.
- LOAD Pick a file, or drop one anywhere on the window.
- Put TONIQ on the audio track you want to read, as an insert.
- Press CAPTURE.
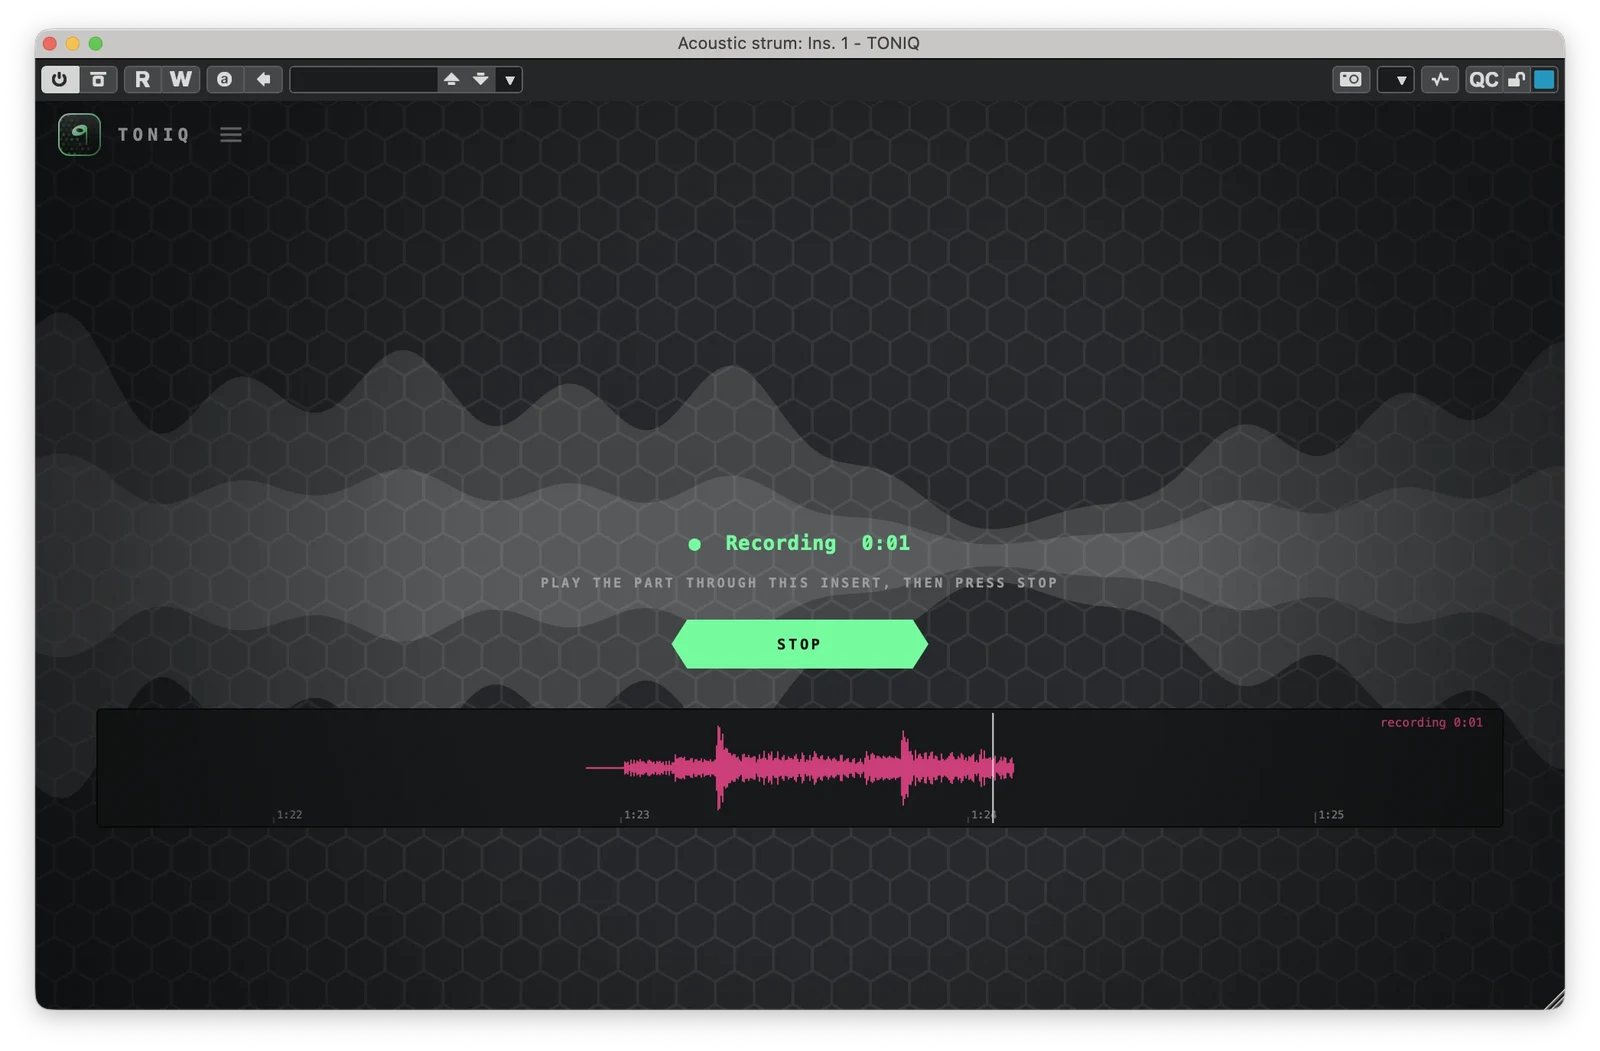
- Recording The time the take has run. The dot shows it is recording.
- STOP Press it when the part is done. TONIQ then reads the take.
- The take What TONIQ hears, on your DAW's timeline. Nothing here means no audio is reaching the insert.
- Play the part in your DAW. It has to play through TONIQ's insert: a muted or frozen track gives TONIQ silence.
- Press STOP when the part is done.
Capture records up to about five minutes. When it is full, TONIQ says "THE TAKE IS FULL · PRESS STOP". For anything longer, drop the file on TONIQ instead: files have no length limit.
To capture again, or capture more, use Another take or file. To start over, open the menu and choose Clear source…. It is the last item in the ≡ menu, and is active once TONIQ has a source.
On a plain insert there is no loop: TONIQ cannot set your DAW's cycle. Use the DAW's own loop.
C. The standalone app
Open TONIQ (the app), then drop a file on it or click LOAD (⌘O on Mac, Ctrl+O on Windows). Drag the MIDI from the app into any DAW.
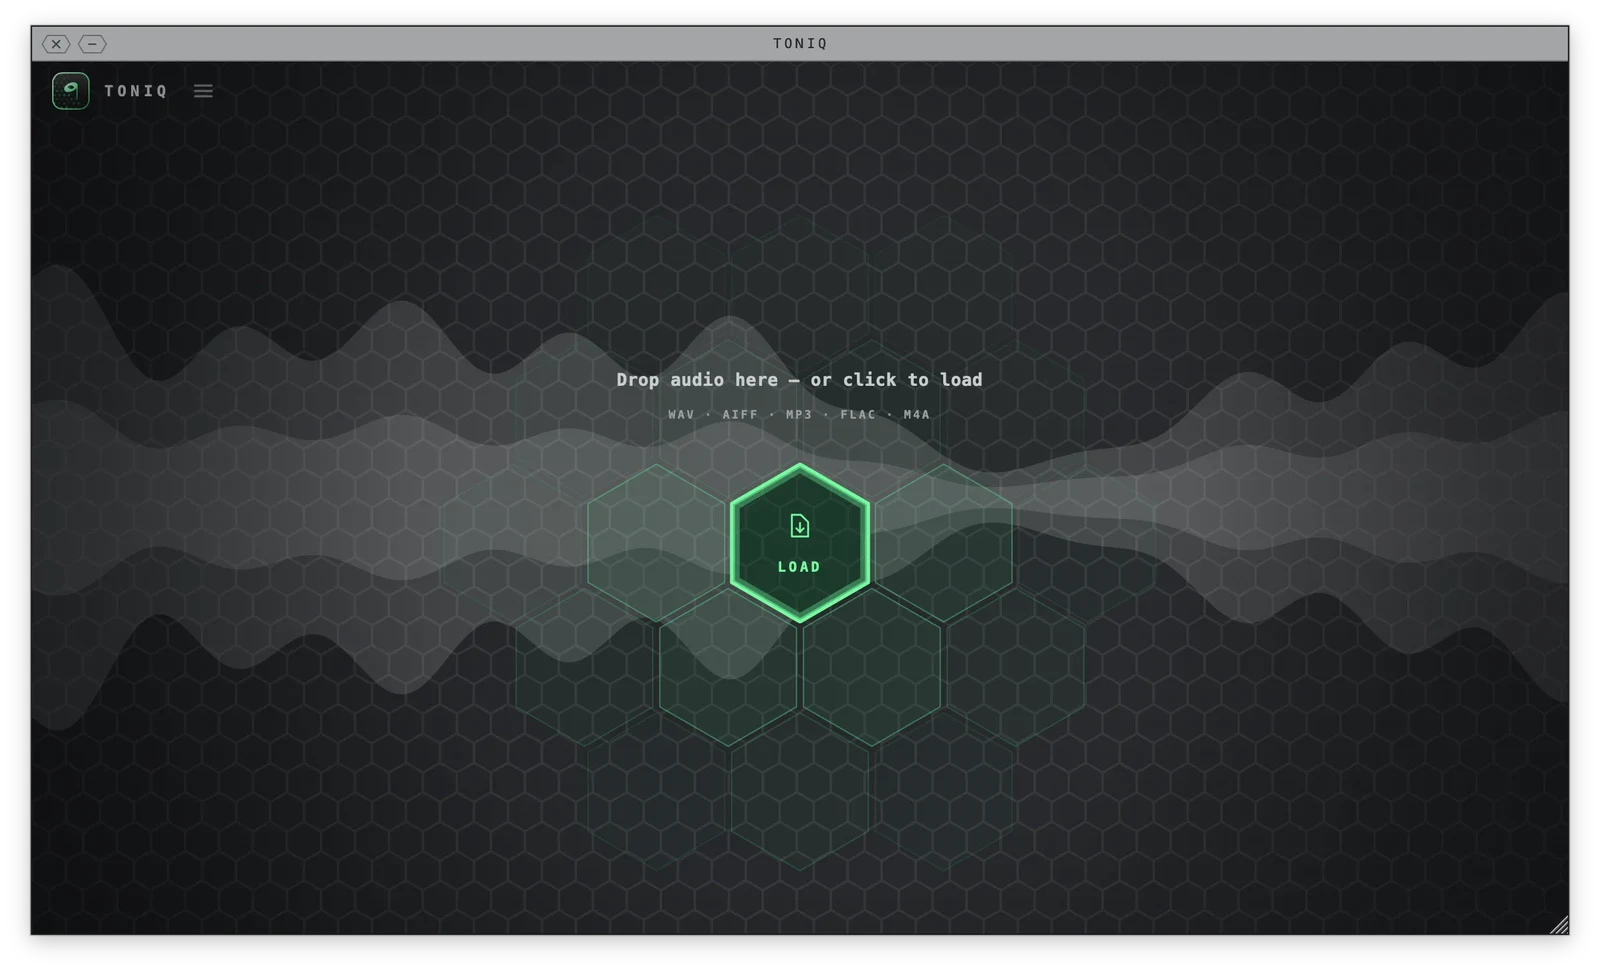
- ≡ menu Size, theme, note colours, audio settings, licence.
- Drop area Drop a WAV, AIFF, MP3, FLAC or M4A file anywhere on the window.
- LOAD Or pick a file.
The standalone app works on files only: it has no Capture and no audio input. To turn a live performance into MIDI, record it first, or use Capture in the plug-in.
Audio settings (standalone app)
Open the ≡ menu and choose Audio settings… (⌘, on Mac, Ctrl+P on Windows). This is where you pick what the app plays through.
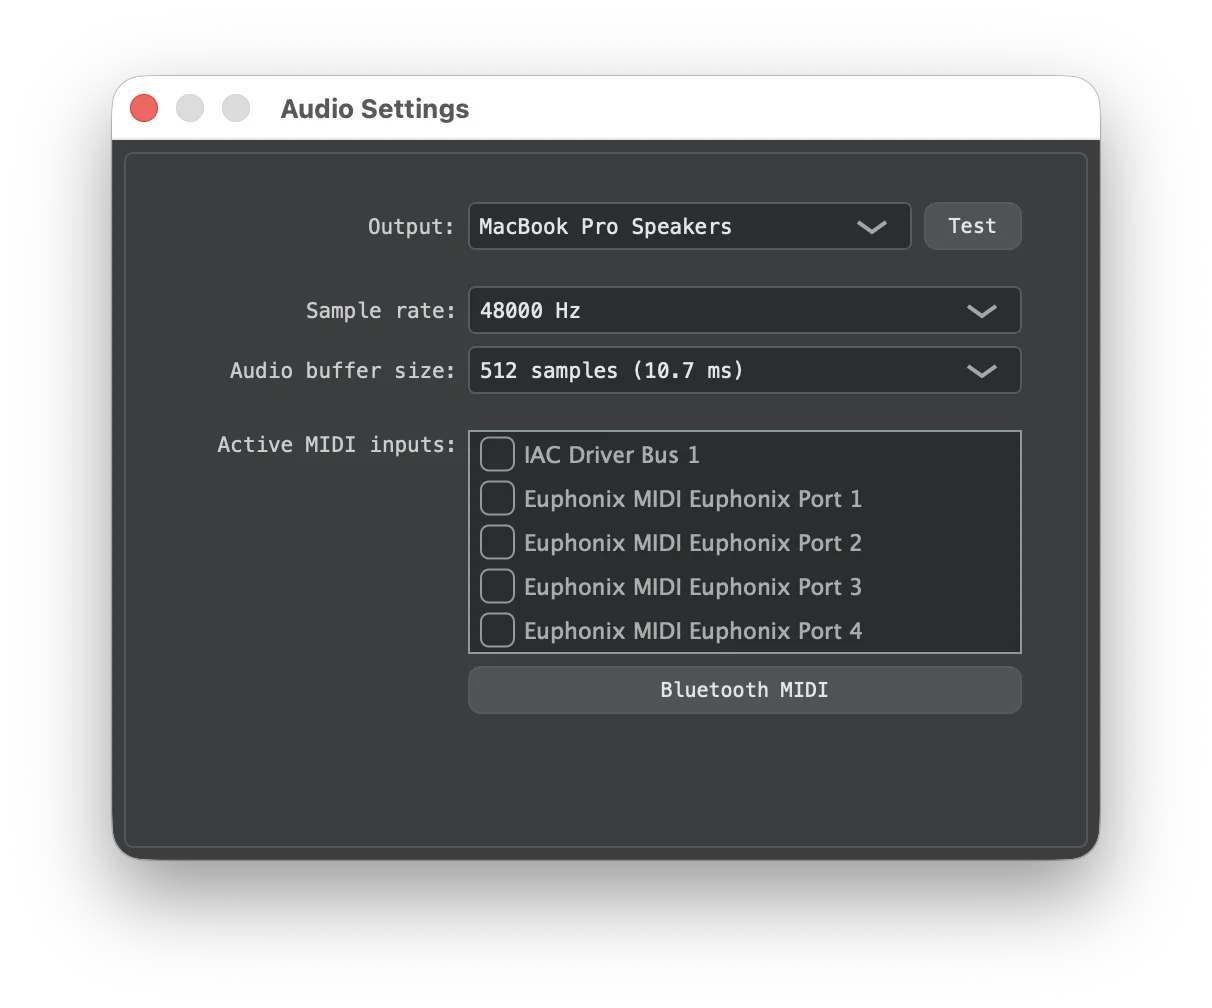
- Output Where you hear TONIQ.
- Test Plays a short tone.
- Sample rate Leave as it is.
- Audio buffer size Larger if you hear clicks.
- Active MIDI inputs Not needed.
- Bluetooth MIDI Not needed.
- Output: the speakers or audio interface you listen on. Test plays a short tone.
- Sample rate and Audio buffer size: leave them as they are unless you hear clicks. If you do, pick a larger buffer.
- Active MIDI inputs and Bluetooth MIDI: TONIQ doesn't need them.
There is no input setting. The app reads files only.
How to: a part to MIDI in Logic, Ableton or FL Studio (no ARA)
- Put TONIQ on the audio track as an insert effect (in Logic: Audio FX, TONIQ).
- Drag the region or the audio file from the DAW onto TONIQ's window. Or press CAPTURE, play the part through the track, and press STOP.
- Pick the mode (section 3). Wait for the result.
- Create a new software-instrument track with the sound you want.
- Drag MIDI TO YOUR DAW (or the editor's EXPORT MIDI) onto that track.
- Move the MIDI so its first note sits where the part's first note is. Outside ARA the file starts at its first note.
With Pro, to keep audio edits too: drag EXPORT AUDIO onto a new audio track, then mute the original track (section 6).
3. Choosing what it is ↑ Contents
After the audio is in, TONIQ asks WHAT'S IN THIS AUDIO?, with the file's name under it, and lists five kinds of audio.
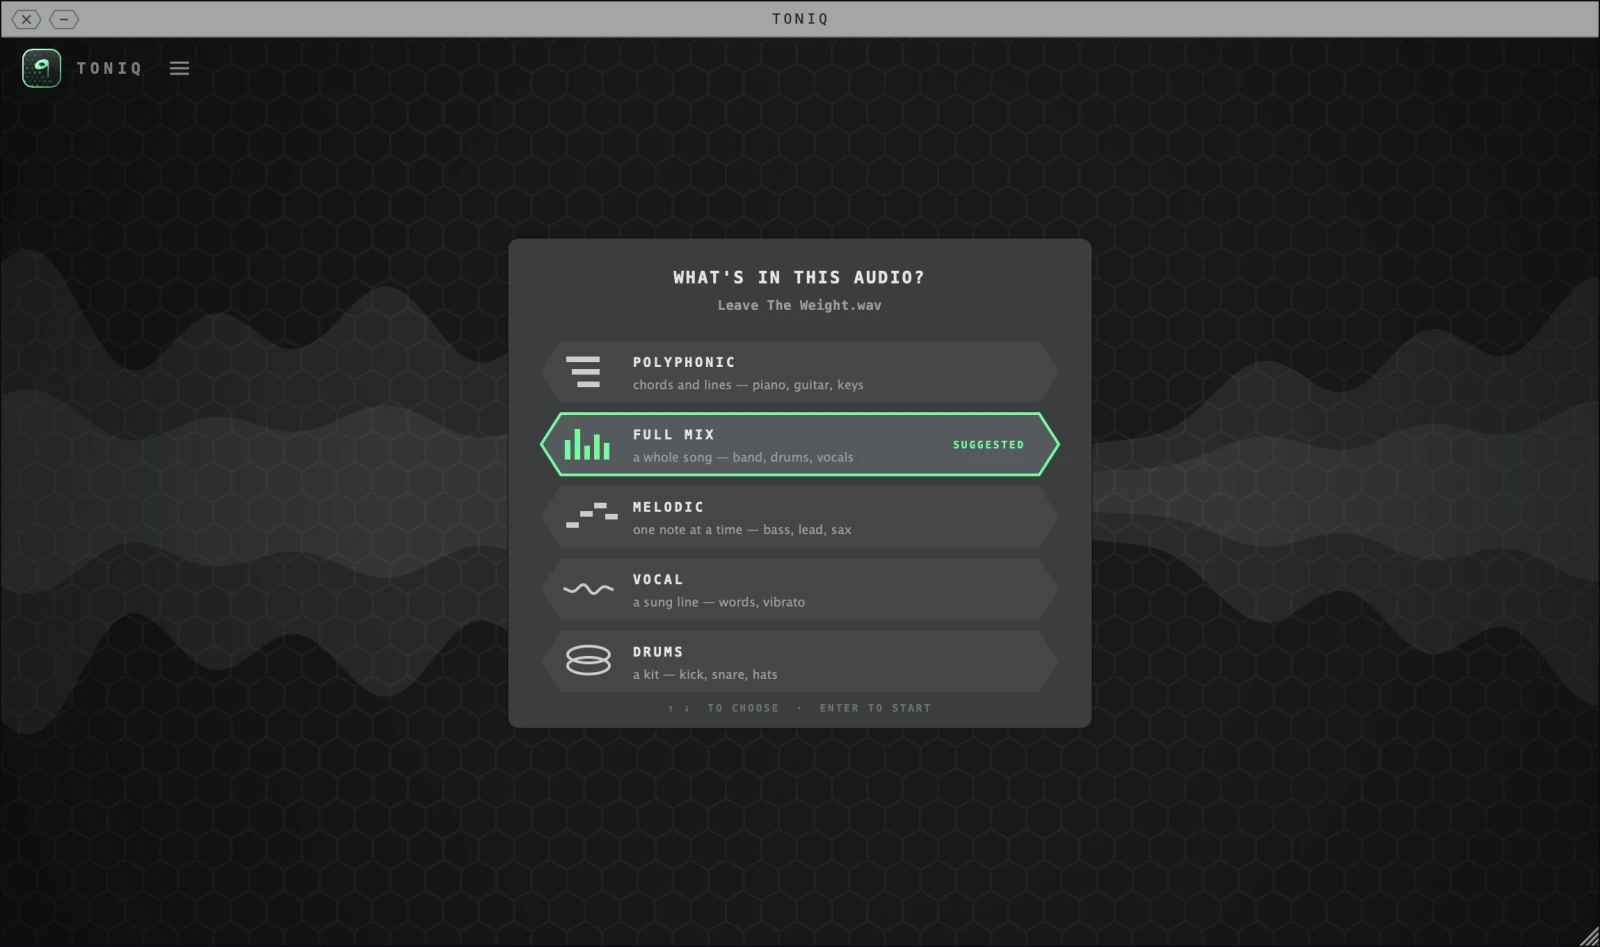
- The five kinds of audio Click one, use ↑ ↓ and Enter, or press 1–5.
- SUGGESTED TONIQ's guess from listening to the file.
- Key hint ↑ ↓ to choose, Enter to start.
While it listens, the list says "Listening…". Then one row is marked SUGGESTED: TONIQ's guess from listening to the file. Pick a row with the mouse, or use ↑ ↓ and Enter or Space (the hint at the bottom of the list), or press 1–5 for the first to fifth row.
On the toolbar the choice is on a key that reads ALGORITHM or the mode's name. This manual calls it the mode.
| Mode | For | What it does |
|---|---|---|
| Polyphonic | Chords and lines: piano, guitar, keys | Every note TONIQ hears, several at once. |
| Full mix | A whole song: band, drums and vocals | Separates the song first, then reads the drums, the bass and the vocal line from their own parts. Slower. |
| Melodic | One note at a time: bass, lead, sax | One note at a time. On a shared start the higher note wins, and each note ends where the next begins. |
| Vocal | A sung line: words, breaths, vibrato | One note at a time, keeps softer starts, and places each note where the pitch settles rather than on the breath. Keeps slides and vibrato as pitch bend, also in the free version. |
| Drums | A drum kit | Kick, snare, side stick, hi-hats (closed, pedal, open), toms, ride, crash, with velocity and hi-hat openness. MIDI channel 10. |
Which one?
- A single instrument playing chords: Polyphonic.
- A bass line, a lead, a horn, a whistle: Melodic.
- A singer on their own: Vocal.
- A drum loop or a kit stem: Drums.
- A finished song with everything in it: Full mix.
If the result looks wrong, try another mode: on the result screen press TRY ANOTHER ALGORITHM; in the editor click the mode key on the toolbar. Changing the mode reads the audio again, as long as you have not edited any notes yet. If you have, press Analyse to read it again in the new mode. Analyse replaces your note edits with a fresh reading.
The first time you use a mode it can take a little longer to start.
How to: a vocal line as MIDI
- Load the vocal on its own (a vocal stem, or a single recorded take). For a vocal inside a finished song, use Full mix: its Vocals instrument is the sung line.
- Choose Vocal. TONIQ switches the playback sound to Sine, so you hear the line plainly, and with Pro it turns VIBRATO (MIDI) on.
- Listen with the synth and the audio keys on the toolbar. Turn on the Pitch layer to see the sung pitch line through each note.
- Drag the MIDI to a track. The slides and vibrato are in the file as pitch bend, on the free version too. If the slides and vibrato sound too small or too wide, set your synth's pitch-bend range to match the file (section 7).
- Want flat notes with no slides or vibrato (for example for a pad)? With Pro, set VIBRATO (MIDI) to Off in the settings column.
- A note split in two where the singer held one? With Pro, select both and press G to merge them (section 5).
4. Reading the result ↑ Contents
The result screen
When TONIQ has read the audio, the start screen shows the result.
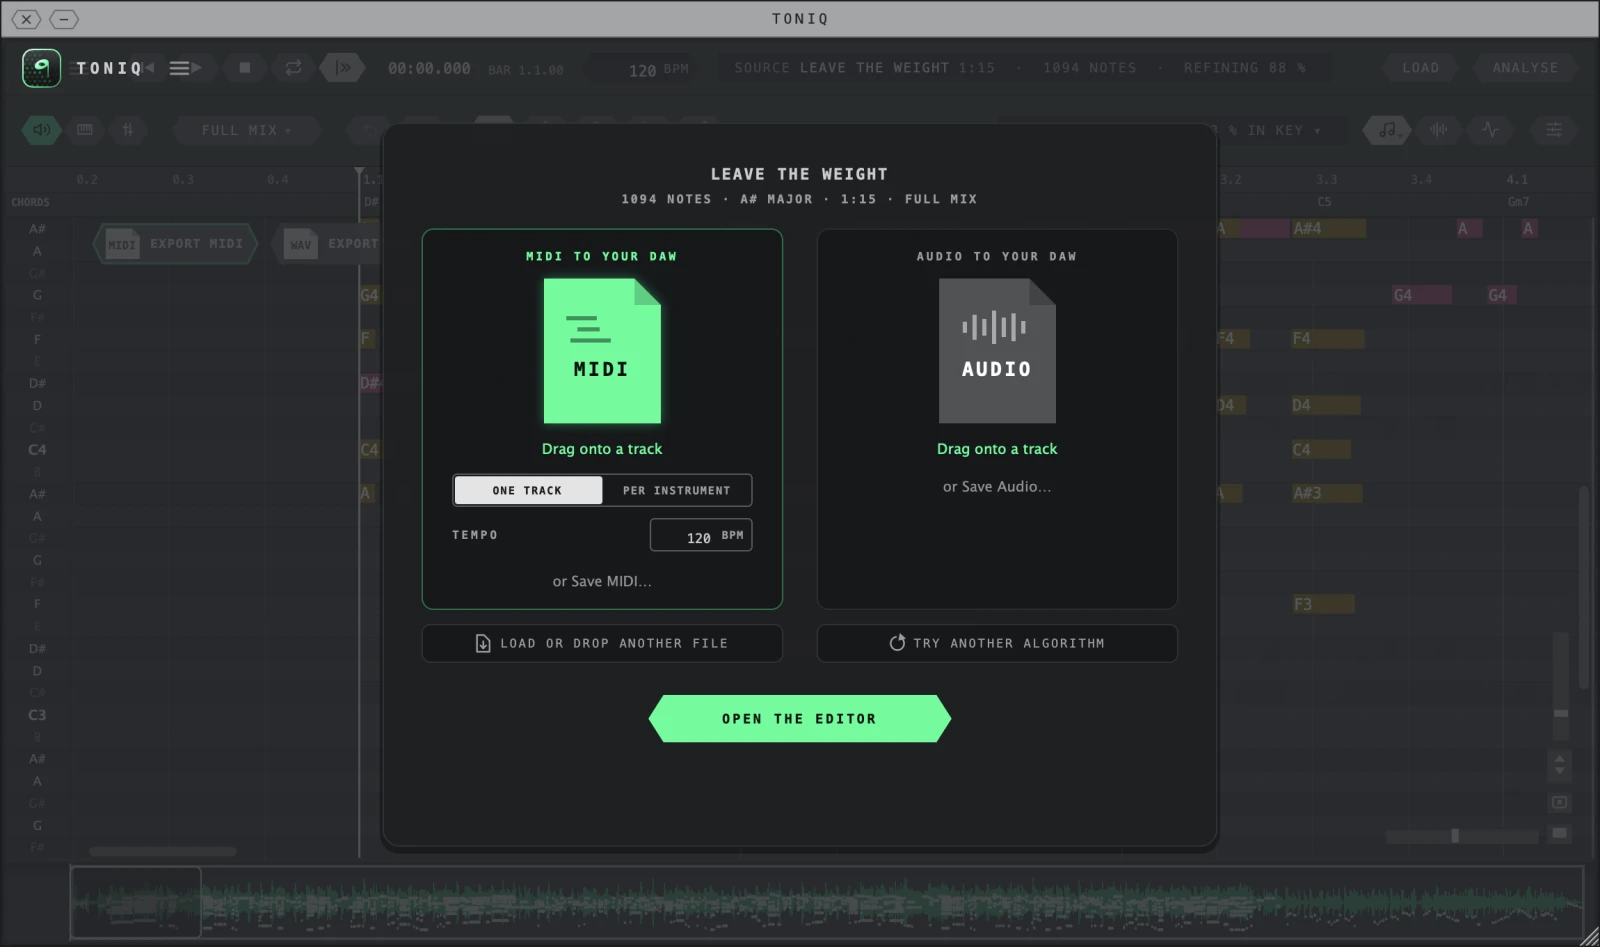
- Heading Notes, key, length and mode.
- MIDI TO YOUR DAW Drag the MIDI onto a track.
- ONE TRACK / PER INSTRUMENT Full mix: one MIDI track, or one per instrument (Pro).
- TEMPO A BPM box in the standalone; HOST or SET in a plug-in.
- or Save MIDI… Save a MIDI file.
- AUDIO TO YOUR DAW Pro: drag the take as audio, or Save Audio…
- LOAD OR DROP ANOTHER FILE Start again with another file (not under ARA).
- TRY ANOTHER ALGORITHM Read the audio again in another mode.
- OPEN THE EDITOR The piano roll.
While it reads, a bar fills and says what TONIQ is doing: "Reading the notes…", or for a Full mix "Separating the mix · reading the notes…". With Pro, the AUDIO badge then shows "Preparing each note's audio… N %".
When it is done:
- The heading: how many notes, the key, the length and the mode (for example "1094 NOTES · A# MAJOR · 1:15 · FULL MIX").
- MIDI TO YOUR DAW: drag onto a track, or Save MIDI… to save a file.
- AUDIO TO YOUR DAW (Pro): drag the take onto a track as audio, or Save Audio….
- ONE TRACK / PER INSTRUMENT (Full mix): one MIDI track, or one per instrument (Pro).
- TEMPO: the tempo the MIDI file is written at. In a plug-in, HOST follows your DAW and SET lets you type a tempo from 60 to 200 BPM. In the standalone app it is a BPM box. Set your DAW to the same tempo, so the notes land on its bars.
- LOAD OR DROP ANOTHER FILE, TRY ANOTHER ALGORITHM (read it again in another mode), and OPEN THE EDITOR: the piano roll, where you can look closely, listen and (with Pro) edit. Enter opens the editor too. Under ARA there is no LOAD OR DROP key: the clip is the source. On the free version, the line under OPEN THE EDITOR says "View, listen, export — free for good. Editing is Pro."
In a Full mix, the MIDI is ready to drag when the progress bar is full.
If TONIQ found nothing, the screen says No notes found, with "CLICK TO TRY ANOTHER ALGORITHM, OR DROP ANOTHER FILE". Other messages here: "The read stopped" (the reading was cancelled; load the file again), "The read failed" (see section 10), and under ARA "No notes in this clip".
To get back to this screen from the editor: ≡ menu, Simple view.
The toolbar
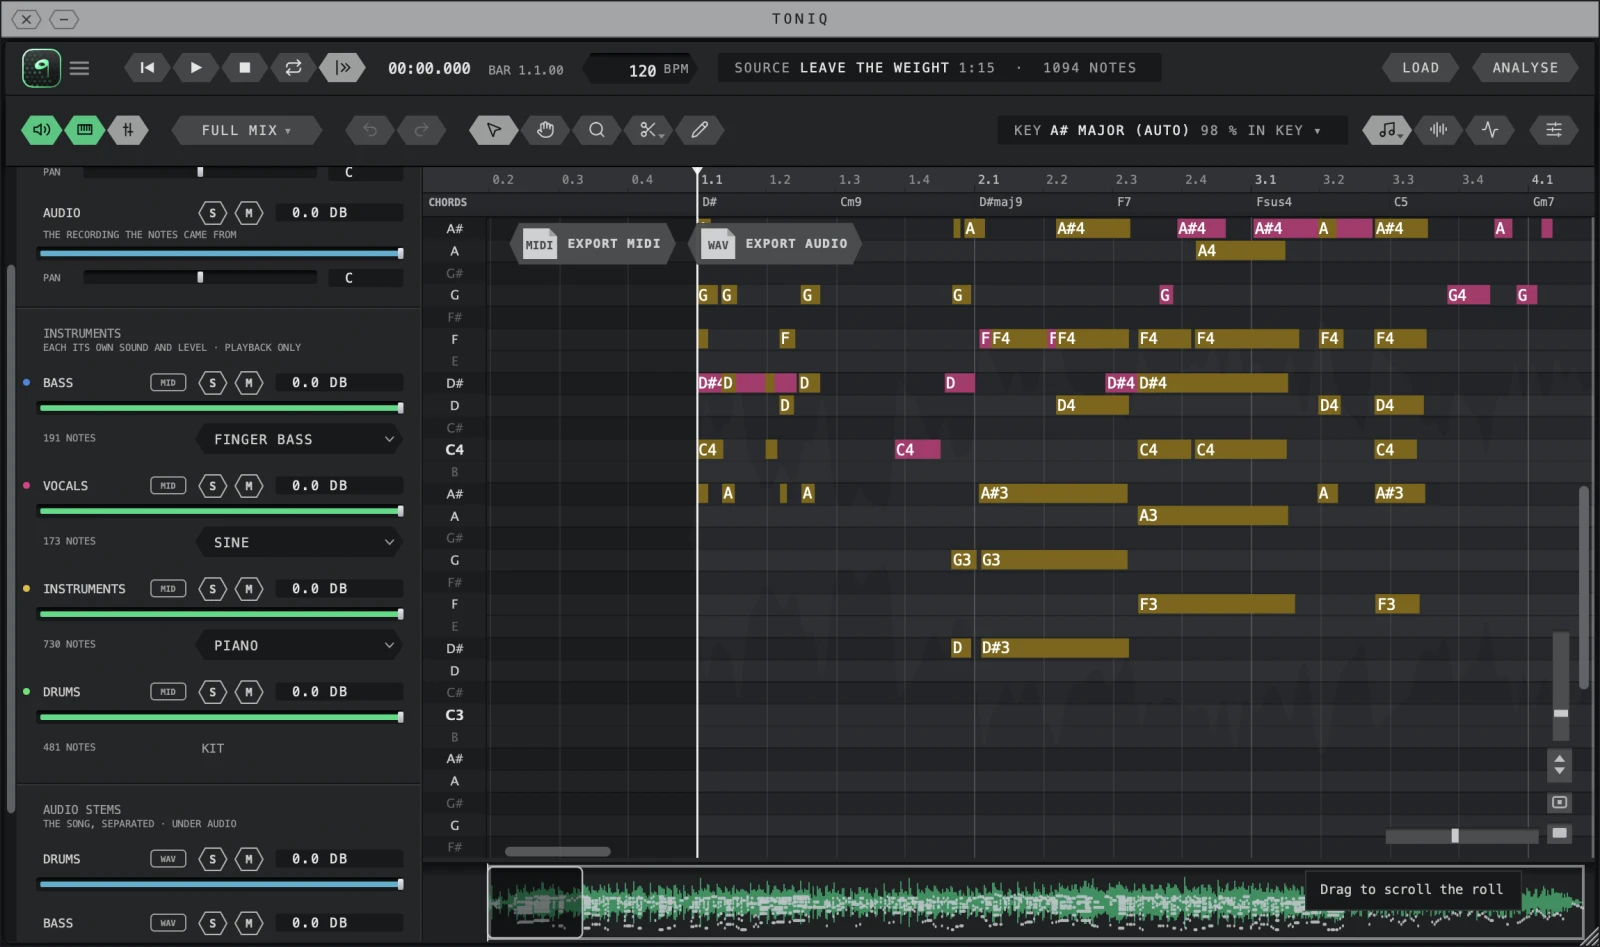
- ≡ menu Size, brightness, theme, note colours, licence.
- Transport Back to the start, play, stop, loop (standalone; in a DAW use its transport).
- Follow The roll follows the playhead. Off: the view stays where you put it.
- Clock Time and bar of the playhead.
- Tempo The tempo the grid uses.
- Source The file or clip, its length and the note count.
- LOAD Load another file.
- ANALYSE Read the audio again.
- Audio Hear the original recording on or off.
- Synth Hear the notes on or off.
- Mix (⌗) Opens the mix column (left).
- Mode What the audio is (section 3). Click to change.
- Undo / Redo ⌘Z / ⇧⌘Z.
- Tools Select, Hand, Zoom, Cut/Glue, Pencil (section 5).
- KEY The key TONIQ found, and Correct pitch…
- Layers Notes, spectrogram, pitch line.
- Settings Opens the settings column.
- Chords The chord under each beat.
- EXPORT MIDI Drag the MIDI to your DAW, or click to export.
- EXPORT AUDIO Drag the edited take, or click to export (Pro).
- MONITOR What you hear: the synth and the recording, each with S, M, level and pan.
- INSTRUMENTS Each instrument: MID tag to drag it, S, M, level, note count, sound.
- AUDIO STEMS The song separated: WAV tag to drag it, S, M, level.
- Keyboard Click a key to hear it and select that row.
- Overview The whole take. Drag to scroll, drag its edges to zoom.
- Zoom and fit Pitch zoom, fit the take, overview on/off.
From the left:
- ≡ menu: size, brightness, theme, note colours, licence (see The ≡ menu below).
- Transport: back to the start, play, stop, loop. In a plug-in, the play key starts your DAW's transport.
- Follow: the roll follows the playhead. Off: the view stays where you put it.
- Clock: the time and bar of the playhead.
- Tempo: the tempo the grid and the MIDI use. Click it to choose Follow the host's tempo or Set the tempo here.
- Source: the file or clip, its length and the note count. It also says what is going on, for example "captured 0:42 · ready to analyse", "refining N %" (a Full mix improving its separation after the first pass), "buffer full" (Capture is full), or "● edited audio" (you are hearing your audio edits). Under ARA, click it for a list of the clip's regions and why any were left out ("outside the analysed range", "percussive, not transcribed", "analysis found nothing").
- LOAD and ANALYSE (read the audio again; it replaces your edits).
- Audio and Synth keys (a speaker and a keyboard icon): hear the original recording and the transcription on or off.
- Mix (⌗): opens the mix column (see Listening).
- Mode: what the audio is (section 3). Click to change.
- Undo / Redo.
- Tools: Select, Hand, Zoom, Cut/Glue, Pencil (section 5).
- KEY: the key TONIQ found, and Correct pitch… (see Key and chords).
- Layers: Notes, Spectrogram, Pitch.
- Settings (right end): opens the settings column.
- The licence chip shows your state: "Trial 12 days", "Free · try Pro free" or "Free · unlock editing". When a new version is out, an UPDATE chip appears (section 9).
The piano roll
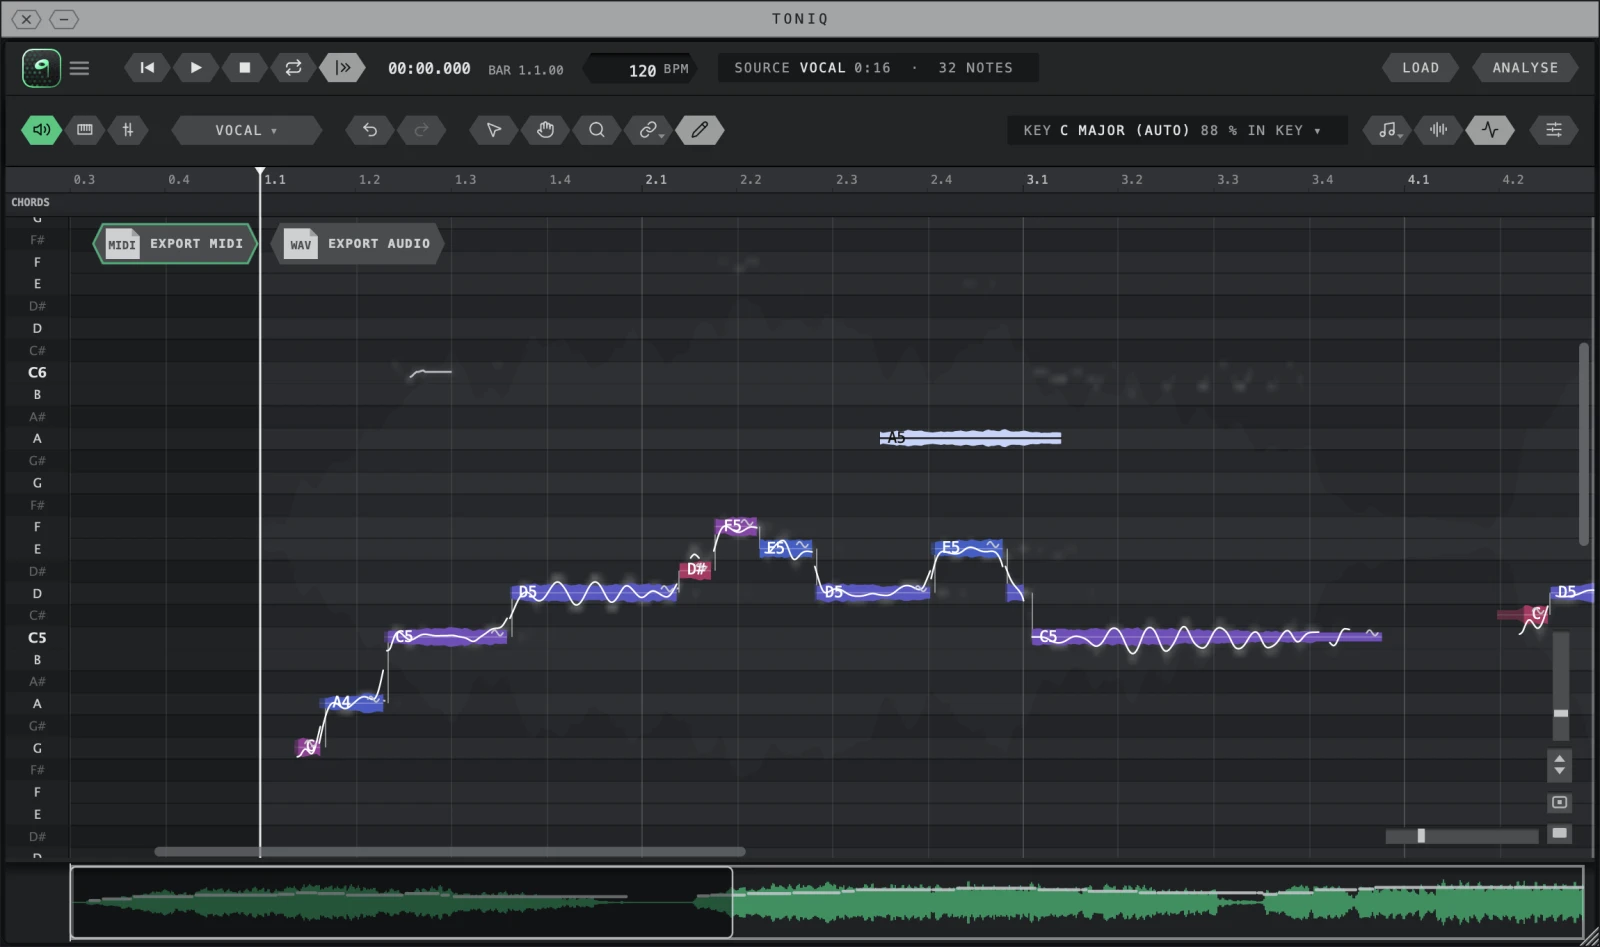
- Notes are drawn over a keyboard on the left. Hover a note to see its name, start time and length.
- Click a note to hear it. Click a key on the keyboard to hear that pitch and select every note in its row (Shift adds the row).
- The CHORDS lane under the ruler names the chords bar by bar.
- The overview under the roll shows the whole take; drag it to scroll, drag its edges to zoom. Turn it on with the overview key.
Moving around
- Scroll: two-finger swipe or mouse wheel. Up/down moves in pitch, sideways (or Shift + wheel) moves in time.
- Zoom: ⌘ / Ctrl + wheel. The zoom sliders change pitch and time zoom; double-click either to fit the take; the fit key shows the whole take.
- The Zoom tool (Z): click to zoom in, Option/Alt-click to zoom out, drag to zoom.
- The Hand tool (H): drag to pan.
The ruler
- Click to move the playhead.
- Drag to loop a section (standalone app and ARA); drag an edge to change it; double-click to clear it (or right-click, Clear loop).
Layers
Three keys on the toolbar choose what is drawn:
- Notes: notes on the plain grid. Hold the key to choose the note view: MIDI notes (plain bars) or Waveform notes (each note drawn from its audio). A Melodic or Vocal take opens with waveform notes.
- Spectrogram: the audio under the notes, showing slides, vibrato and harmonics.
- Pitch: the line the recording sings, drawn through each note. Faint where there is pitch but no note.
Spectrogram and Pitch can be on together.
Listening
- Two keys on the toolbar switch what you hear: the synth (keyboard icon: the transcription) and the audio (speaker icon: the original recording). Turn one off to hear the other alone.
- The Mix key (⌗) opens the mix column. It has three parts:
- MONITOR: what you hear while you work. An INSTRUMENTS row (the synth) and an AUDIO row (the recording), each with solo (S), mute (M), level and pan.
- INSTRUMENTS: each instrument with its own sound and level, for playback only. Each row shows a MID tag, S, M, level, its note count and a sound menu.
- AUDIO STEMS (Full mix): the song separated, under the audio. Each row has a WAV tag, S, M and level.
- MID and WAV tags are dragged, not clicked: drag one onto a track in your DAW. A click only shows a hint.
- Option/Alt-click S or M to solo or mute every row; ⌘/Ctrl-click S to solo that row alone.
- Sounds: Piano, Electric piano, Guitar, Electric guitar, Synth, Strings, Sine; for bass, Finger bass, Sub / 808 and Synth bass. Drums always play a kit.
- In a Full mix, the instrument rows are the instruments TONIQ found in that song (for example Bass, Vocals, Drums, and an Instruments row for the rest). Solo and mute here are for listening; they are not saved, and the MIDI export keeps muted instruments.
- Space plays and stops in the standalone app. In a plug-in, use your DAW's transport.
Key and chords
The Key readout on the toolbar shows the key TONIQ found. Click it for:
- Correct pitch… (Pro, see section 6)
- Auto Key: follow the notes
- Key: choose the root yourself
- Scale: choose the scale
- Custom notes: tick your own set of notes
- Show notes out of key: in Grey note colours, notes outside the key turn blue. The default Scale colours already show them in pink.
Everything in TONIQ that uses a key reads this one.
Settings
The settings key (right end of the toolbar) opens the settings column.
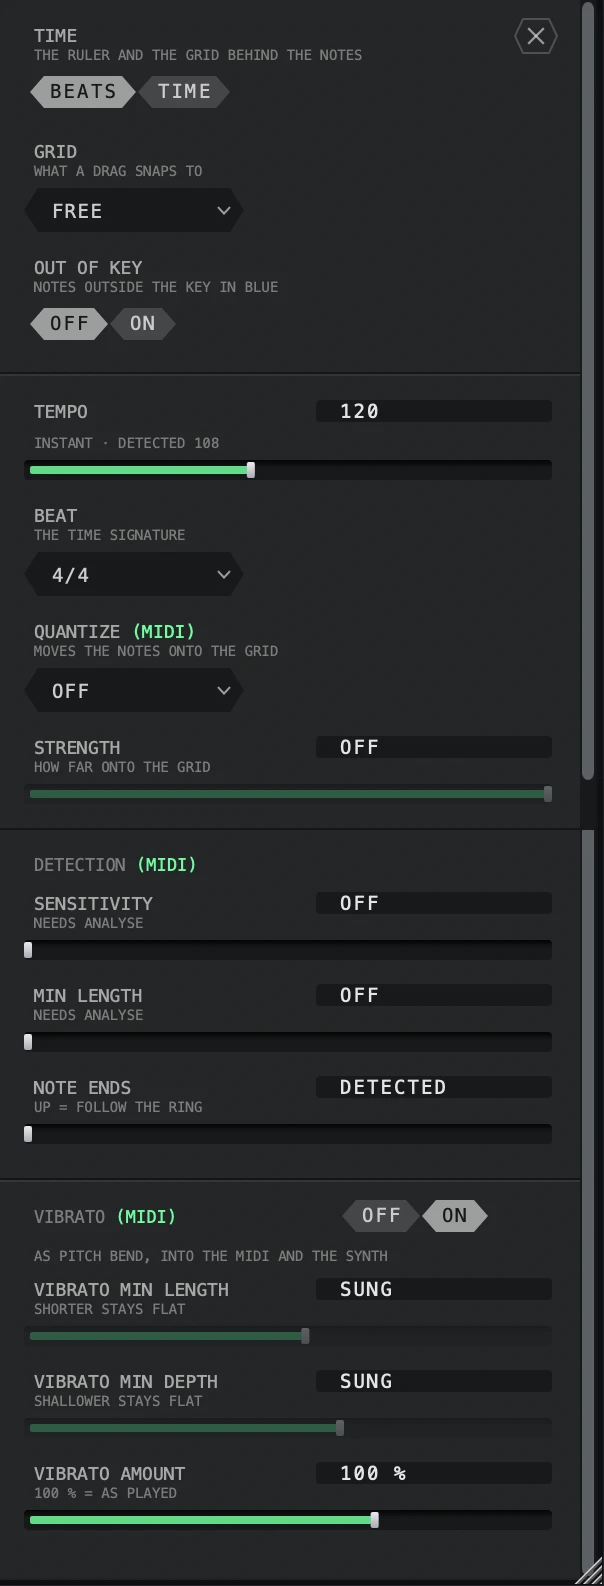
- TIME Beats or minutes:seconds
- GRID What a drag snaps to
- OUT OF KEY Notes outside the key in blue
- TEMPO Tempo, and the one detected
- BEAT Time signature
- QUANTIZE (MIDI) Pro: grid for the MIDI
- STRENGTH How far onto the grid
- DETECTION (MIDI) Pro
- SENSITIVITY Drops quiet notes
- MIN LENGTH Drops short notes
- NOTE ENDS Detected, or let notes ring
- VIBRATO (MIDI) Pro: slides and vibrato as pitch bend
- VIBRATO MIN LENGTH Shorter stays flat
- VIBRATO MIN DEPTH Shallower stays flat
- VIBRATO AMOUNT 100 % = as played
From the top:
- TIME: the ruler in Beats or Time (minutes and seconds). It changes the display, nothing else.
- GRID: what a drag snaps to (Free for none). It moves nothing by itself.
- OUT OF KEY: On draws notes outside the key in blue, in Grey note colours. Scale colours already show them in pink.
- TEMPO: in a plug-in, Host follows the DAW ("FOLLOWING THE HOST") and Manual sets it with the fader. In the standalone app it is a number and a fader; the line under it shows the tempo TONIQ detected in the audio.
- BEAT: the time signature. In a DAW, the DAW's own signature is used.
- QUANTIZE (MIDI), DETECTION (MIDI), VIBRATO (MIDI): Pro, see section 6.
- GHOSTS (Drums mode only): On also keeps soft hits, giving more ghost notes and a few that are not really there. Off keeps the hits TONIQ is sure of. Free. Not shown in other modes.
The ≡ menu (top left)
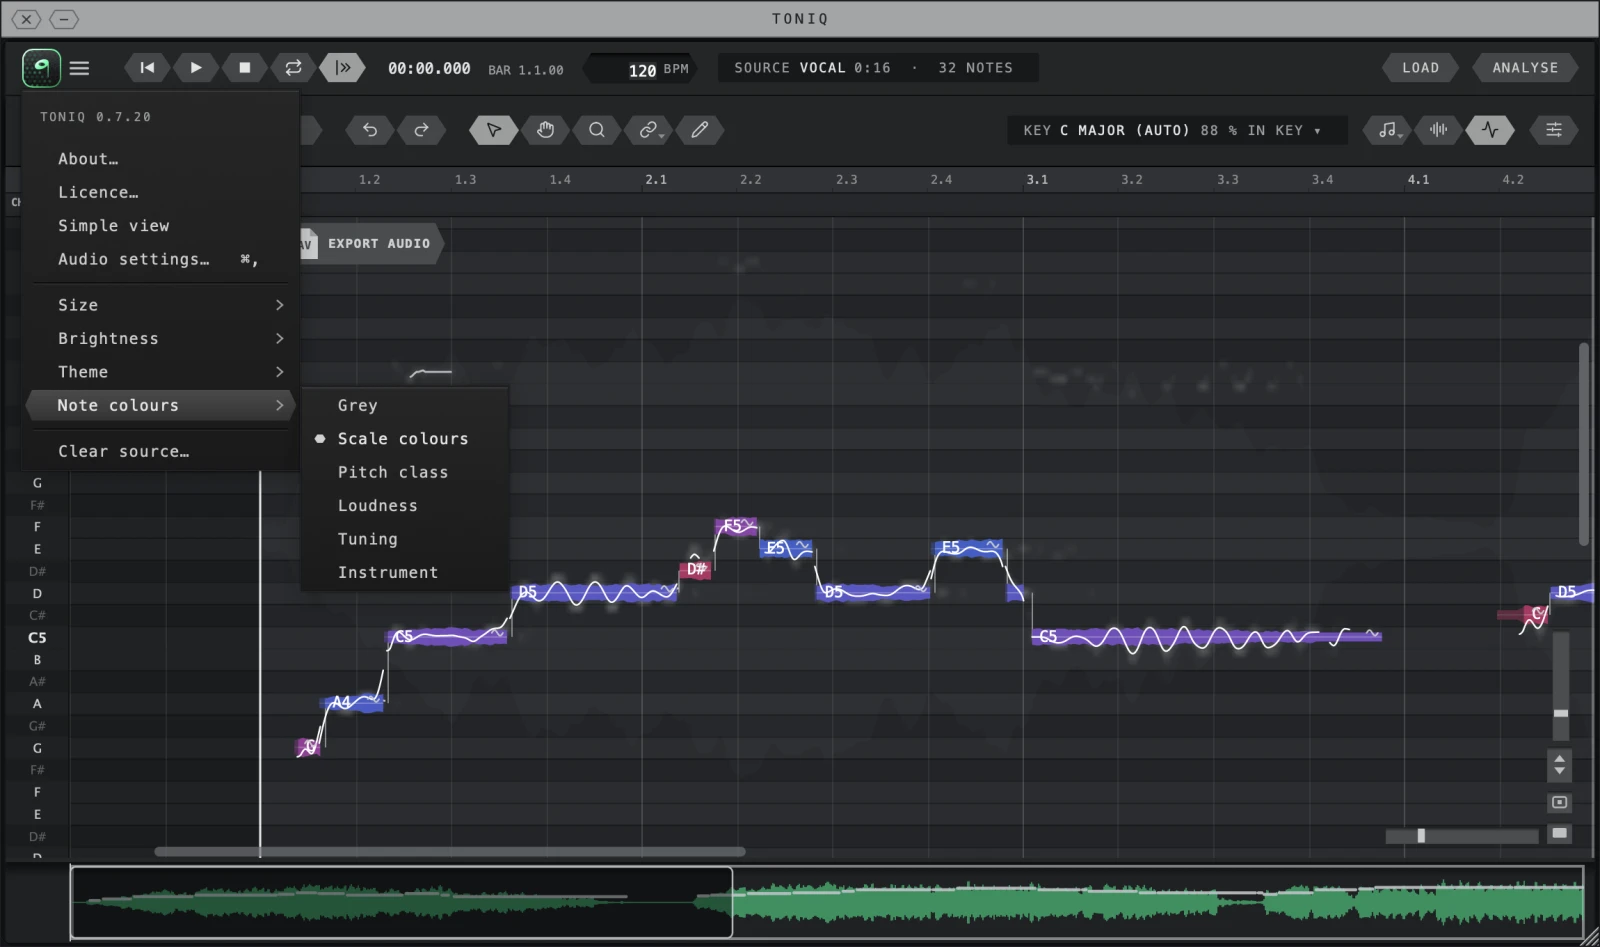
- Version Tell us this number when you write.
- Simple view Back to the result screen.
- Audio settings… Standalone only (⌘,).
- Size, Brightness, Theme How the window looks.
- Note colours Opens the six colour choices.
- Clear source… Not under ARA: start over.
- The six choices The dot marks the current one.
| Item | What it does |
|---|---|
| TONIQ 0.7.x | The version you are running. Tell us this number when you write to us. |
| About… | The About card: version, your licence (with Manage), updates (section 9), Manual, Support, and credits. |
| Try Pro free… / Activate… / Licence… | The licence card: sign-in, trial, Pro key (section 1). The name depends on your state. |
| Simple view | Back to the result screen (section 4). |
| Audio settings… | Standalone app only (⌘, ; Windows Ctrl+P): the audio output. |
| Size | 75 %, 100 %, 125 % or 150 %. The top line says what the window is drawn at now. If the DAW keeps the window small, the size you asked for says "(window too small)". |
| Brightness | The panel's brightness, from −20 % to +20 %. |
| Theme | Follow macOS (Windows: Follow system), Dark or Light. Remembered on this computer, for every copy of TONIQ. |
| Note colours | How the notes on the roll are coloured. See below. |
| Clear source… | Forget the loaded or captured audio and start over. Not under ARA, where the clip is the source. |
The standalone app's menus
The standalone app also has a menu bar: at the top of the screen on a Mac, at the top of the window on Windows.
| Menu | Items |
|---|---|
| TONIQ (Mac app menu) | About TONIQ, the licence item (Try Pro free… / Activate… / Licence…), Preferences… (⌘,: the audio settings) |
| File | Load… (⌘O), Analyse (⌘R), Export MIDI… (⌘E), Export Audio…, Clear Source… |
| Edit | Undo (⌘Z), Redo (⇧⌘Z), Select All (⌘A), Delete, Correct Pitch… |
| Algorithm | The five modes: Polyphonic, Full mix, Melodic, Vocal, Drums |
Note colours
Colours only change how the roll looks. They never change the notes, the sound or the MIDI.

| Choice | What the colour tells you |
|---|---|
| Grey | Nothing: every note grey. The quietest look. |
| Scale colours (the default) | The note's place in the key. Notes in the key are shades of violet, the key's root note the deepest. A note outside the key is hot pink. Until TONIQ knows the key, notes are coloured by name, as in Pitch class. |
| Pitch class | The note's name: every C one colour, every C♯ the next, around the colour wheel. Useful for seeing chord shapes and repeated notes. |
| Loudness | How hard the note was played, against the take's own quietest and loudest: blue and dim for soft, bright orange for loud. |
| Tuning | How close the sung or played pitch is to the note: green within 10 cents (the brighter, the closer), amber 10 to 30 cents off, red more than 30 cents off. Grey where TONIQ could not measure it. Made for Correct Pitch: correct a note and watch it turn green. (A cent is a hundredth of a semitone.) |
| Instrument | Full mix: which instrument track the note goes to. Bass blue, Vocals pink, Guitar orange, Keys violet, Strings lime, Brass & Winds red, Synth teal, and amber for the Instruments row (everything else). The same colours mark the rows in the mix column. A Full mix opens in this view. In other modes it looks like Scale colours. |
Selected notes are drawn in a colour each scheme leaves free (for example amber in Scale colours), never with an outline.
5. Editing notes (Pro) ↑ Contents
On the free version you can select notes, listen and export. Changing a note opens the "Editing notes is Pro" card.
Tools
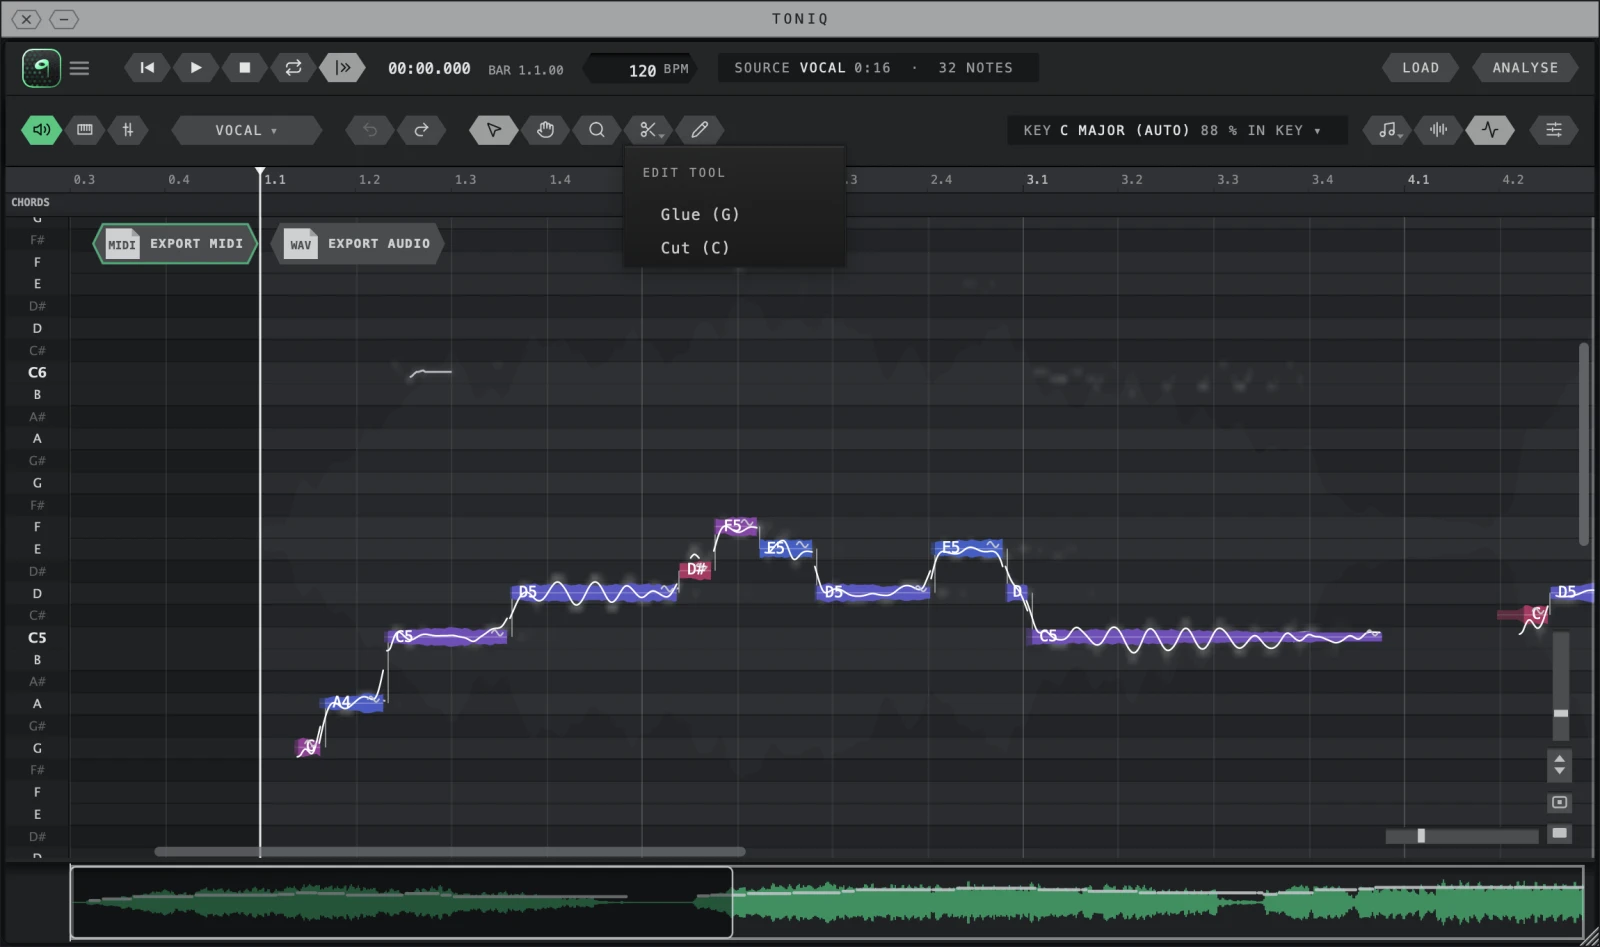
- Select (V) Select, move, stretch.
- Hand (H) Move the view.
- Zoom (Z) Click in, Option-click out.
- Cut / Glue Hold for the EDIT TOOL menu.
- EDIT TOOL menu Glue (G) or Cut (C).
- Pencil (P) Draw MIDI-only notes.
| Tool | Key | What it does |
|---|---|---|
| Select | V | Click a note to select it; drag empty grid to select a box; drag a note to move it; drag its edge to change its length. |
| Hand | H | Drag to move the view. |
| Zoom | Z | Click to zoom in, Option/Alt-click to zoom out, drag to zoom. |
| Glue | G | Drag a box around two or more notes to join them into one. |
| Cut | C | Click a note to cut it there. A line shows where the cut will land. Hold ⌘/Ctrl to cut without snapping. |
| Pencil | P | Click empty grid to draw a note; drag to set its length. Hold ⌘/Ctrl to draw without snapping; Esc cancels a stroke. |
Glue and Cut share one toolbar key. Hold it for the EDIT TOOL menu and choose Glue (G) or Cut (C). With Glue chosen, the key shows a chain link.
Hold to borrow a tool. Hold a tool key, use the tool, and let go: TONIQ goes back to the tool you had. A quick tap switches tools for good.
Selecting
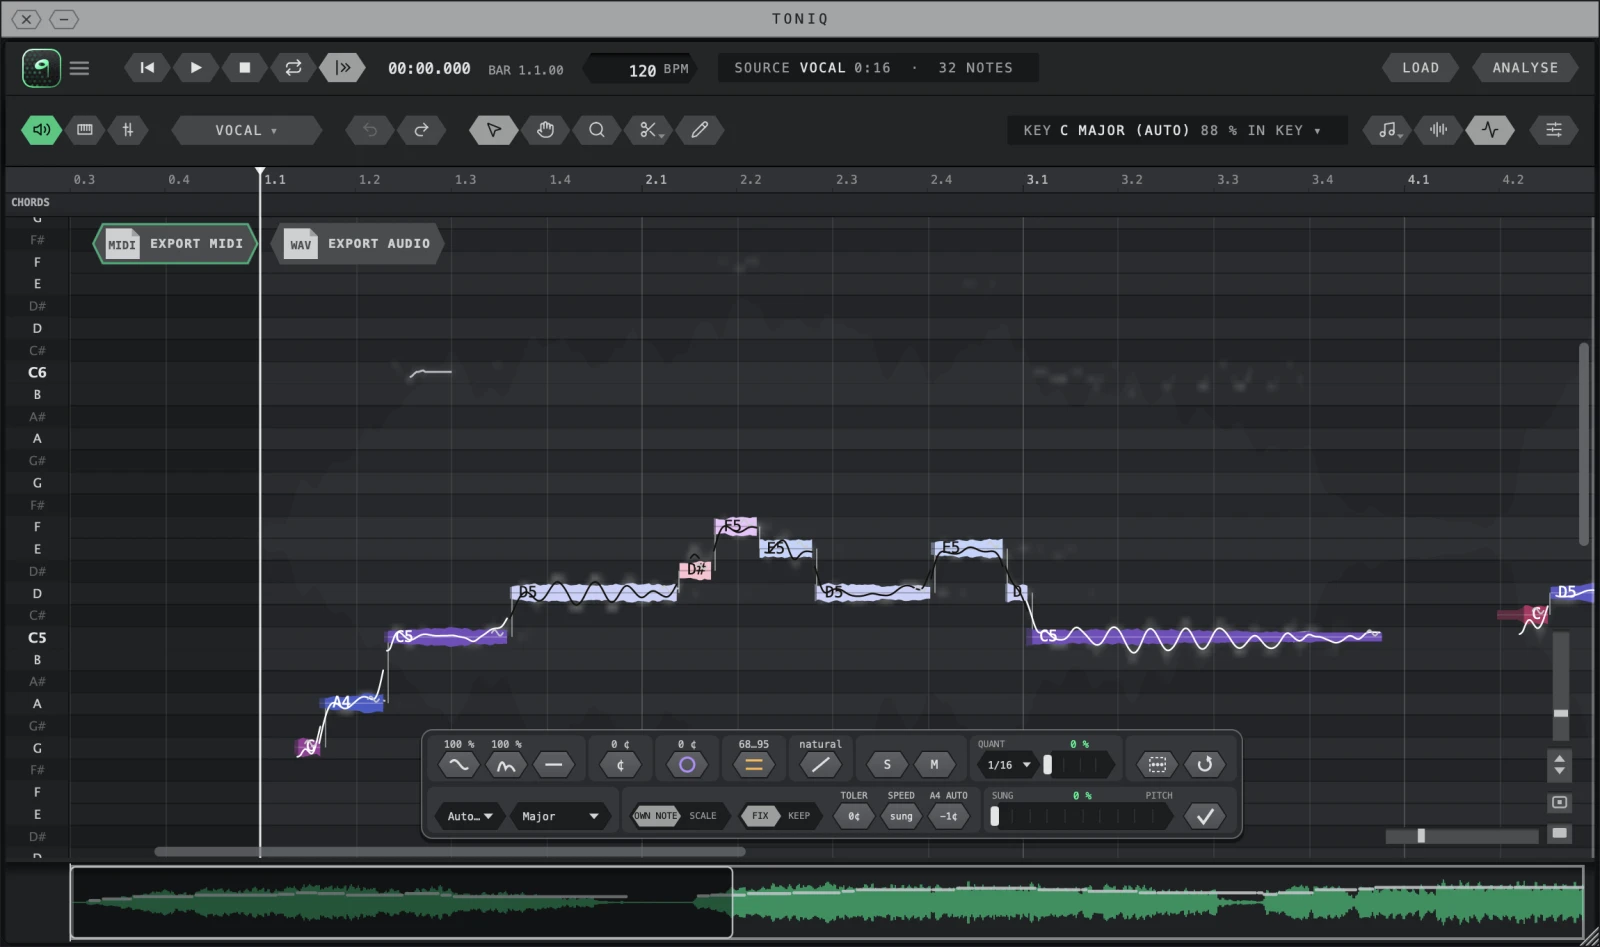
- Click a note. Shift-click adds a note, or removes a selected one.
- Drag on empty grid for a box. Shift-drag adds to the selection.
- ⌘A / Ctrl+A selects all. Esc clears the selection.
- Click a key on the keyboard to select every note of that pitch.
Moving and changing notes
- Drag a note to move it. It moves in pitch first, and starts moving in time once you clearly drag sideways.

- Shift-drag moves in pitch and leaves the timing alone.
- ⌘ / Ctrl-drag turns snapping off: free timing, and pitch in cents.
- Option / Alt-drag moves a copy.
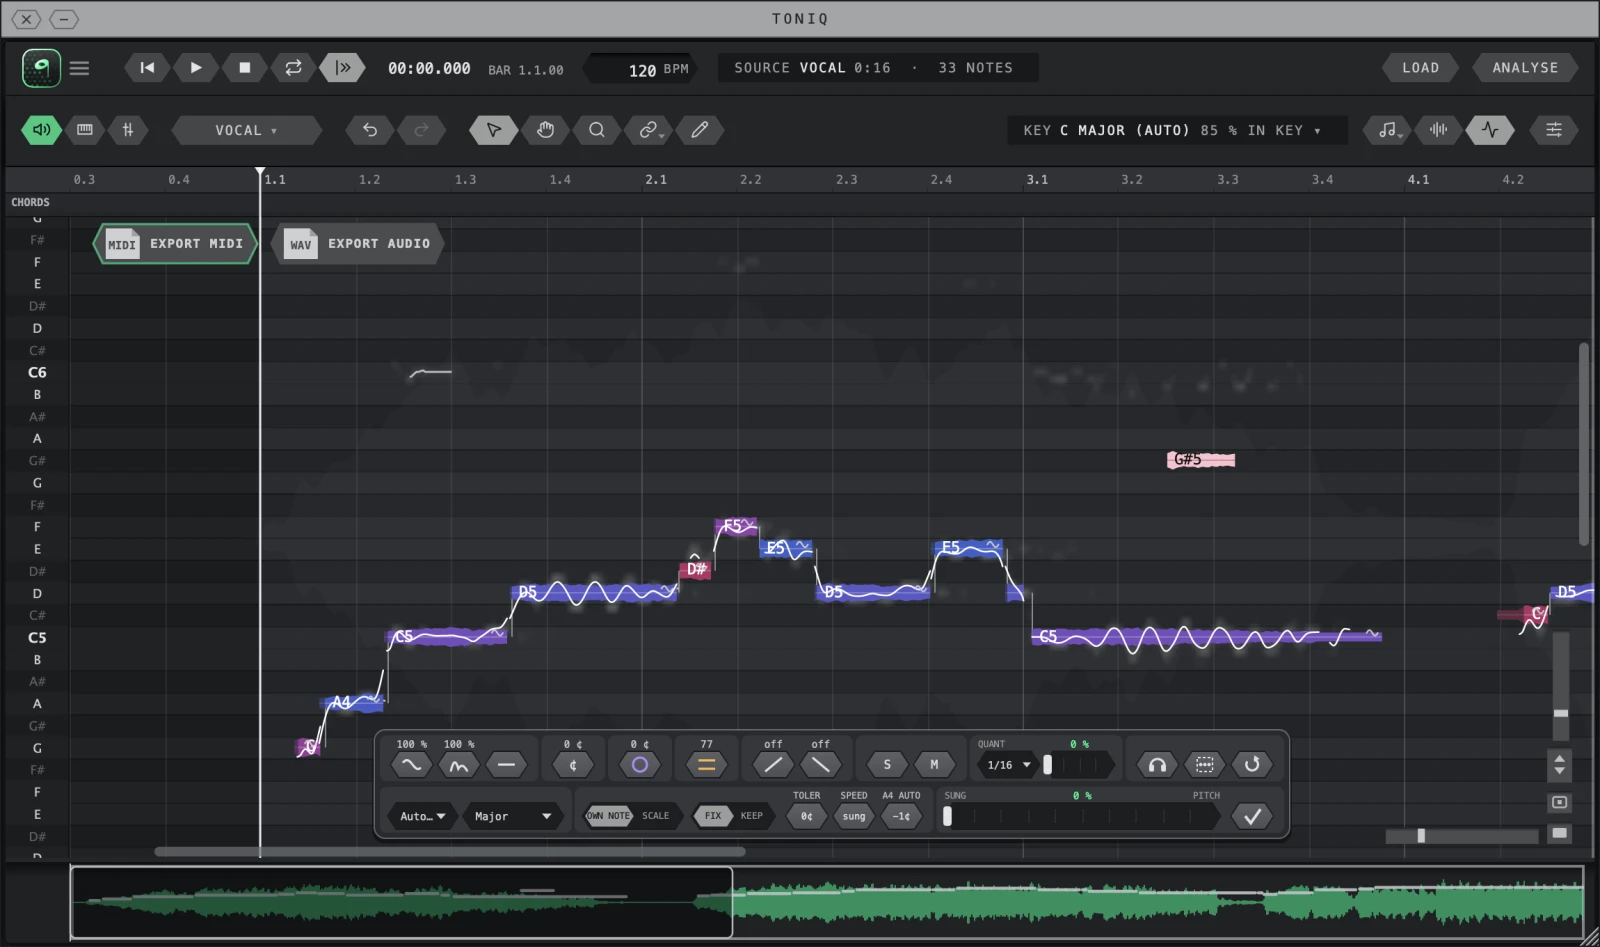
- Drag an edge to change the start or the end. Where two notes are joined, the edge between them is a join handle instead (a small green square showing a time in ms): dragging it sets how slowly one note slides into the next. Change a length at a free end.
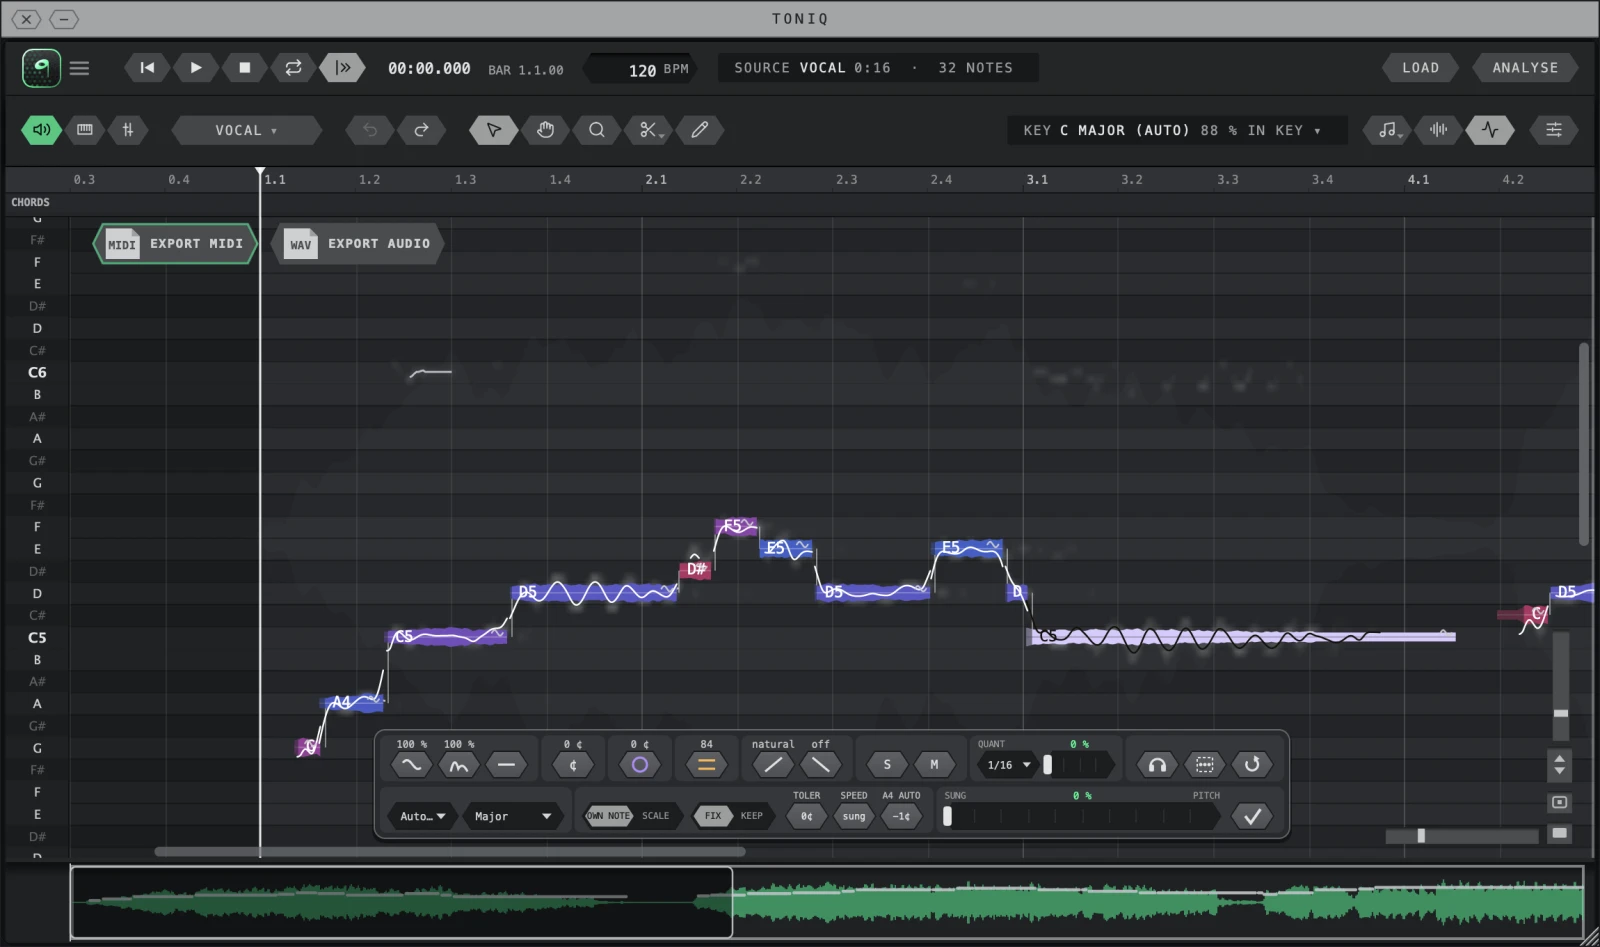
- Cut a note in two with the Cut tool (C), or glue notes into one with the Glue tool (G).


- Draw a note with the Pencil (P).
- ↑ / ↓: one semitone. Shift + ↑ / ↓: one octave.
- ← / →: one grid step earlier or later.
- Option / Alt + ↑ / ↓: fine pitch, 5 cents a press (1 cent with Shift too).
- Q: snap the selected notes onto the edit grid.
- Delete / Backspace: delete the selection.
Notes you draw with the Pencil are pure MIDI: they have no audio of their own, and the key readout ignores them.
The right-click menu
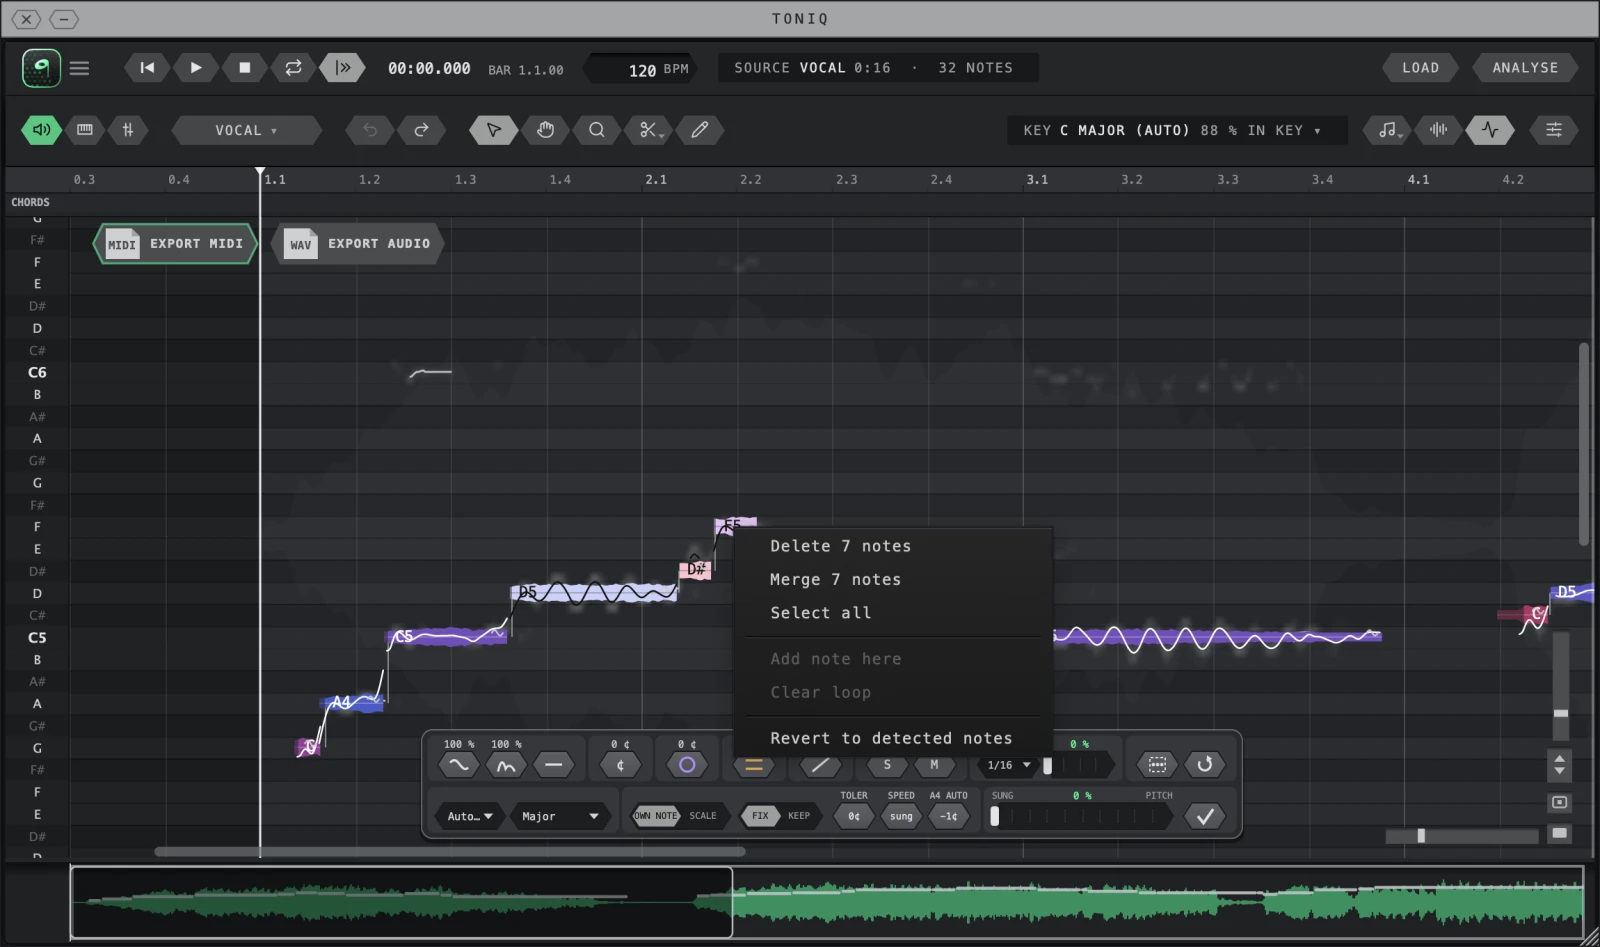
Right-click on the roll:
- Delete N notes
- Merge N notes (two or more selected)
- Select all
- Add note here (on empty grid: a note one grid step long, at that pitch)
- Clear loop
- Revert to detected notes: throws away your edits and goes back to what TONIQ found
Undo, redo, revert
- Undo: ⌘Z / Ctrl+Z, or the undo key on the toolbar.
- Redo: ⇧⌘Z / Ctrl+Shift+Z, or ⌘Y / Ctrl+Y, or the redo key.
- Back to the start: right-click, Revert to detected notes.
- One note or a selection back to how it was detected: Reset on the note panel.
The note panel
Select notes with the Select tool and a panel opens at the bottom of the roll. Drag it anywhere. It moves out of the way when it would cover the note it is editing. Its controls change the notes you selected; with several notes selected, each drag moves every one by the same amount.
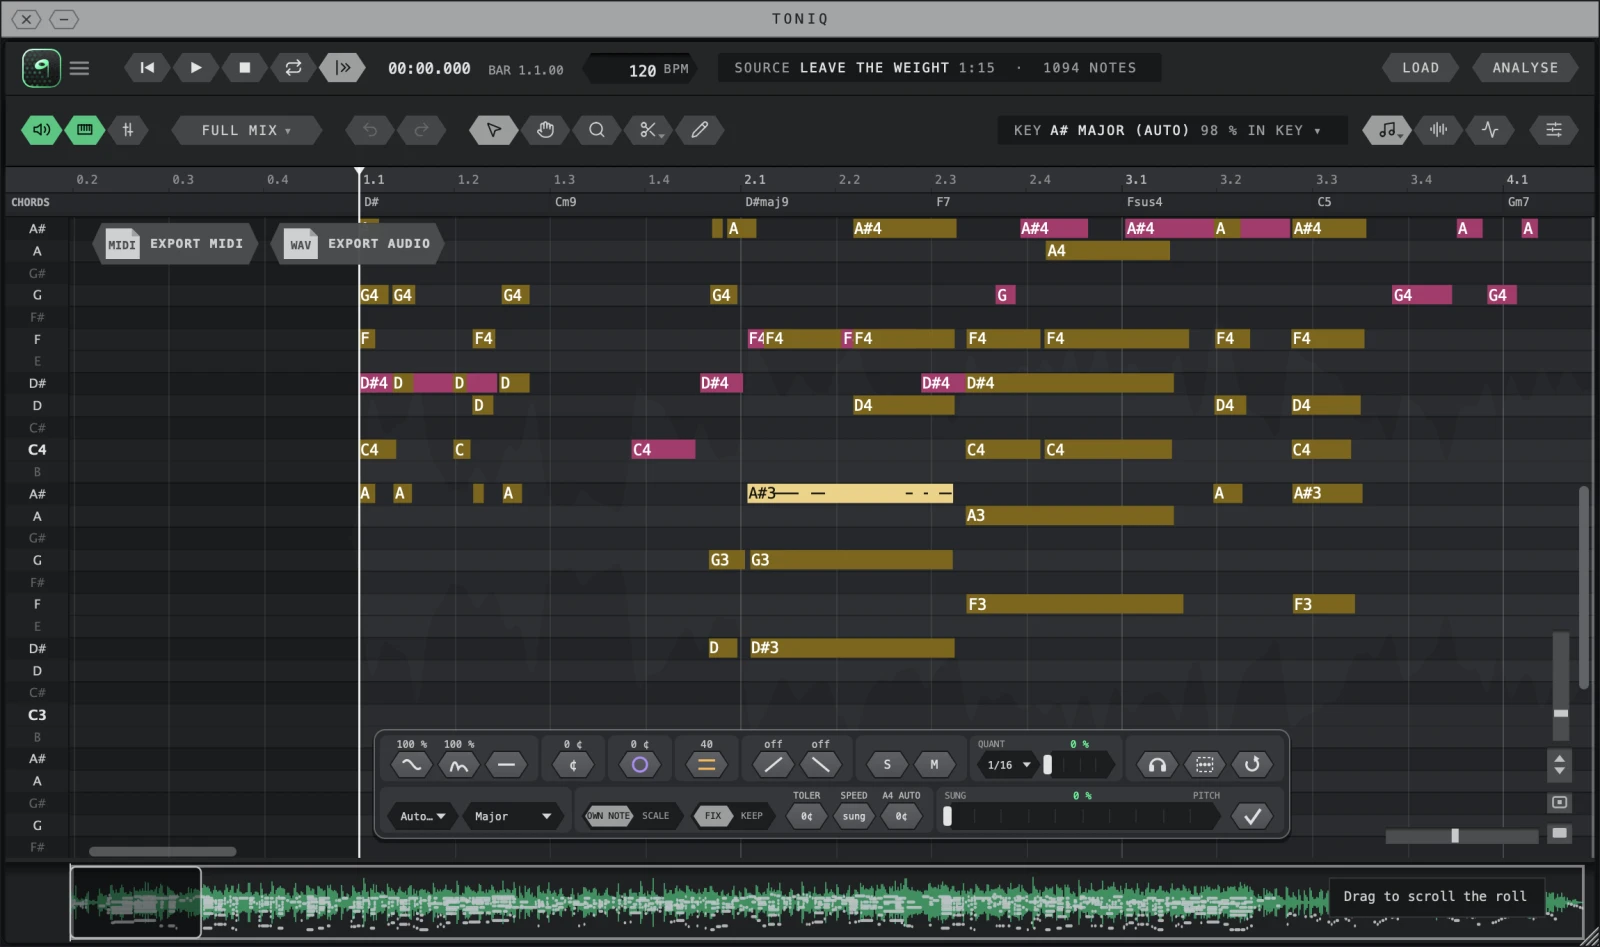
- A selected note Selected notes change colour; the panel acts on them.
- Drift and Vibrato Hover for the name. Drag up or down.
- Straighten Removes drift and vibrato.
- Fine pitch In cents.
- Formant Darker or brighter.
- Level The note's volume.
- Scoop in / Fall off Or the slide between joined notes.
- S / M Solo, mute the selection (listening only).
- QUANT Grid and strength for the selection.
- Listen, Select, Reset Hear, select all, back to as detected.
- Key and scale What Correct Pitch corrects to.
- OWN NOTE / SCALE Each note to its own pitch, or into the scale.
- FIX / KEEP Correct every note, or leave intended slides.
- TOLER, SPEED, A4 Tolerance, slide speed, reference pitch.
- SUNG … PITCH How far: as sung to exactly on pitch.
- ✓ Correct fully.
The controls show their value, not their name: hover over one to see what it is. The top row, from the left:
| On the panel | Control | What it does |
|---|---|---|
| two % figures | Drift and Vibrato | Drift is the slow pitch movement (the wander, the scoop in): drag down to hold the note steady. Vibrato: drag up to deepen it (up to 1000 %), down to flatten it. Both go below 0, which turns the movement upside down. A third control, Straighten, removes both. |
| two ¢ figures | Fine pitch and Formant | Fine pitch in cents. Formant (the tone colour of a voice or instrument): down sounds bigger and darker, up smaller and brighter. |
| a number | Level | The note's volume. |
| off or natural | Scoop in and Fall off | off on a free note end, natural where the note is joined to the next. Drag up for a longer scoop or fall, sideways for its depth; the control then shows its length and depth (for example "290ms", "+100"). |
| S / M | Solo / Mute | Hear the selection alone, or take it out. A listening aid: not saved, no undo, never in an export. Standalone and ARA. Right-click S or M to clear every solo or mute. |
| QUANT with a grid and a % | Quantize | Moves the selected notes, and their audio, onto the grid. Click the grid for its menu (1/4, 1/8, 1/16, 1/32 and triplets); Shift-drag the % for fine steps. |
| three icons | Listen, Select, Reset | Hear the note, select all, reset to what was detected. |


The second row holds the Correct Pitch controls (section 6).
Option/Alt-click a fader to send it back to its start.
Solo (S) and Mute (M) work in the standalone app and under ARA, on the free version too. On a plain insert track (Capture or drag-and-drop) the DAW's own solo and mute do the job, so TONIQ leaves S and M to the DAW.
How to: fix notes that came out an octave off
- Make wrong octaves easy to spot: hold the Notes key and choose Waveform notes, or turn on the Pitch layer. A note an octave off sits far from the pitch line.
- Select the wrong notes: click the first one, Shift-click the others. To take every note of one pitch, click that key on the keyboard.
- Press Shift + ↓ to move them down an octave, or Shift + ↑ to move them up.
- Click a note to hear it against the audio. ⌘Z / Ctrl+Z undoes the move.
If many notes are off, the mode may be wrong: Melodic or Vocal for a single line, Polyphonic for chords (section 3). On the free version, try another mode, or move the notes in your DAW after exporting.
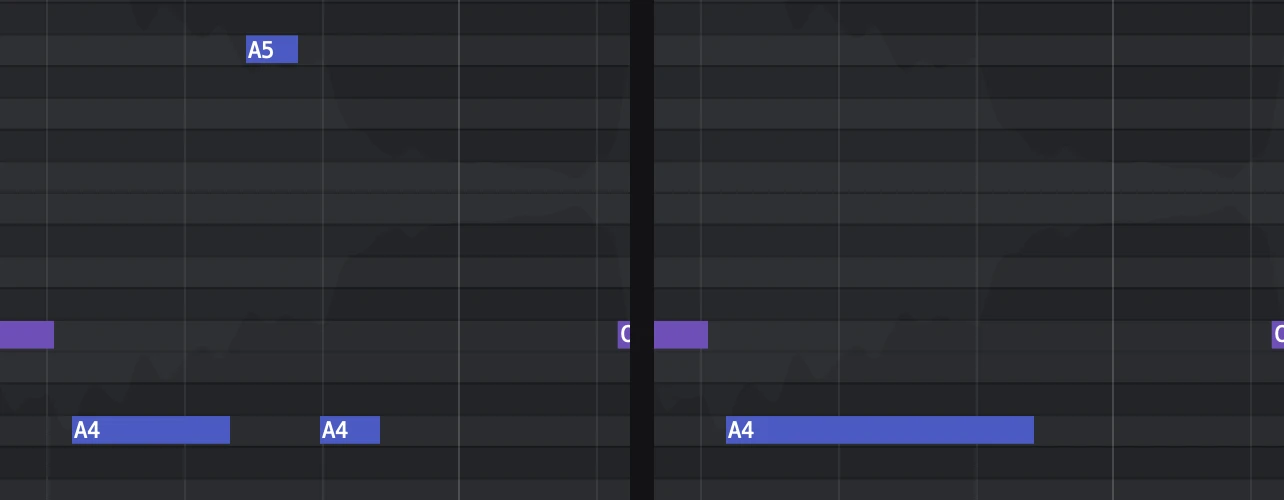
How to: join fragments of one sustained note that came out in two octaves
Sometimes a long held note comes out as several short notes, jumping between the right octave and the one above or below it. To make it one note again:
- Pick the Select tool (V).
- Click the first fragment, then Shift-click each of the others. Pick the fragments themselves: if you use a box, check that no other notes are caught in it.
- Press G, or right-click and choose Merge N notes.
The fragments become one note that runs from the start of the first to the end of the last. It takes the pitch of the longest fragment. (If two are the same length, the earlier one wins. A fragment that came from the recording wins over one you drew or copied.)
The merged note stays selected. If it landed in the wrong octave, press Shift + ↓ to move it down an octave, or Shift + ↑ to move it up. ⌘Z / Ctrl+Z undoes the merge.
You can also use the Glue tool: press G with nothing selected (or hold G), and drag a box across the fragments. Everything the box touches is joined, so keep the box tight.
6. Pro features ↑ Contents
Each of these is in the same app. On the free version the control is visible, dimmed or marked PRO, and opens a card that explains it.
Edit notes inside the audio
Move, stretch, cut, glue, add and delete notes (section 5), and change pitch, timing, length and level note by note. The audio follows the notes: you hear the edited take, not just the MIDI. Vibrato and slides can be changed per note on the note panel.
Getting the edited audio into your song: ARA or a plain insert
Where your audio edits end up depends on how TONIQ is connected.
| ARA (Pro Tools, Cubase, Nuendo, Studio One, REAPER) | Plain insert (Logic, Ableton, FL Studio, Bitwig…) | Standalone app | |
|---|---|---|---|
| Where you hear the edits | On the DAW's timeline, from the clip itself | On the track, inside the parts you captured, while TONIQ stays on the insert. A file you dragged in is heard only inside TONIQ. | Inside TONIQ |
| Is the song changed? | Yes: the clip plays the edited take, like any ARA editor | No: the recording on the track is not changed | No |
| To keep the edited audio | Nothing to do. Bounce or render as usual if you want a new file | Export it: drag EXPORT AUDIO onto a new track, or click it and save a WAV, then mute the original | Export it: EXPORT AUDIO, then Export the edited take to a file… |
| If you remove TONIQ | The edits go with it | The edits stop playing; the exported WAV keeps them | — |
The edited take is exported as a mono WAV. The song's stems (section 7) are stereo.
MIDI works the same everywhere: drag EXPORT MIDI to a track, or export a file (section 7).
Pencil
Draw notes TONIQ missed (P). Drawn notes are pure MIDI, with no audio of their own.
Detection (MIDI)
In the settings column:
- SENSITIVITY: drops notes quieter than the level you set. Off keeps every note TONIQ found. The higher the value, the more quiet notes are dropped.
- MIN LENGTH: drops notes shorter than this (off to 400 ms).
- NOTE ENDS: left at "detected", notes end where TONIQ heard them end. Push it up and each note rings out as played.
The free version uses the standard detection. Settings made in Pro are kept in the session on the free version, but not applied, and the column says "KEPT FOR PRO".
Vibrato (MIDI)
- VIBRATO (MIDI) On: vibrato and slides go into the MIDI and the synth as pitch bend.
- VIBRATO MIN LENGTH and VIBRATO MIN DEPTH: notes shorter or shallower than this stay flat. (In Vocal mode these do not apply: a sung note keeps its slides and vibrato.)
- VIBRATO AMOUNT: 100 % is as played, up to 150 %.
Where notes overlap, the vibrato is written as MPE (MIDI Polyphonic Expression: each note on its own channel, so each can move in pitch on its own), for DAWs and synths that read MPE. See insektiq.com/audio-to-mpe.
The free version writes pitch bends in Vocal mode and flat notes elsewhere.
Quantize (MIDI)
In the settings column: pick a grid, then a STRENGTH (how far onto the grid; 100 % reads "on the grid"). This moves the whole transcription's MIDI (what export and drag carry). The audio stays where it was played.
To quantize just some notes, and move their audio with them, use the note panel's QUANT, or select the notes and press Q.
MIDI per instrument from a full mix
From a Full mix, export one MIDI track per instrument: Bass, Vocals, Guitar, Keys, Strings, Brass & Winds, Synth, and Drums (not under ARA), plus an Instruments track for everything else. Choose it on the result screen (PER INSTRUMENT), in the EXPORT MIDI menu, or drag one instrument from its MID tag in the mix column. Empty instruments are left out.
Correct Pitch
Click the Key readout and choose Correct pitch…, or use the second row of the note panel, which is there as soon as notes are selected. It works on the selected notes, or on every note if none is selected.

From the left:
- The key (Auto… or a key you choose) and the scale (for example Major, or Custom notes).
- OWN NOTE moves each note onto its own pitch and never to another note; SCALE also moves notes outside the scale into it. FIX corrects every note; KEEP leaves notes that slide on purpose. TOLER (tolerance) leaves notes that are already close. SPEED sets how fast the pitch arrives between joined notes (0 ms is the hard-tune sound; "sung" keeps the singer's slides). A4 AUTO: the reference pitch, measured from the take (double-click to measure it again).
- The SUNG … PITCH fader: from as sung (left) to exactly on pitch (right). The ✓ key corrects fully.
Audio export
The EXPORT AUDIO badge (top left of the roll, with a WAV tag): drag the edited take into your DAW, or click for:
- Export the edited take to a file…
- Export the edited take and each pitch's audio… (one file per pitch; in a Full mix, per instrument and pitch)
- Export the selected notes' audio… (one file per note, and a
_rest.wavwith everything else)
Right after a read, TONIQ may still be separating the notes. If you drag or export then, it says "Separating the notes first — drag again when it is done", or "Finishing the separation — the export follows when it is done".
7. Exporting MIDI and stems ↑ Contents
MIDI (free)
- Drag the EXPORT MIDI badge (top left of the roll) or the MIDI TO YOUR DAW card (result screen) onto a track in your DAW.
- Save a file: click EXPORT MIDI and choose Export MIDI to a file…, or press ⌘E / Ctrl+E in the standalone. The file is offered in your Music folder, named after the audio with
_toniq.midat the end.
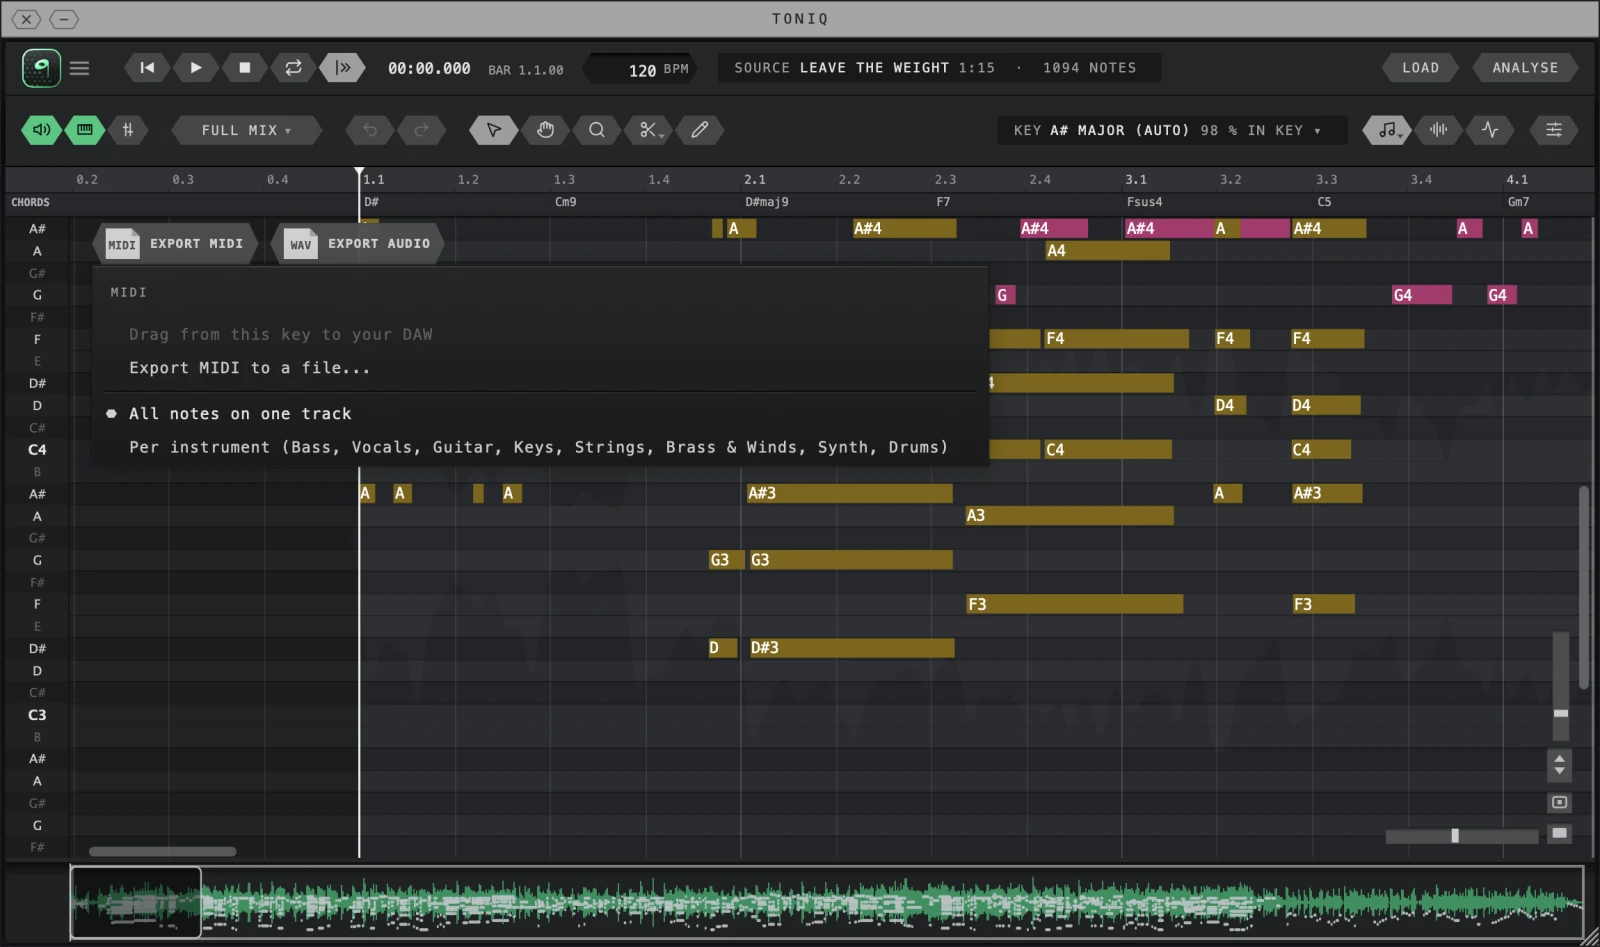
- EXPORT MIDI Click for this menu, or drag.
- Export MIDI to a file… Save a .mid file.
- One track / Per instrument What the drag and the file hold.
What the file holds: the notes with velocity, the tempo, and for Drums General MIDI drum notes on channel 10 (hi-hat openness on CC4, the controller drum plug-ins read for how open the hi-hat is). Pitch bends are in Vocal mode, and in every mode with Pro's Vibrato on.
Pitch-bend range. The file sets its own pitch-bend range: ±2 semitones, or wider when a slide needs it. If slides and vibrato sound too small or too wide on your synth, set the synth's pitch-bend range to match.
Where the notes start
- ARA: the file keeps the clip's position on your timeline, so it lines up when you drop it at the song's start.
- Everywhere else: the file starts at its first note. Drop it where the audio starts.
MIDI per instrument (Pro)
See section 6. Both the drag and the file follow the choice of All notes on one track or Per instrument in the EXPORT MIDI menu. A single instrument dragged from its MID tag is named after the audio and the instrument, for example Song - Bass.mid.
Audio stems from a full mix (free)
A Full mix is separated into four audio stems: Drums, Bass, Vocals, Other. They are free: you can hear, drag and export them on the free version.
- Drag one stem into your DAW from its WAV tag in the mix column (a stereo WAV).
- Or click EXPORT AUDIO and choose Export the song's stems (Drums, Bass, Vocals, Other)…, then pick a folder.
The stems are written as separated, without the mix column's levels and mutes.
Under ARA the stems can be heard but not dragged or exported yet: for the files, drop the song on the standalone app. The audio stems are free; the MIDI split into one track per instrument is Pro (section 6).
The edited take and each pitch's audio (Pro)
See Audio export in section 6.
File names
| What | Name |
|---|---|
| MIDI file | <name>_toniq.mid |
| One instrument's MIDI | <name> - Bass.mid (and so on) |
| The edited take | <name>_edited.wav |
| The edited take and each pitch's audio | a folder <name>_edited |
| The selected notes' audio | a folder <name>_notes |
| The song's stems | a folder <name> stems, holding <name> - Drums.wav and so on |
<name> is the audio file's name.
8. Keyboard shortcuts ↑ Contents
On Windows, ⌘ is Ctrl and Option is Alt.
Tools
| Key | Action |
|---|---|
| V | Select |
| H | Hand |
| Z | Zoom |
| G | Glue; with 2+ notes selected, merge them (see Notes) |
| C | Cut |
| P | Pencil |
| Hold a tool key | Borrow that tool, go back on release |
Notes (with notes selected)
| Key | Action |
|---|---|
| ↑ / ↓ | Up / down one semitone |
| Shift + ↑ / ↓ | Up / down one octave |
| ← / → | Earlier / later by one grid step |
| Option + ↑ / ↓ | Fine pitch, 5 cents |
| Option + Shift + ↑ / ↓ | Fine pitch, 1 cent |
| Q | Quantize the selection to the edit grid |
| G | Merge the selection into one note |
| Delete / Backspace | Delete |
| S | Solo the selection |
| M | Mute the selection |
| Shift + S | Clear every solo |
| Shift + M | Clear every solo and mute |
| Esc | Clear the selection; cancel a Pencil stroke |
Editing
| Key | Action |
|---|---|
| ⌘Z | Undo |
| ⇧⌘Z or ⌘Y | Redo |
| ⌘A | Select all |
Mouse
| Gesture | Action |
|---|---|
| Shift-click | Add a note to, or remove it from, the selection |
| Shift-drag a note | Move in pitch, keep the timing |
| ⌘-drag a note | Move without snapping |
| Option-drag a note | Move a copy |
| ⌘-drag empty grid | Zoom to a box |
| ⌘ + wheel | Zoom in time |
| Shift + wheel | Scroll in time |
| Option-click a fader | Reset it |
| Double-click the ruler | Clear the loop |
| Option-click S or M (mix column) | Solo or mute every row |
| ⌘-click S (mix column) | Solo that row alone |
Start and result screens
| Key | Action |
|---|---|
| ↑ / ↓, then Enter or Space | Choose a mode, start |
| 1–5 | Pick a mode directly |
| Enter (result screen) | Open the editor |
| Enter (on a Pro card) | Press the lit key |
Standalone app
| Key | Action |
|---|---|
| Space | Play / stop |
| ⌘O | Load a file |
| ⌘R | Analyse |
| ⌘E | Export MIDI |
| ⌘, (Windows: Ctrl+P) | Audio settings |
9. Updating TONIQ ↑ Contents
TONIQ checks for a new version by itself.
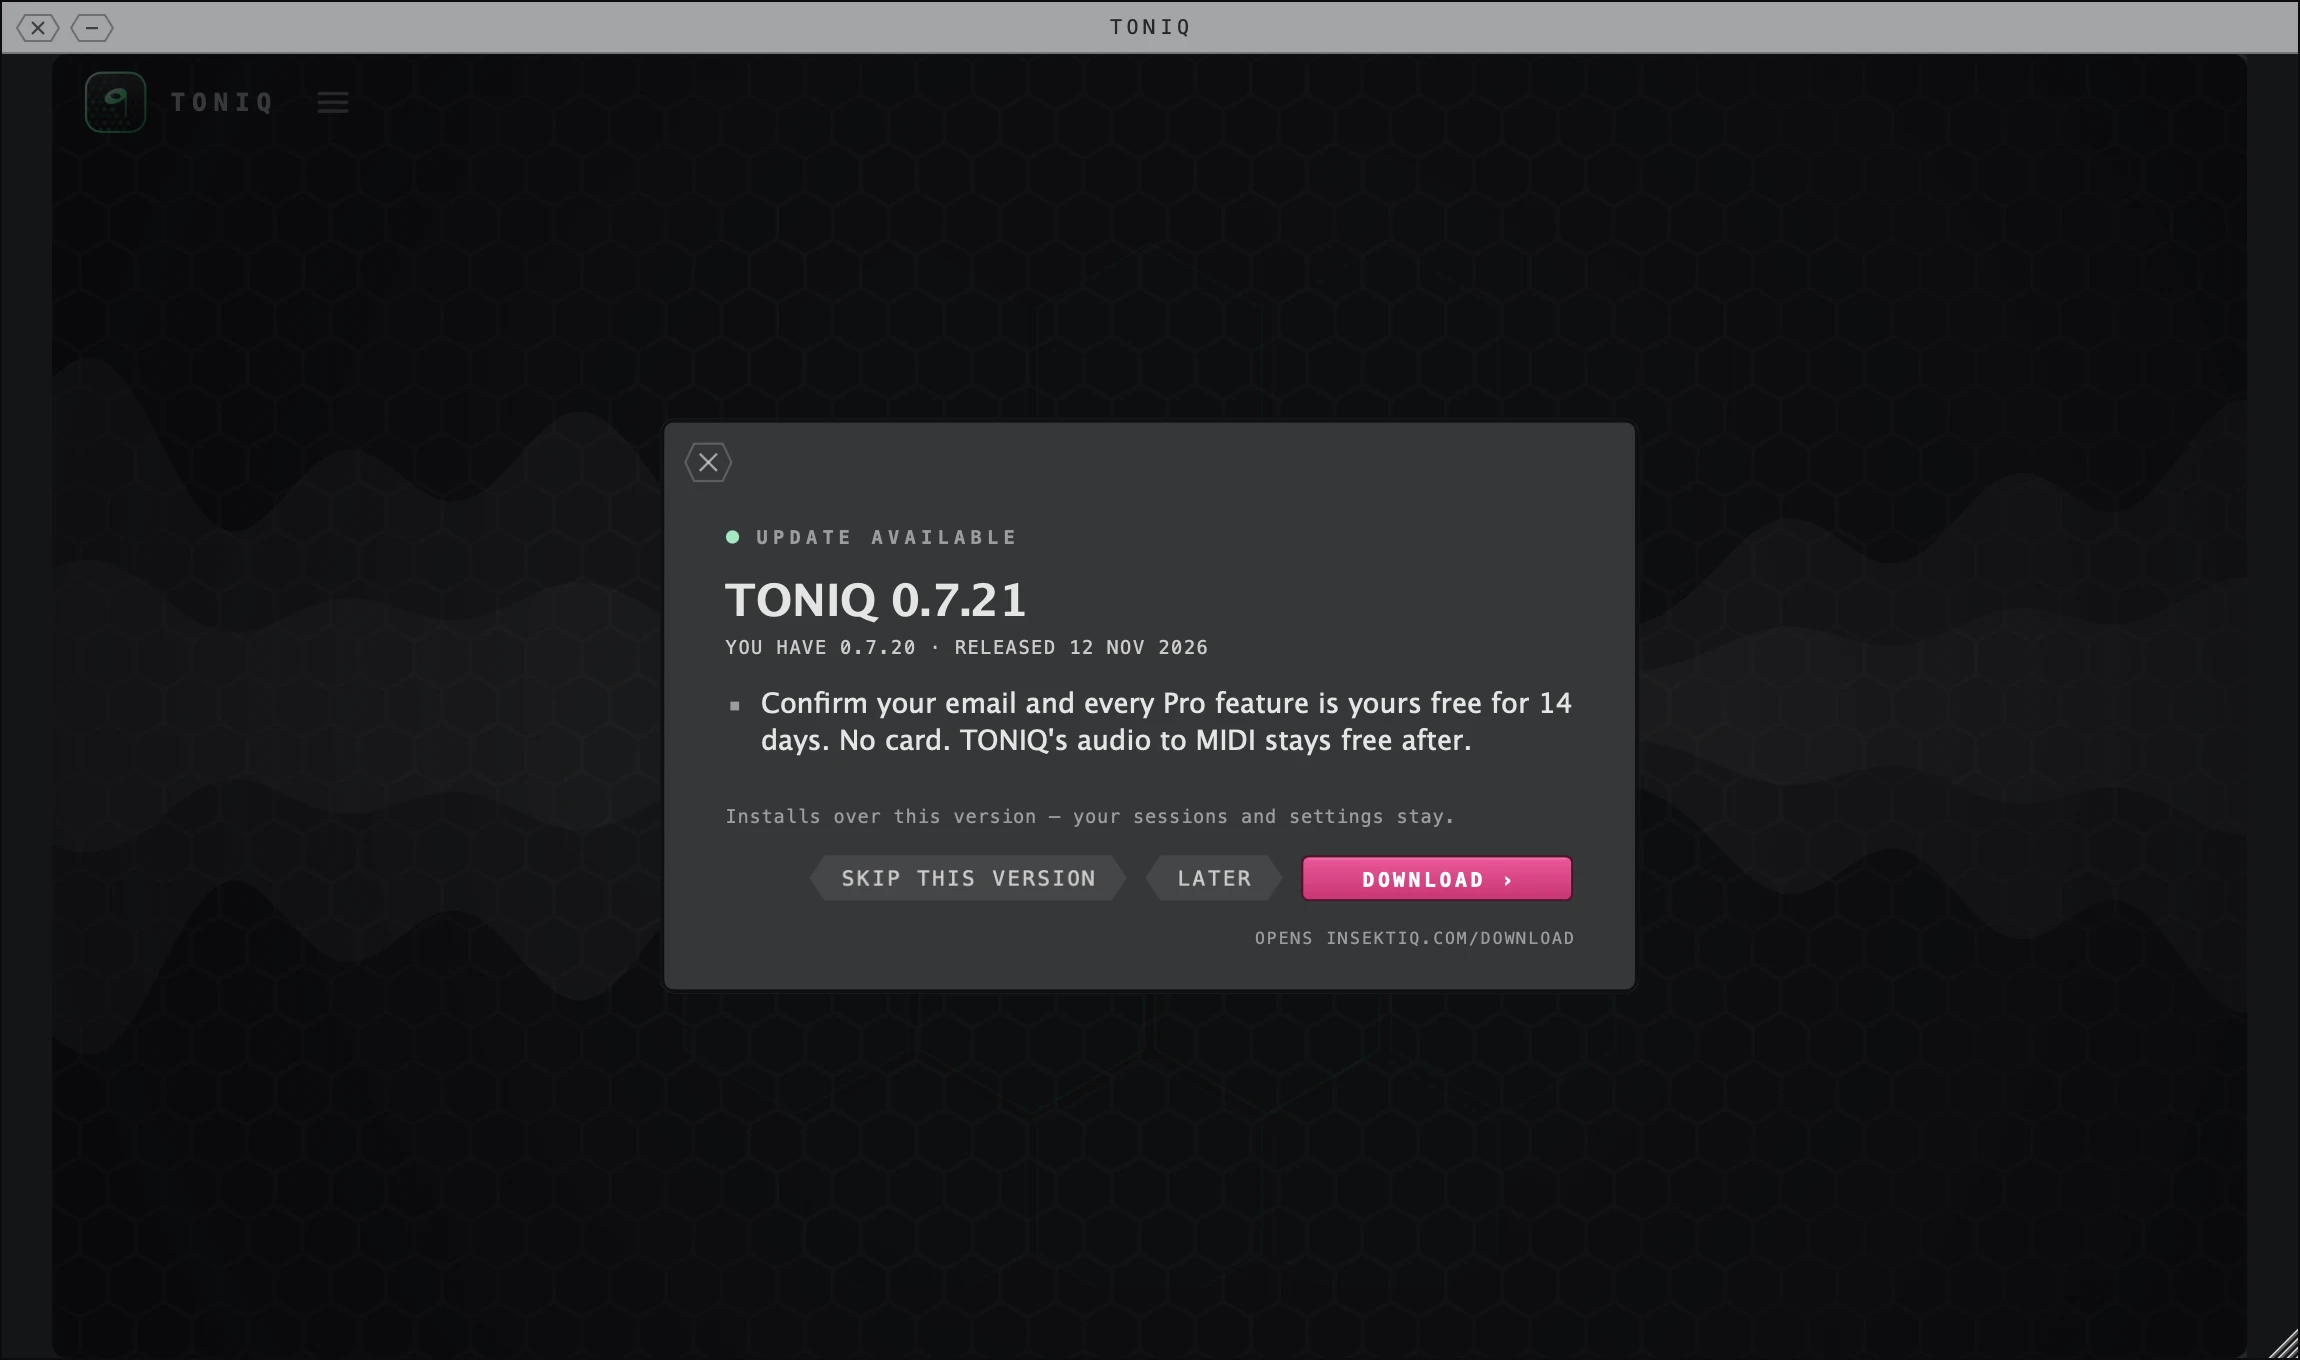
- UPDATE AVAILABLE IMPORTANT FIX for an urgent one.
- Versions The new version, the one you have, and its date.
- What's new The update's note.
- Skip this version Stops asking about this version.
- Later Closes the card for now.
- DOWNLOAD › Opens insektiq.com/download.
- When one is out, an UPDATE 0.7.x chip appears on the toolbar (IMPORTANT UPDATE for an urgent fix), and the update card opens once for that version.
- The card says UPDATE AVAILABLE (or IMPORTANT FIX) and what is new. DOWNLOAD › opens insektiq.com/download. Skip this version stops it asking about this one; Later closes it for now.
- Run the new installer as in section 1. It installs over the version you have: your sessions and settings stay. Close your DAW and the TONIQ app first.
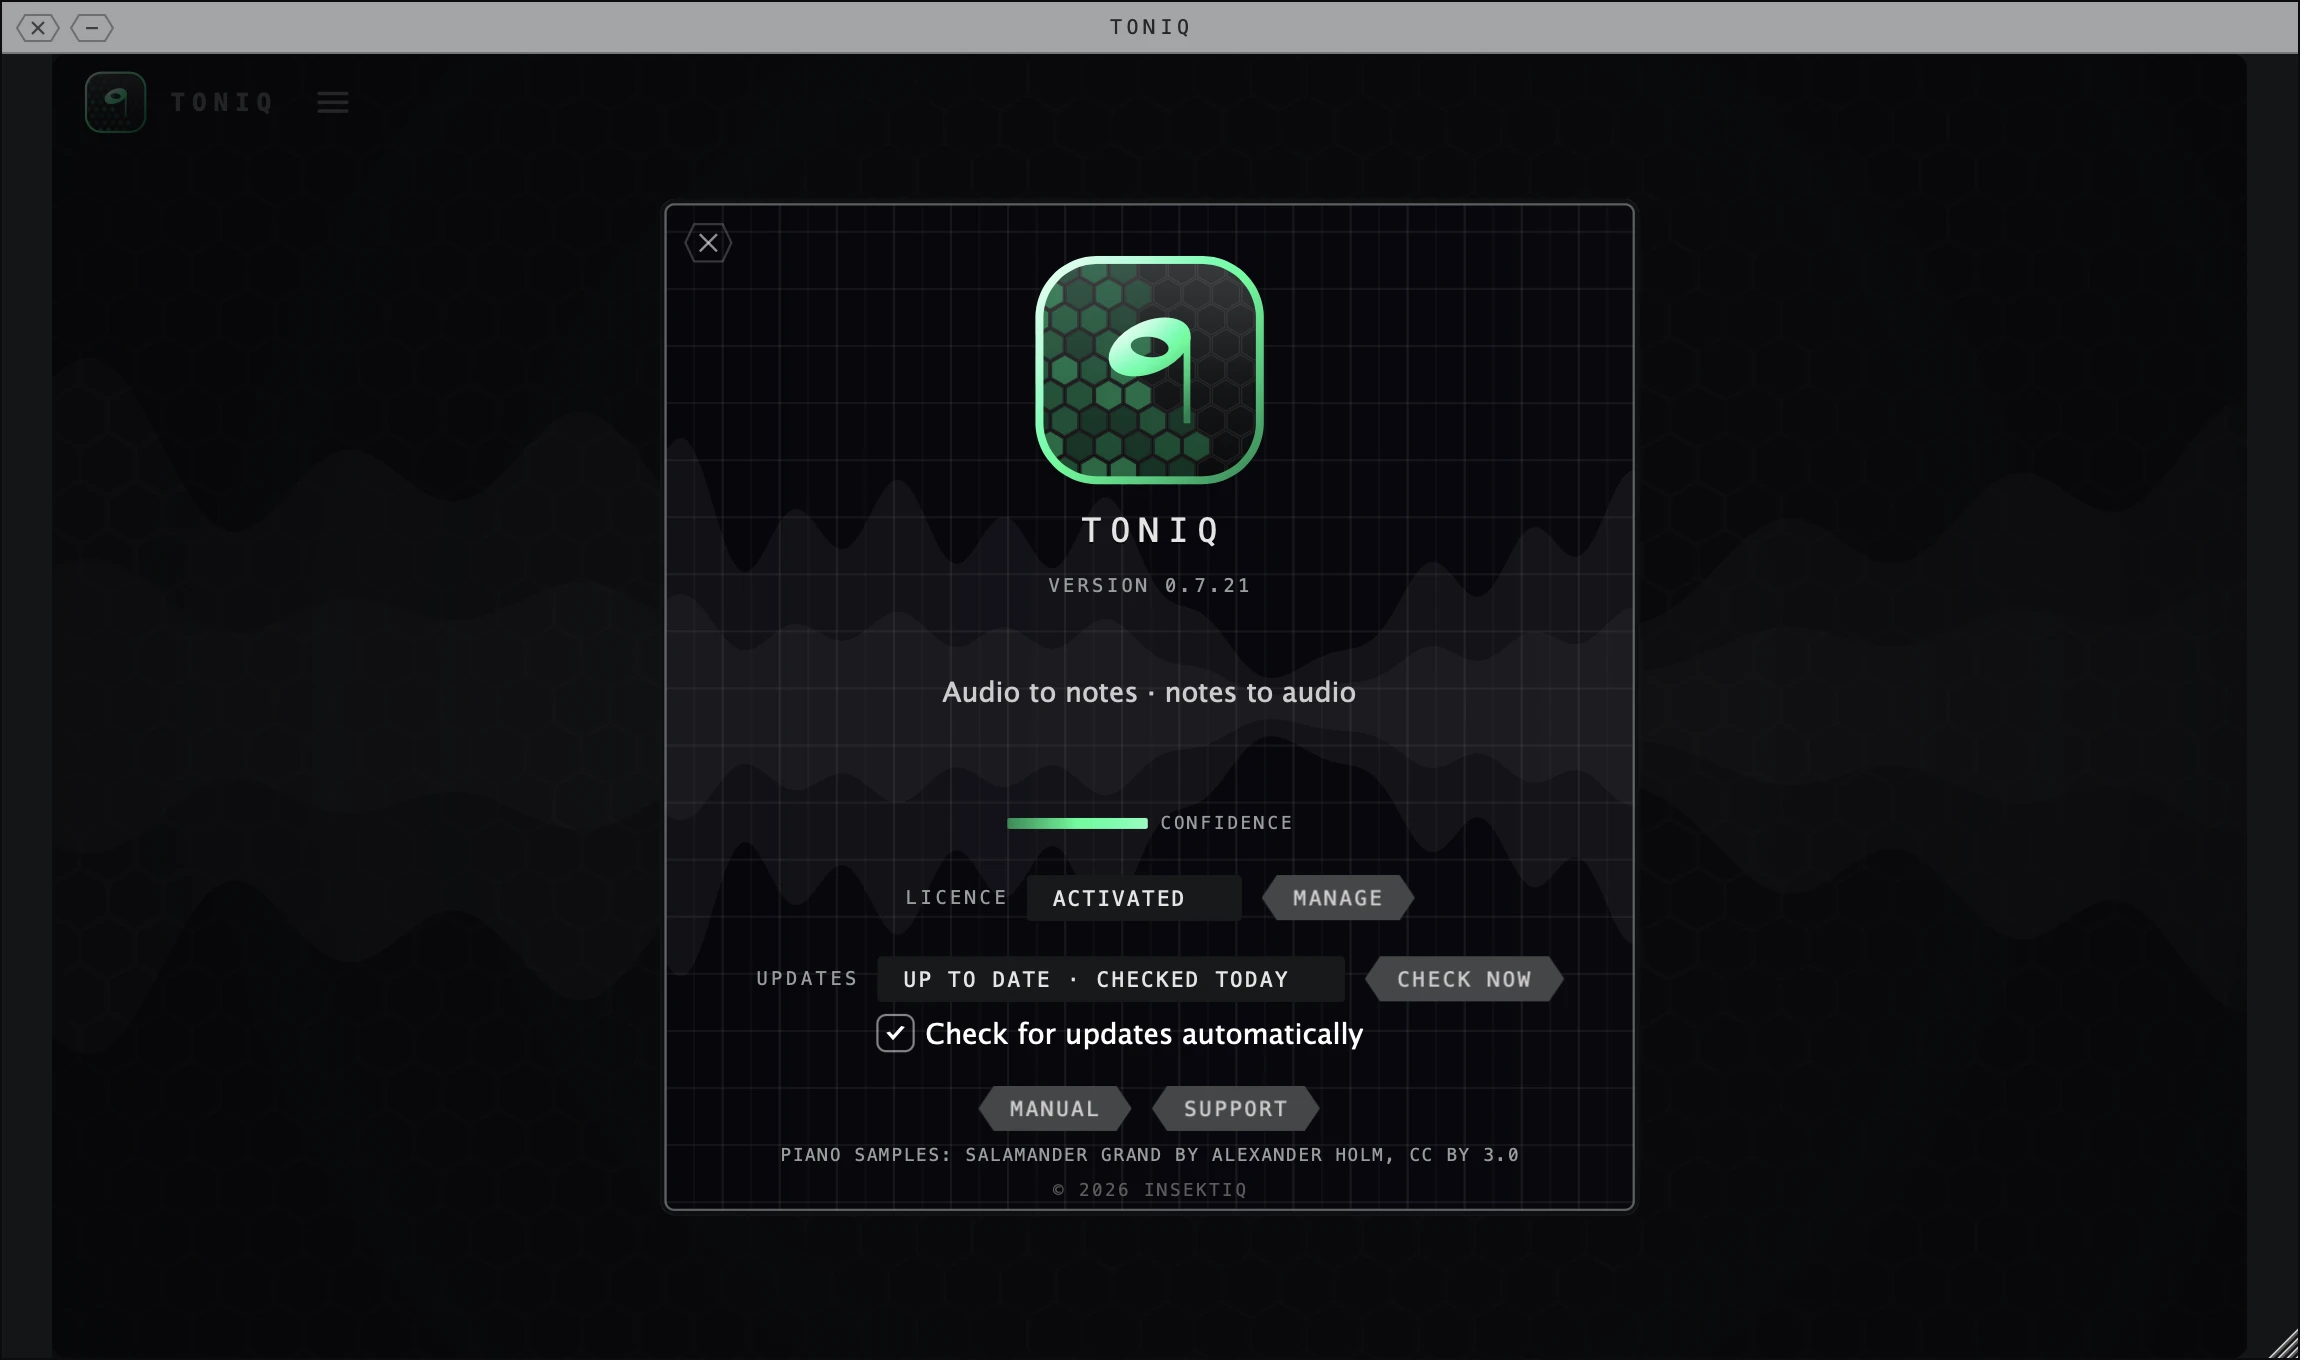
- Version The version you are running.
- LICENCE Your state: activated, trial or free.
- MANAGE Opens the licence card.
- UPDATES Up to date, or which version is available.
- CHECK NOW Checks at once.
- Check for updates automatically Turns the automatic check on or off.
- MANUAL Opens the manual.
- SUPPORT Opens the support page.
To check yourself, open About… in the ≡ menu. The UPDATES row says, for example, UP TO DATE · CHECKED TODAY, or 0.7.x AVAILABLE. Press Check now to check at once. Check for updates automatically turns the automatic check on or off.
10. Troubleshooting and FAQ ↑ Contents
Messages TONIQ shows
"No notes found" TONIQ read the audio but found no notes in the mode you chose. Click the message to try another mode (section 3), or drop another file. A drum loop needs Drums; a whole song needs Full mix.
"The read failed" (or a message saying TONIQ's engine is missing or damaged) TONIQ could not finish reading. If the message mentions the engine or its components, reinstall TONIQ from insektiq.com/download. Otherwise load the file again, and if it fails again write to us with the file (section 11).
"Cannot read audio file" The file is not in a format TONIQ reads, or it is damaged. Use WAV, AIFF, FLAC or MP3 (and M4A on a Mac), or convert the file to WAV.
"Separating the notes first" / "Finishing the separation" TONIQ is still preparing each note's audio after a read. Wait until it is done, then drag or export again.
"Verify your email to export MIDI" Exports need your verified email. Finish the email step (section 1): TONIQ asks for it when it opens.
"Signed in for now, but TONIQ couldn't save it in …" TONIQ could not write to its folder, so it will ask for a code again next time. Make the folder in the message writable (on a Mac, check it in Finder's Get Info), then verify again.
Questions
Is my audio uploaded? No. Everything runs on your computer. TONIQ only goes online to send your sign-in code, check your licence and check for updates.
Does TONIQ need the internet after I sign in? Reading, editing and exporting work offline. TONIQ checks your licence and looks for updates when it is online.
The code email doesn't arrive. Look in Spam and Promotions. Check the address shown on the card; if it is wrong, go back and type it again. Wait for Resend code and press it. If nothing arrives after that, write to info@insektiq.com.
TONIQ says it can't reach insektiq.com, or there's no internet. Verifying your email, and the 14 days of Pro that start with it, need a connection. Check that your firewall or a network filter does not block TONIQ, then try again. To activate a Pro licence on an offline computer, use No internet? on the licence card (section 1). In TONIQ 0.7.19 and earlier, a slow reply from our server could show as "no internet" even when you were online. Update to the latest version (section 9).
Some notes are an octave off. See "How to: fix notes that came out an octave off" in section 5.
Quiet notes are missing. On the free version TONIQ uses the standard detection. Try another mode. For drums, turn GHOSTS on. With Pro, check that SENSITIVITY and MIN LENGTH are off, and draw any missed notes with the Pencil (P) or right-click, Add note here.
Too many notes in a dense mix. Use Full mix for a finished song: it separates the song first and reads the bass, vocals and drums from their own parts. If you have the separate stems or tracks, run TONIQ on each one; a single instrument reads more cleanly than a mix. With Pro, raise SENSITIVITY or MIN LENGTH to drop quiet and very short notes.
My exported MIDI file looks empty. Outside ARA, the file starts at the first note. If you import it at bar 1, the notes are there, but they may sit far from the audio. Drop the file where the audio starts.
The MIDI plays at the wrong speed, or the slides and vibrato sound wrong. Set your DAW's tempo to the TEMPO on the result screen. For the slides and vibrato, set your synth's pitch-bend range to match the file (section 7).
Capture recorded nothing. TONIQ must be an insert on the track you play, and the audio must play through it: a muted or frozen track gives silence. Press CAPTURE before you press play in the DAW.
There are no WAV tags, or no stem export. Stems come from a Full mix. Under ARA you can hear them but not drag or export them yet: drop the song on the standalone app for the files.
The loop does nothing. TONIQ's loop works in the standalone app and under ARA. On a plain insert, use your DAW's loop.
S and M are missing on the note panel. On a plain insert the DAW's own solo and mute do the job (section 5).
The first read in a mode is slow. The first time a mode runs on a computer, TONIQ prepares it. Later reads in that mode start faster.
The audio key or an edit opens a "Pro" card. That feature is part of Pro, and this computer's 14 days of Pro have ended (or never started). Press GO PRO for a licence, or Have a key? Activate if you have one. If the card offers START 14 DAYS, the trial didn't start when you verified (usually no connection at the time); press it to start it now.
How do I update? See section 9.
How do I uninstall?
On a Mac, delete TONIQ from Applications and the plug-ins from /Library/Audio/Plug-Ins (Components, VST3), /Library/Application Support/Avid/Audio/Plug-Ins (AAX) and /Library/Application Support/INSEKTIQ (TONIQ's components). On Windows, use Settings › Apps and uninstall TONIQ.
Where are my files?
- MIDI and audio you export: where you choose. TONIQ offers your Music folder (
~/Musicon Mac). - Files you drag into a DAW: TONIQ writes them to a temporary folder first; your DAW copies them into its project.
- Your notes and edits in a plug-in: saved inside your DAW project.
- TONIQ's own components:
/Library/Application Support/INSEKTIQon a Mac,C:\ProgramData\INSEKTIQon Windows. Your sign-in and licence:~/Library/Application Support/INSEKTIQon a Mac,%APPDATA%\INSEKTIQon Windows. - If we need TONIQ's log files to look into a problem, we'll tell you where to find them.
- The standalone app remembers your last file, notes and edits when you quit it normally (close the window or Quit). After a crash it starts empty.
11. Getting help ↑ Contents
Write to info@insektiq.com. Tell us your TONIQ version (menu, top left), your computer (Mac or Windows, and the system version), your DAW and version, and what you did. A short audio clip and a screenshot help.
— The INSEKTIQ team